Original Link: https://www.anandtech.com/show/9729/the-asus-z170-a-motherboard-review
The ASUS Z170-A Motherboard Review: The $165 Focal Point
by Ian Cutress on October 20, 2015 2:00 PM EST- Posted in
- Motherboards
- Asus
- ATX
- Skylake
- Z170
In the world of technology, you could speculate if there is ever a golden age, or a renaissance. All the time we expect technology to grow and improve, being better than the last. Sometimes there is nostalgia, but it never stops us using the latest because it provides the user experience we expect at a minimum. Like all the motherboard manufacturers, I've followed ASUS for years, and observed their constant iteration as platforms evolve. The newest Skylake platform is upon us, and we review the ASUS Z170-A motherboard to see their interpretation of the desktop this generation.
Other AnandTech Reviews for Intel’s 6th Generation CPUs
- Skylake-K Review: Core i7-6700K and Core i5-6600K – CPU Review
- Comparison between the i7-6700K and i7-2600K in Bench – CPU Comparison
- Overclocking Performance Mini-Test to 4.8 GHz – Overclocking
- Skylake Architecture Analysis – Architecture
- Z170 Chipset Analysis and 55+ Motherboards – Motherboard Overview
- Discrete Graphics: An Update for Z170 Motherboards – PCIe Firmware Update
100-Series Motherboard Reviews:
To read specifically about the Z170 chip/platform and the specifications therein, our deep dive into what it is can be found at this link.
ASUS Z170-A Overview
The motherboard industry has gone through years of consolidation and enhancement, making it very difficult for new companies to emerge. There is strong competition, profit margins are low, and there is a bare minimum expectation of utility. This is seen by the continual march on gaming branded motherboards, if only for SEO, or marketing label enhancements. Aside from ASUS' Republic of Gamers brand, the channel line from ASUS remains free of the gaming SEO and promotes itself as a platform bundled with their self-proclaimed value additions, which can be condensed into 'design, user requested software tools and user experience'. ASUS is not alone in this push, which makes the Z170-A an important part of ASUS' product offering. At $165, it aims at a price point that end-users and system integrators alike will use for the majority of their i5 and i7 systems.
On the face of it, looking at the base hardware add-ons, the Z170-A comes in with a fair amount of what you expect at this price. Networking is the Intel I219-V controller, there is a single PCIe 3.0 x4 based M.2 slot, two USB 3.1 ports at 10 Gbps is provided by an ASMedia ASM1142 controller in both Type-A and Type-C formats, and the PCIe layout promotes two-way graphics with a tertiary PCIe 3.0 x4 slot from the chipset so SLI is not disrupted. One thing to note is the use of a Realtek ALC892 codec, which is perhaps a little surprising as there will be other motherboards around this price point that have the ALC1150.
ASUS' marketed unique points include their onboard ICs to aid overclocking (TPU) and power (EPU), along with an onboard switch to help enable XMP on a memory kit without going into the BIOS. Building on this is a Pro-Clock IC that extends the overclocking range in the base frequency and a T-Topology memory trace design typically reserved for maintaining the high end desktop platform signal integrity (but is optional on Z170). The BIOS and software from ASUS has historically been positive, and we see this as a continuing trend with Skylake.
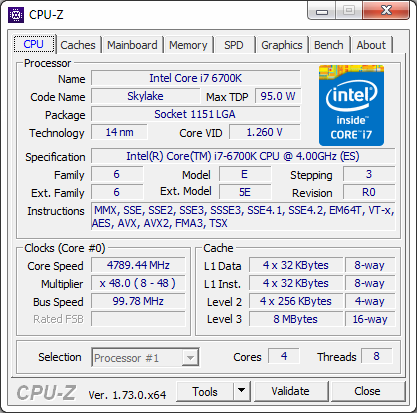
We worked with the Z170-A for part of our Skylake CPU coverage, as added information and BIOSes from ASUS on elements such as the FCLK issue and PCIe performance. The Z170-A, for the BIOSes tested, did not have multi core turbo but did give a 4.8 GHz overclock both in automatic and manual modes.
The $160-$170 price band will be hotly contested for both self-build and retailer pre-built designs. Here ASUS executes well with plenty of positives. For regular and power users, unless you want two M.2 devices or dual network ports, this board seems ideal for a shortlist.


Quick Links to Other Pages
Page 2: Board Features and Visual Inspection
Page 3: BIOS
Page 4: Software
Page 5: System Performance (Audio, USB, Power, POST Times on Windows 7, Latency)
Page 6: CPU Performance, Short Form (Office Tests and Transcoding)
Page 7: Gaming Performance 2015 (R7 240, GTX 770, GTX 980)
Page 8: Conclusions
Quick Board Feature Comparison
| Motherboard Comparison | ||
| ASUS Z170-A | ||
| Socket | LGA1151 | LGA1151 |
| MSRP at Review | $165 | $230 |
| DRAM | 4 x DDR4 | 4 x DDR4 |
| PCIe Layout | x8/x8 | x8/x8 |
| BIOS Version Tested | 0603 | 142 |
| MCT Enabled Automatically? | No | Yes |
| USB 3.1 (10 Gbps) | ASMedia ASM1142 1 x Type-A 1 x Type-C |
ASMedia ASM1142 1 x Type-A 1 x Type-C |
| M.2 Slots | 1 x PCIe 3.0 x4 | 2 x PCIe 3.0 x4 |
| U.2 Ports | No | No |
| Network Controller | 1 x Intel I219-V | 1 x Killer E2400 |
| Audio Controller | Realtek ALC892 | Realtek ALC1150 |
| HDMI 2.0 | No | No |
ASUS Z170-A Overclocking
Experience with ASUS Z170-A
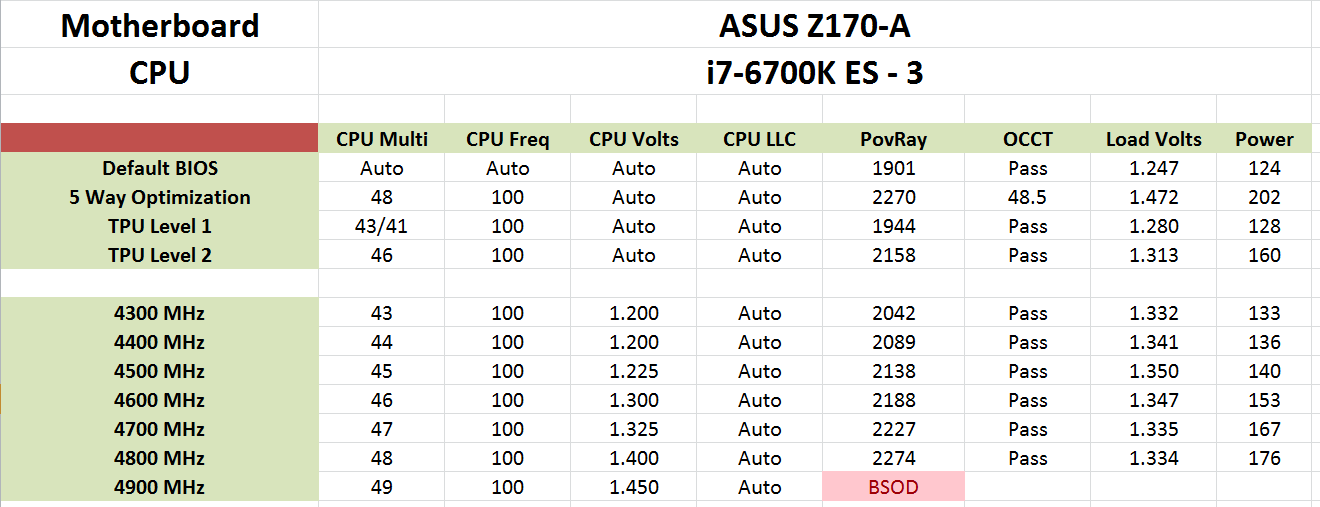
The Z170-A was the second motherboard we tested as part of the initial Skylake routine, partly due to the discussions we had behind some of the discrete PCIe co-processor performance on the Z170 platform. For overclocking, while the previous motherboard we had tested seemed happy moving around at 4.6 GHz for an overclock, the ASUS Z170-A went straight in at 4.8 GHz, no questions asked. It was quite a difference.
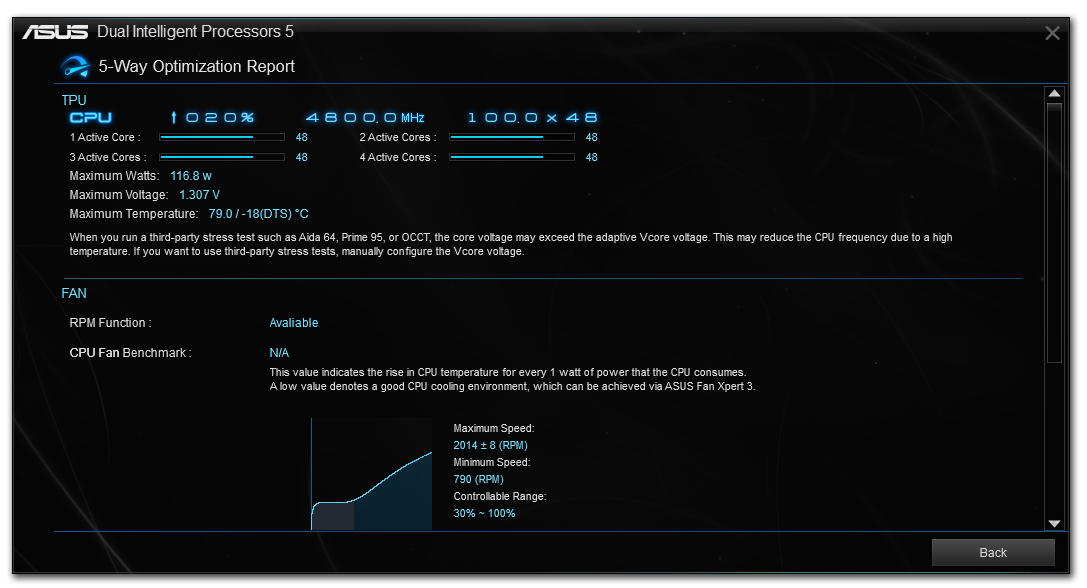
Through the Automatic overclock tool, we let it run and set a temperature limit of 90C for the intermediate stress testing, with each stress test lasting two minutes. I came back to the system about 15 minutes later to see the final results screen show the 4.8 GHz value. We validated this speed and it passed all of our tests, except video encoding. (We discussed the principles of stability in our Skylake overclock testing piece and suffice to say, there are two major camps on the issue.) The TPU Switch gave a good set overclocks as well, with the first stage giving 4.3 GHz/4.1 GHz split for +100 MHz (mild), and the second stage going up to 4.6 GHz on a single core turbo.
For manual overclocking, the results were almost the same, although we were able to get the same frequencies at a lower voltage and power which might be expected. We went for 4.9 GHz as well, but this failed regardless of voltage causing POV-Ray to crash and the system to bluescreen.
Methodology
Our standard overclocking methodology is as follows. We select the automatic overclock options and test for stability with POV-Ray and OCCT to simulate high-end workloads. These stability tests aim to catch any immediate causes for memory or CPU errors.
For manual overclocks, based on the information gathered from previous testing, starts off at a nominal voltage and CPU multiplier, and the multiplier is increased until the stability tests are failed. The CPU voltage is increased gradually until the stability tests are passed, and the process repeated until the motherboard reduces the multiplier automatically (due to safety protocol) or the CPU temperature reaches a stupidly high level (100ºC+). Our test bed is not in a case, which should push overclocks higher with fresher (cooler) air.
Overclock Results
Board Features
The main element that sticks out is the use of the Realtek ALC892 audio codec over the ALC898 or ALC1150, despite the use of an enhanced audio area with EMI shields and other features. In some situations a user might not worry about onboard audio (under the guise of 'nothing really changes' or use their own external DACs), but the ALC898 at least offers a slight SNR improvement for not a lot extra.
It should be pointed out that unlike previous Intel chipsets, a number of motherboard manufacturers will be using x8/x8 on their PCIe 3.0 layouts from the CPU with another PCIe 3.0 x4 from the chipset. This configuration allows for a PCIe device in the final slot without disrupting 2-way SLI, or a full x8/x8/x4 with 3-way SLI.
| ASUS Z170-A | |
| Warranty Period | 3 Years |
| Product Page | Link |
| Price | Amazon US Newegg |
| Size | ATX |
| CPU Interface | LGA1151 |
| Chipset | Intel Z170 |
| Memory Slots (DDR4) | Four DDR4, Supporting 64GB, Dual Channel, Up to 3466 MHz |
| Memory Slots (DDR3L) | None |
| Video Outputs | HDMI DisplayPort DVI-D D-Sub |
| Network Connectivity | Intel I219-V |
| Onboard Audio | Realtek ALC892 |
| PCIe Slots for Graphics (from CPU) | 2 x PCIe 3.0 (x16, x8/x8) |
| PCIe Slots for Other (from PCH) | 1 x PCIe 3.0 x4 3 x PCIe 3.0 x1 1 x PCI |
| Onboard SATA | 6 x SATA 6 Gbps, RAID 0/1/5/10 |
| Onboard SATA Express | One |
| Onboard M.2 | One, 2242 to 22110, SATA and PCIe 3.0 x4 modes, AHCI and NVMe |
| Onboard U.2 | None |
| USB 3.1 | 1 x Type-A 1 x Type-C ASMedia ASM1142 Controller |
| USB 3.0 | 2 x Rear Panel 4 via headers |
| USB 2.0 | 2 x Rear Panel 4 via headers |
| Power Connectors | 1 x 24-pin ATX 1 x 8-pin CPU |
| Fan Headers | 1 x CPU (4-pin) 1 x CPU_OPT (4-pin) 4 x CHA/SYS (4-pin) |
| IO Panel | 1 x Combination PS/2 2 x USB 2.0 2 x USB 3.0 1 x USB 3.1 Type-A 1 x USB 3.1 Type-C 1 x Network RJ-45 (Intel I219-V) HDMI DVI-D DisplayPort D-Sub Audio Jacks |
| Other Features | COM Header Thunderbolt Header EZ XMP Switch DirectKey Header MemOK! Button TPU Switch 5-pin FAN_EXT Header TPM Connector Power Button Front Audio Header Front Panel Header USB BIOS Flashback Header |
In The Box
We get the following:
- Driver CD
- User Manual
- Rear IO Shield
- Three SATA Cables
- Q-Connector
- Flexi-SLI Bridge
- CPU Installation Tool

The Z170-A is a channel product, so it is not expected to contain much more than the bare essentials to get the system up and running, which is what we get here. For users who are not familiar with the CPU Installation tool, this is ASUS’ method to help new builders place their processor without bending pins inside the socket.
Visual Inspection
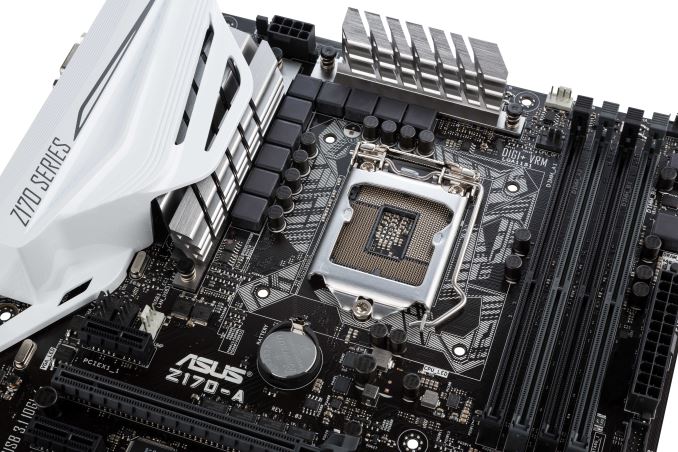
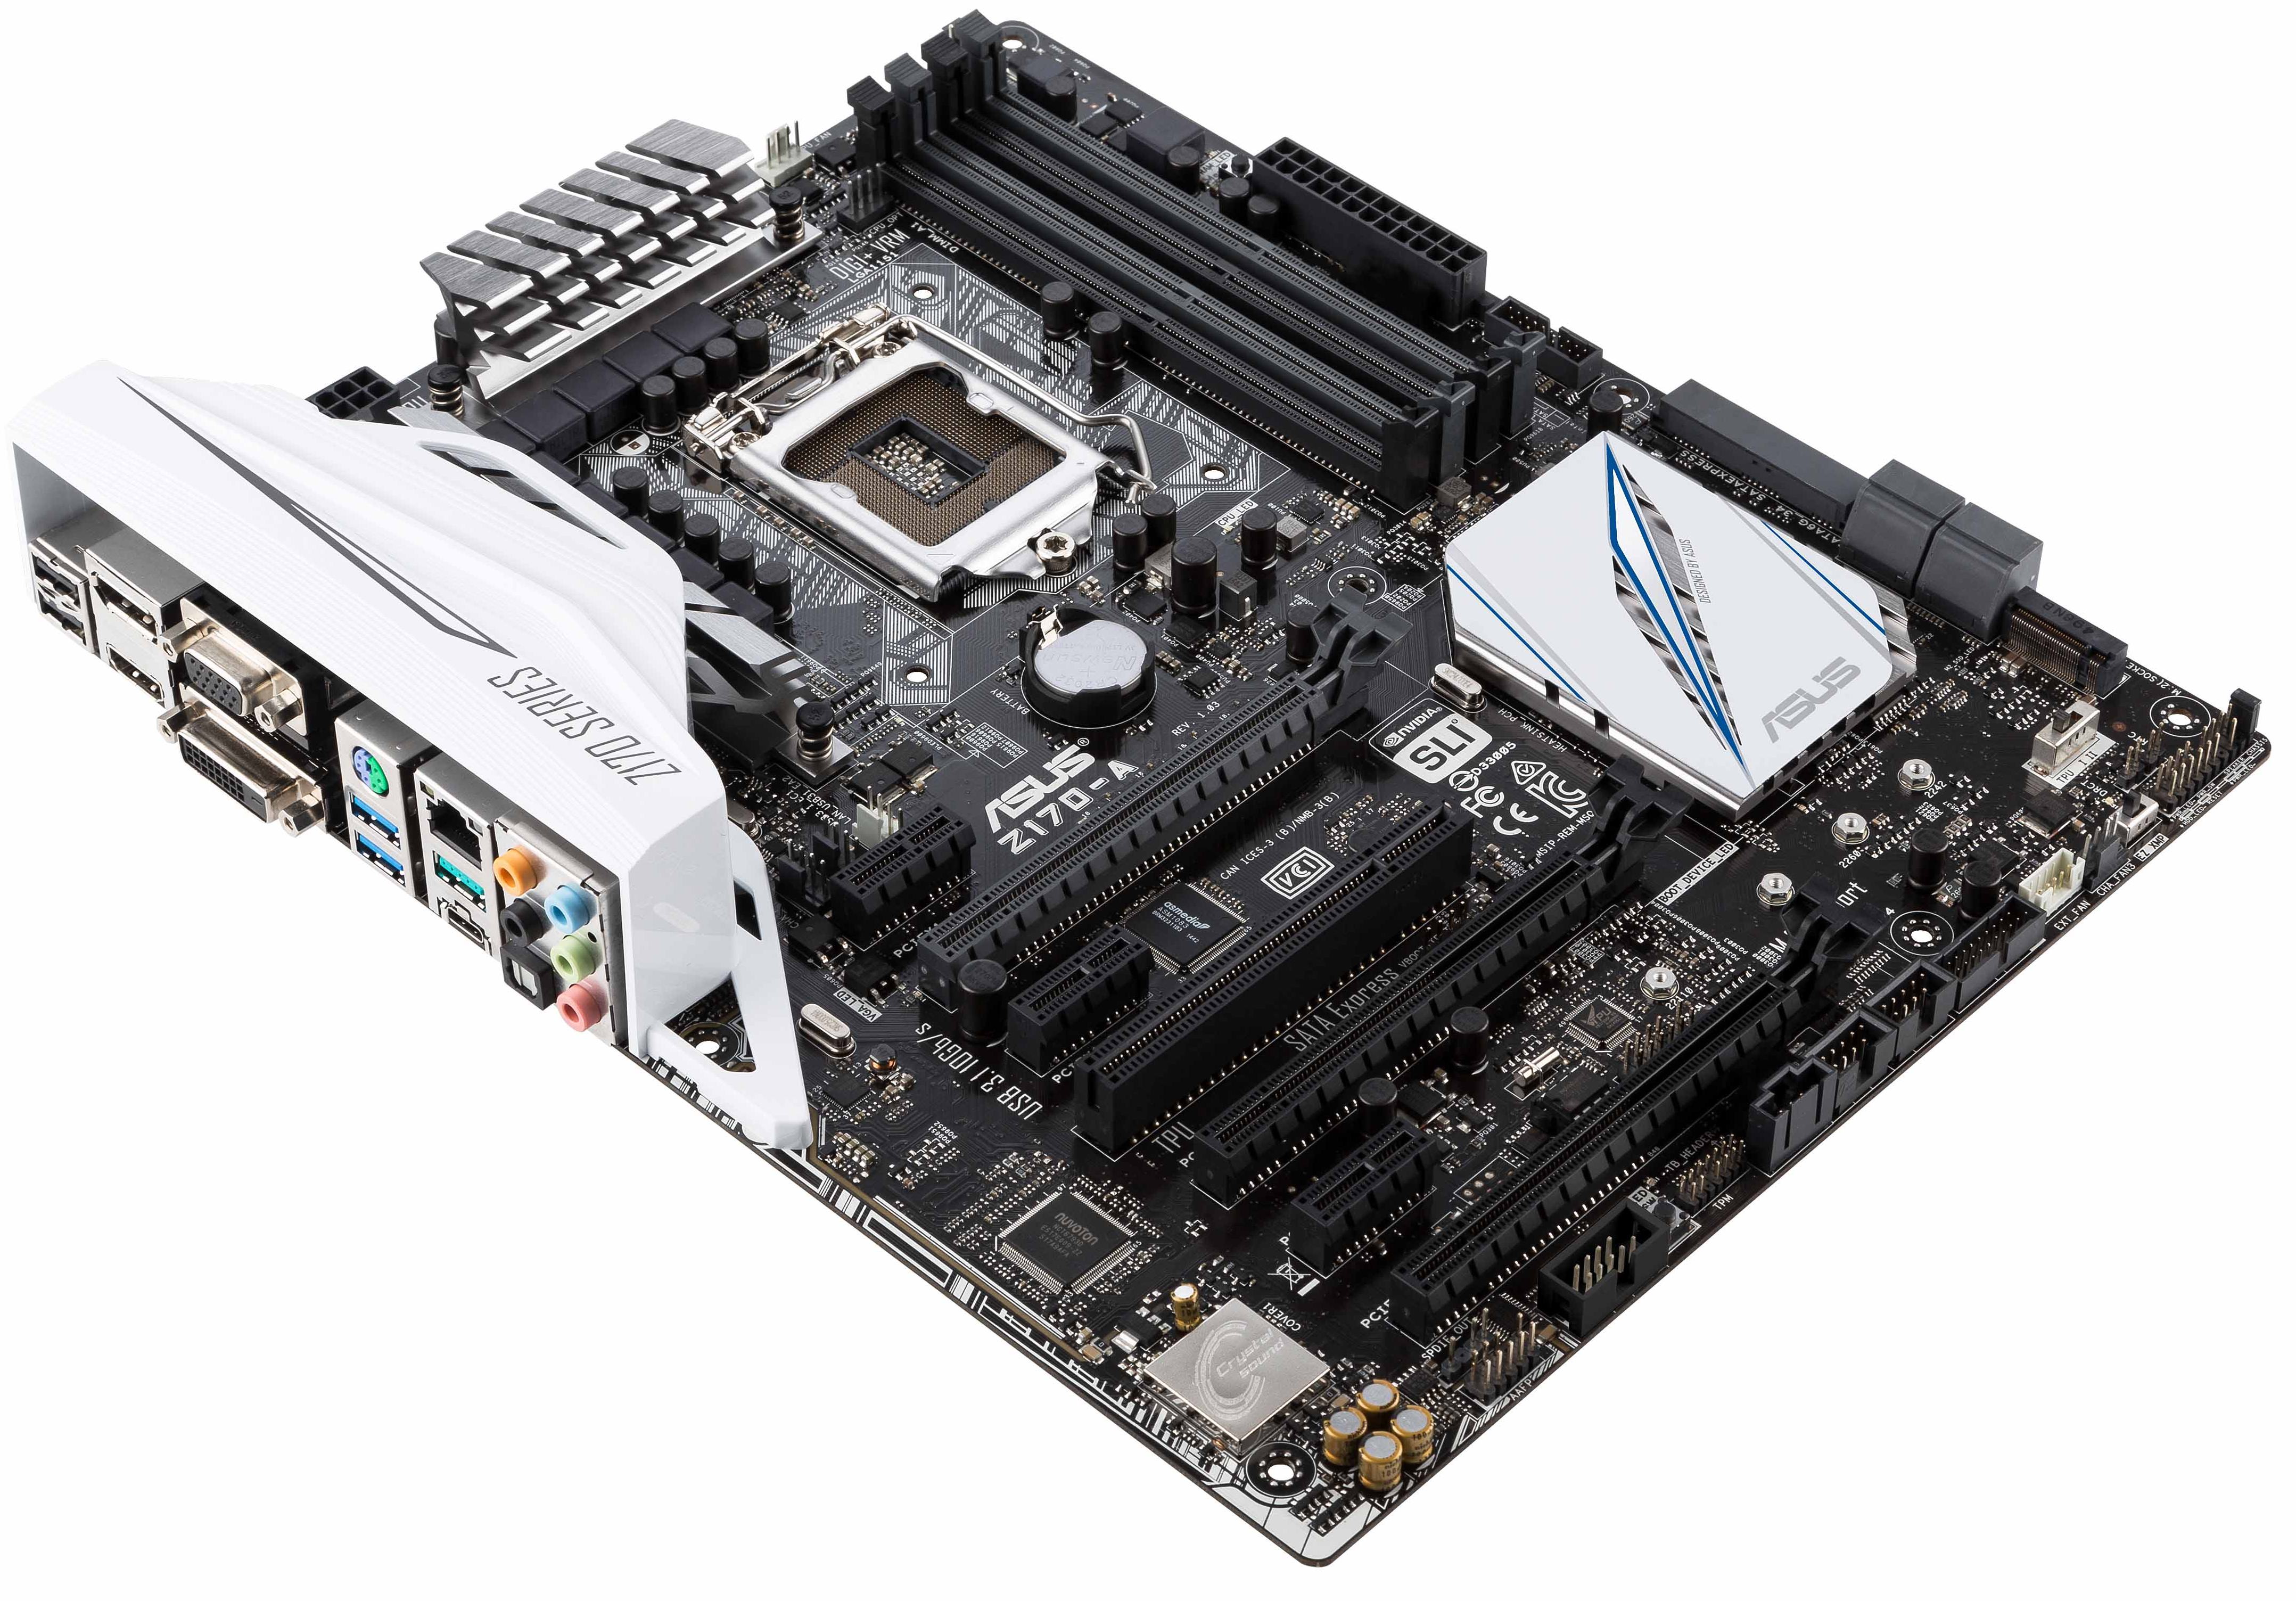
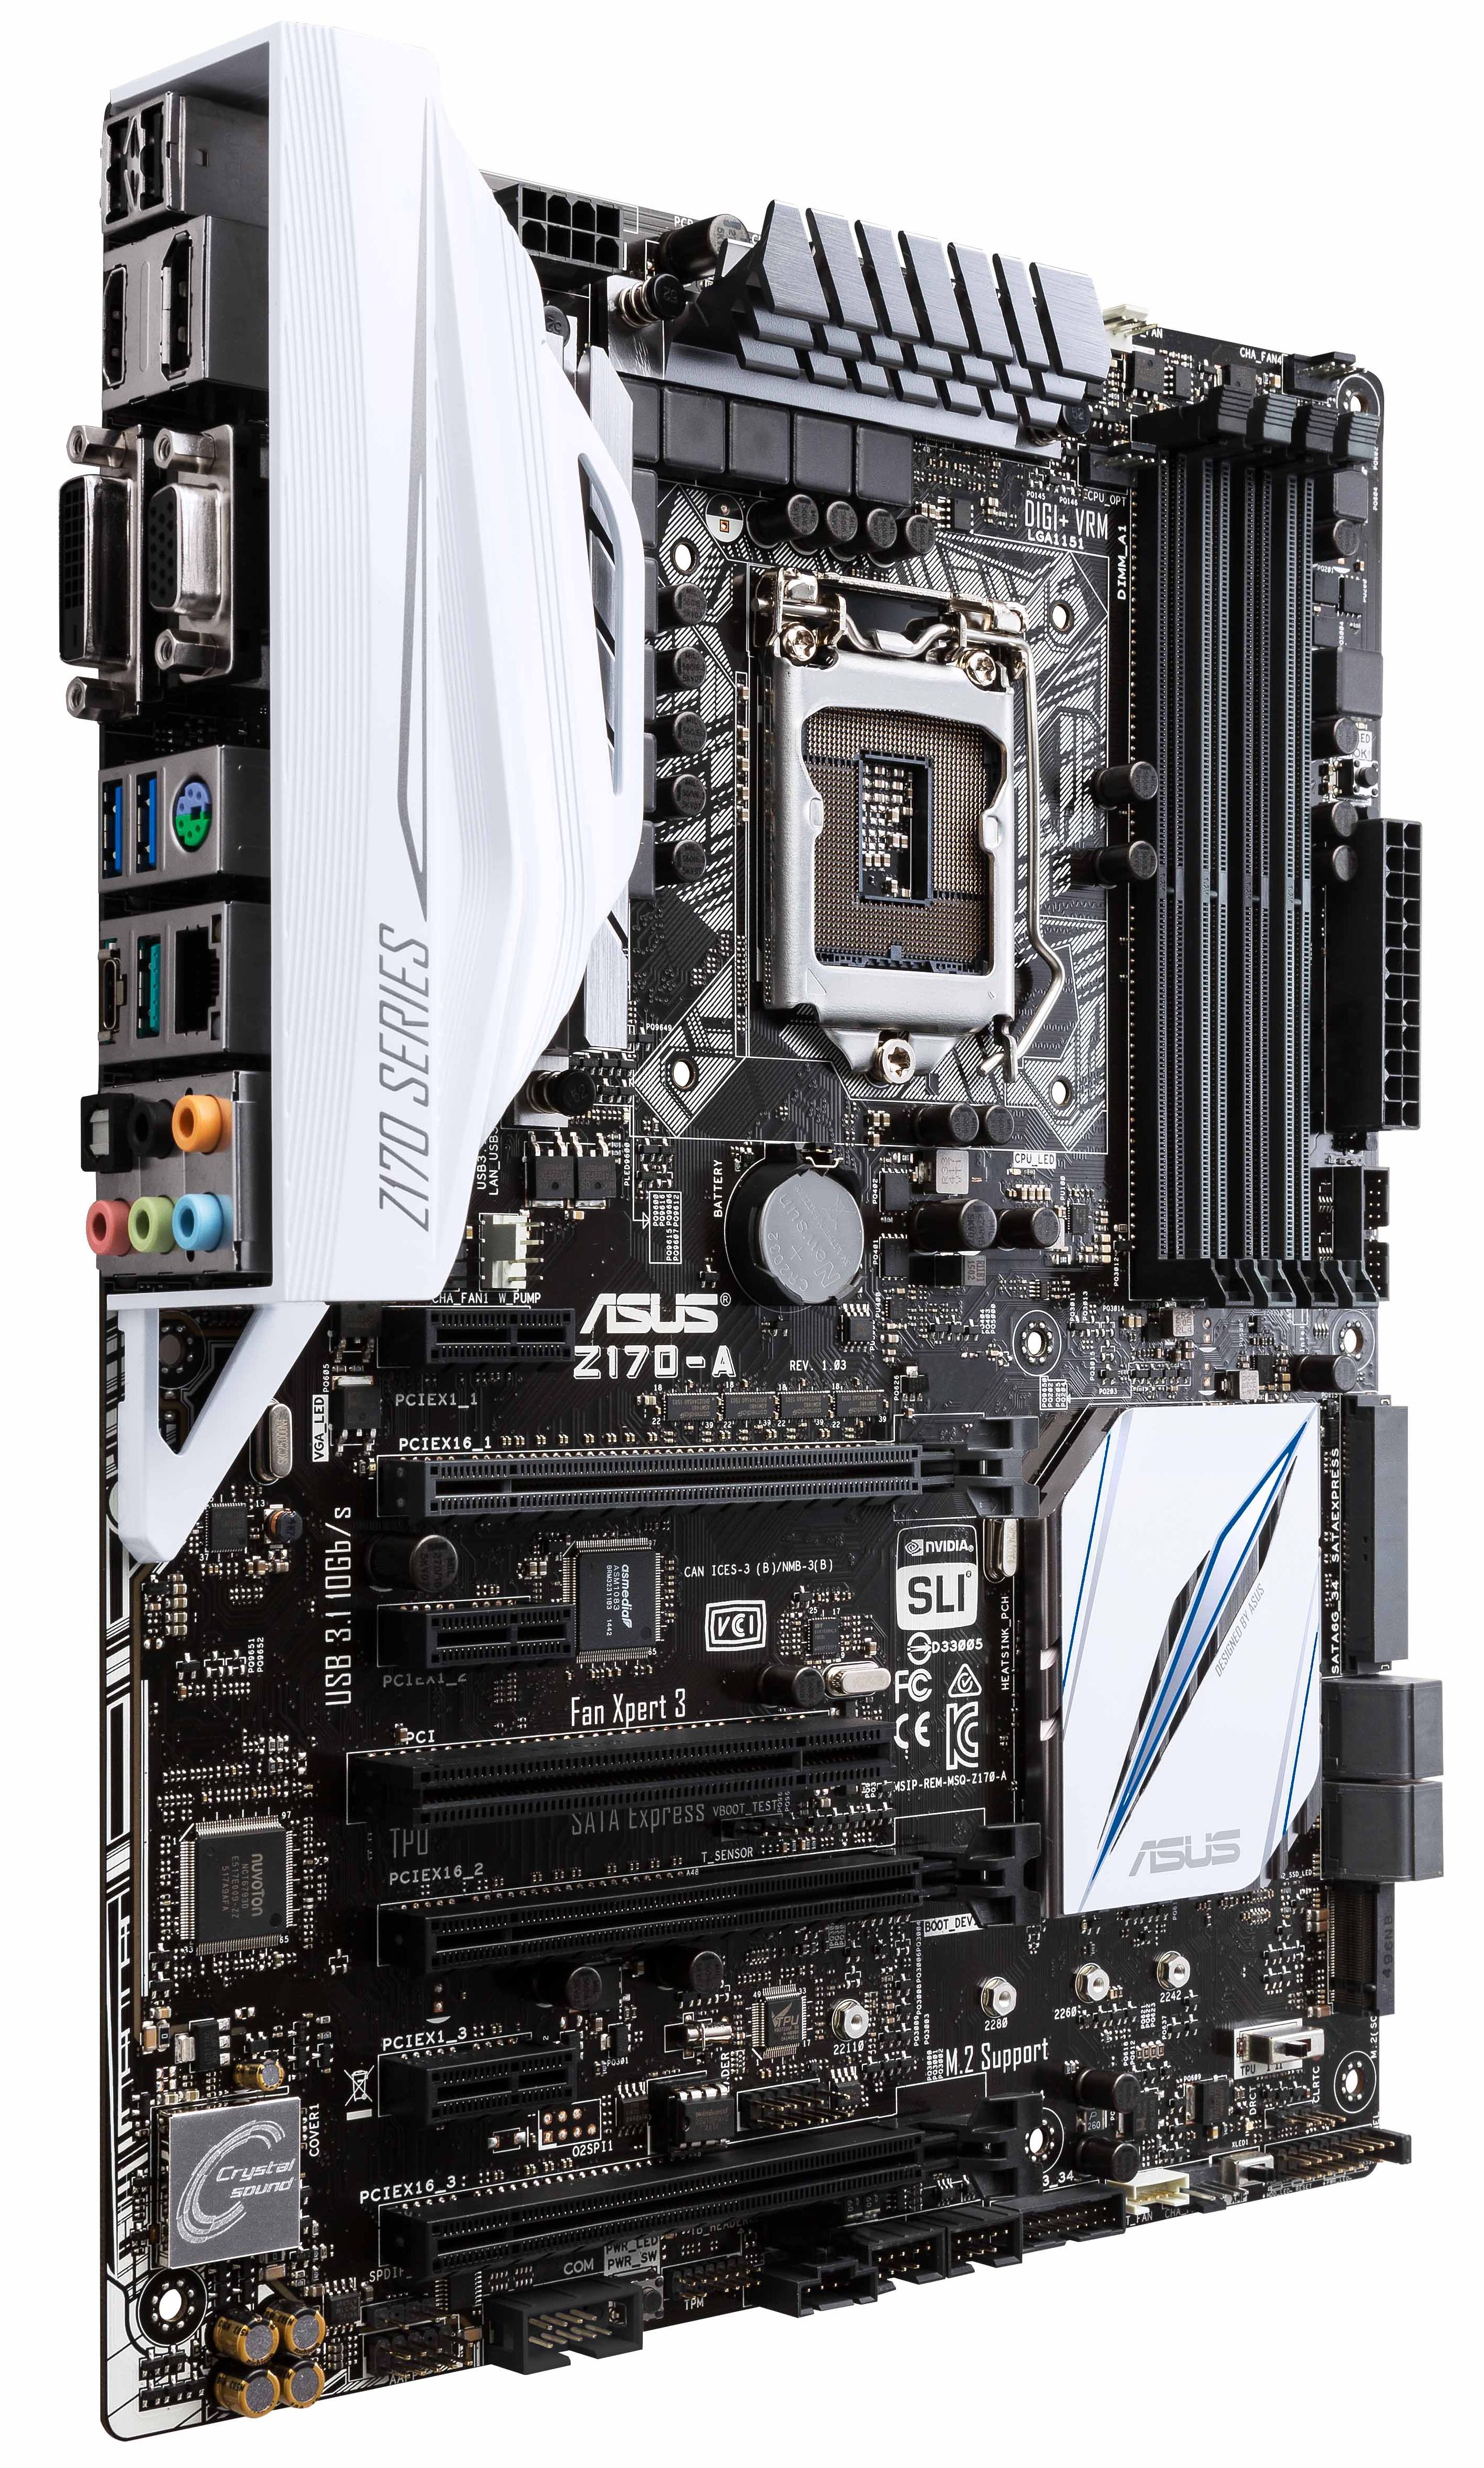
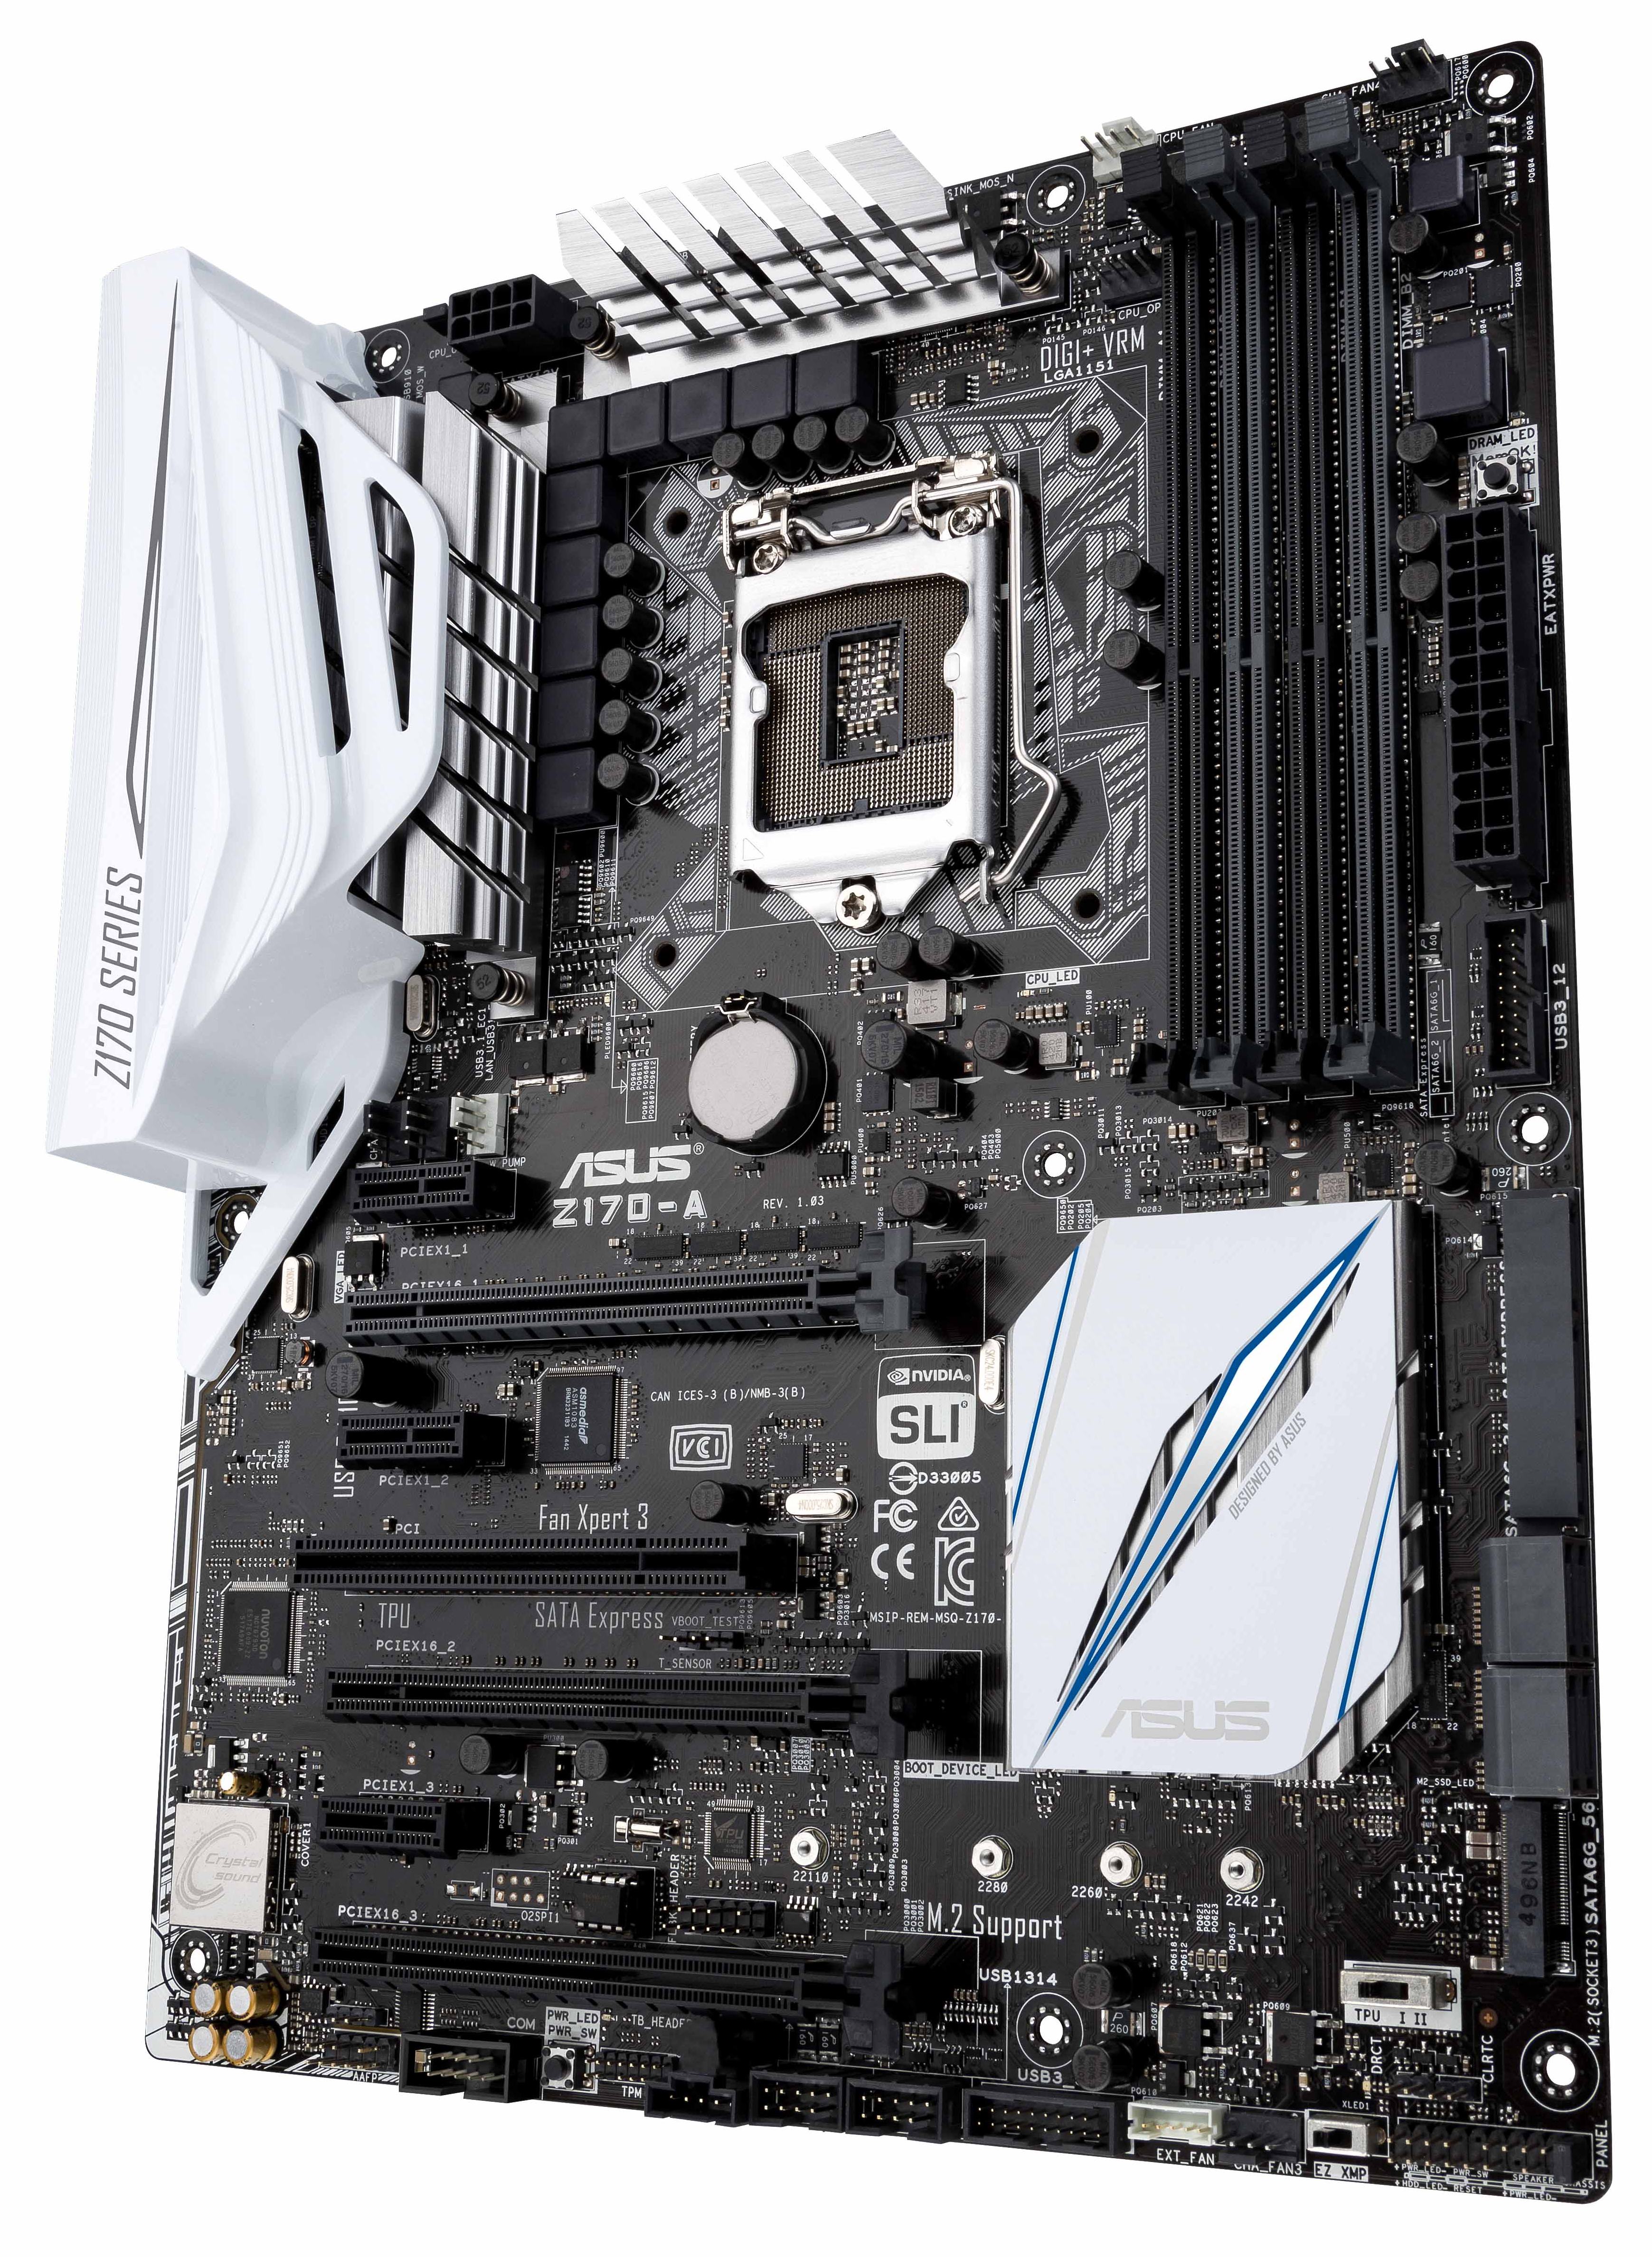
Fresh out of the box, the first thing I certainly noticed was the feel of finesse for a $165 product. The aesthetics are color coordinated with the PCB colors and the heatsink colors complimenting each other. The motherboard is slightly heavy as well, unlike some that we get which can feel deceptively flimsy. One of the features that carries over from X99 is the rear IO cover, featuring ASUS’ white faux-metal (it is plastic) with angled lines to accentuate the design. Despite this, there’s no getting away from the fact that ASUS PCBs are certainly busy, with lots of components each requiring SMT mounting line-up points that gives the PCB a lot of ‘white’. Luckily, one could suggest that the color scheme of the board can take the users mind off of this.
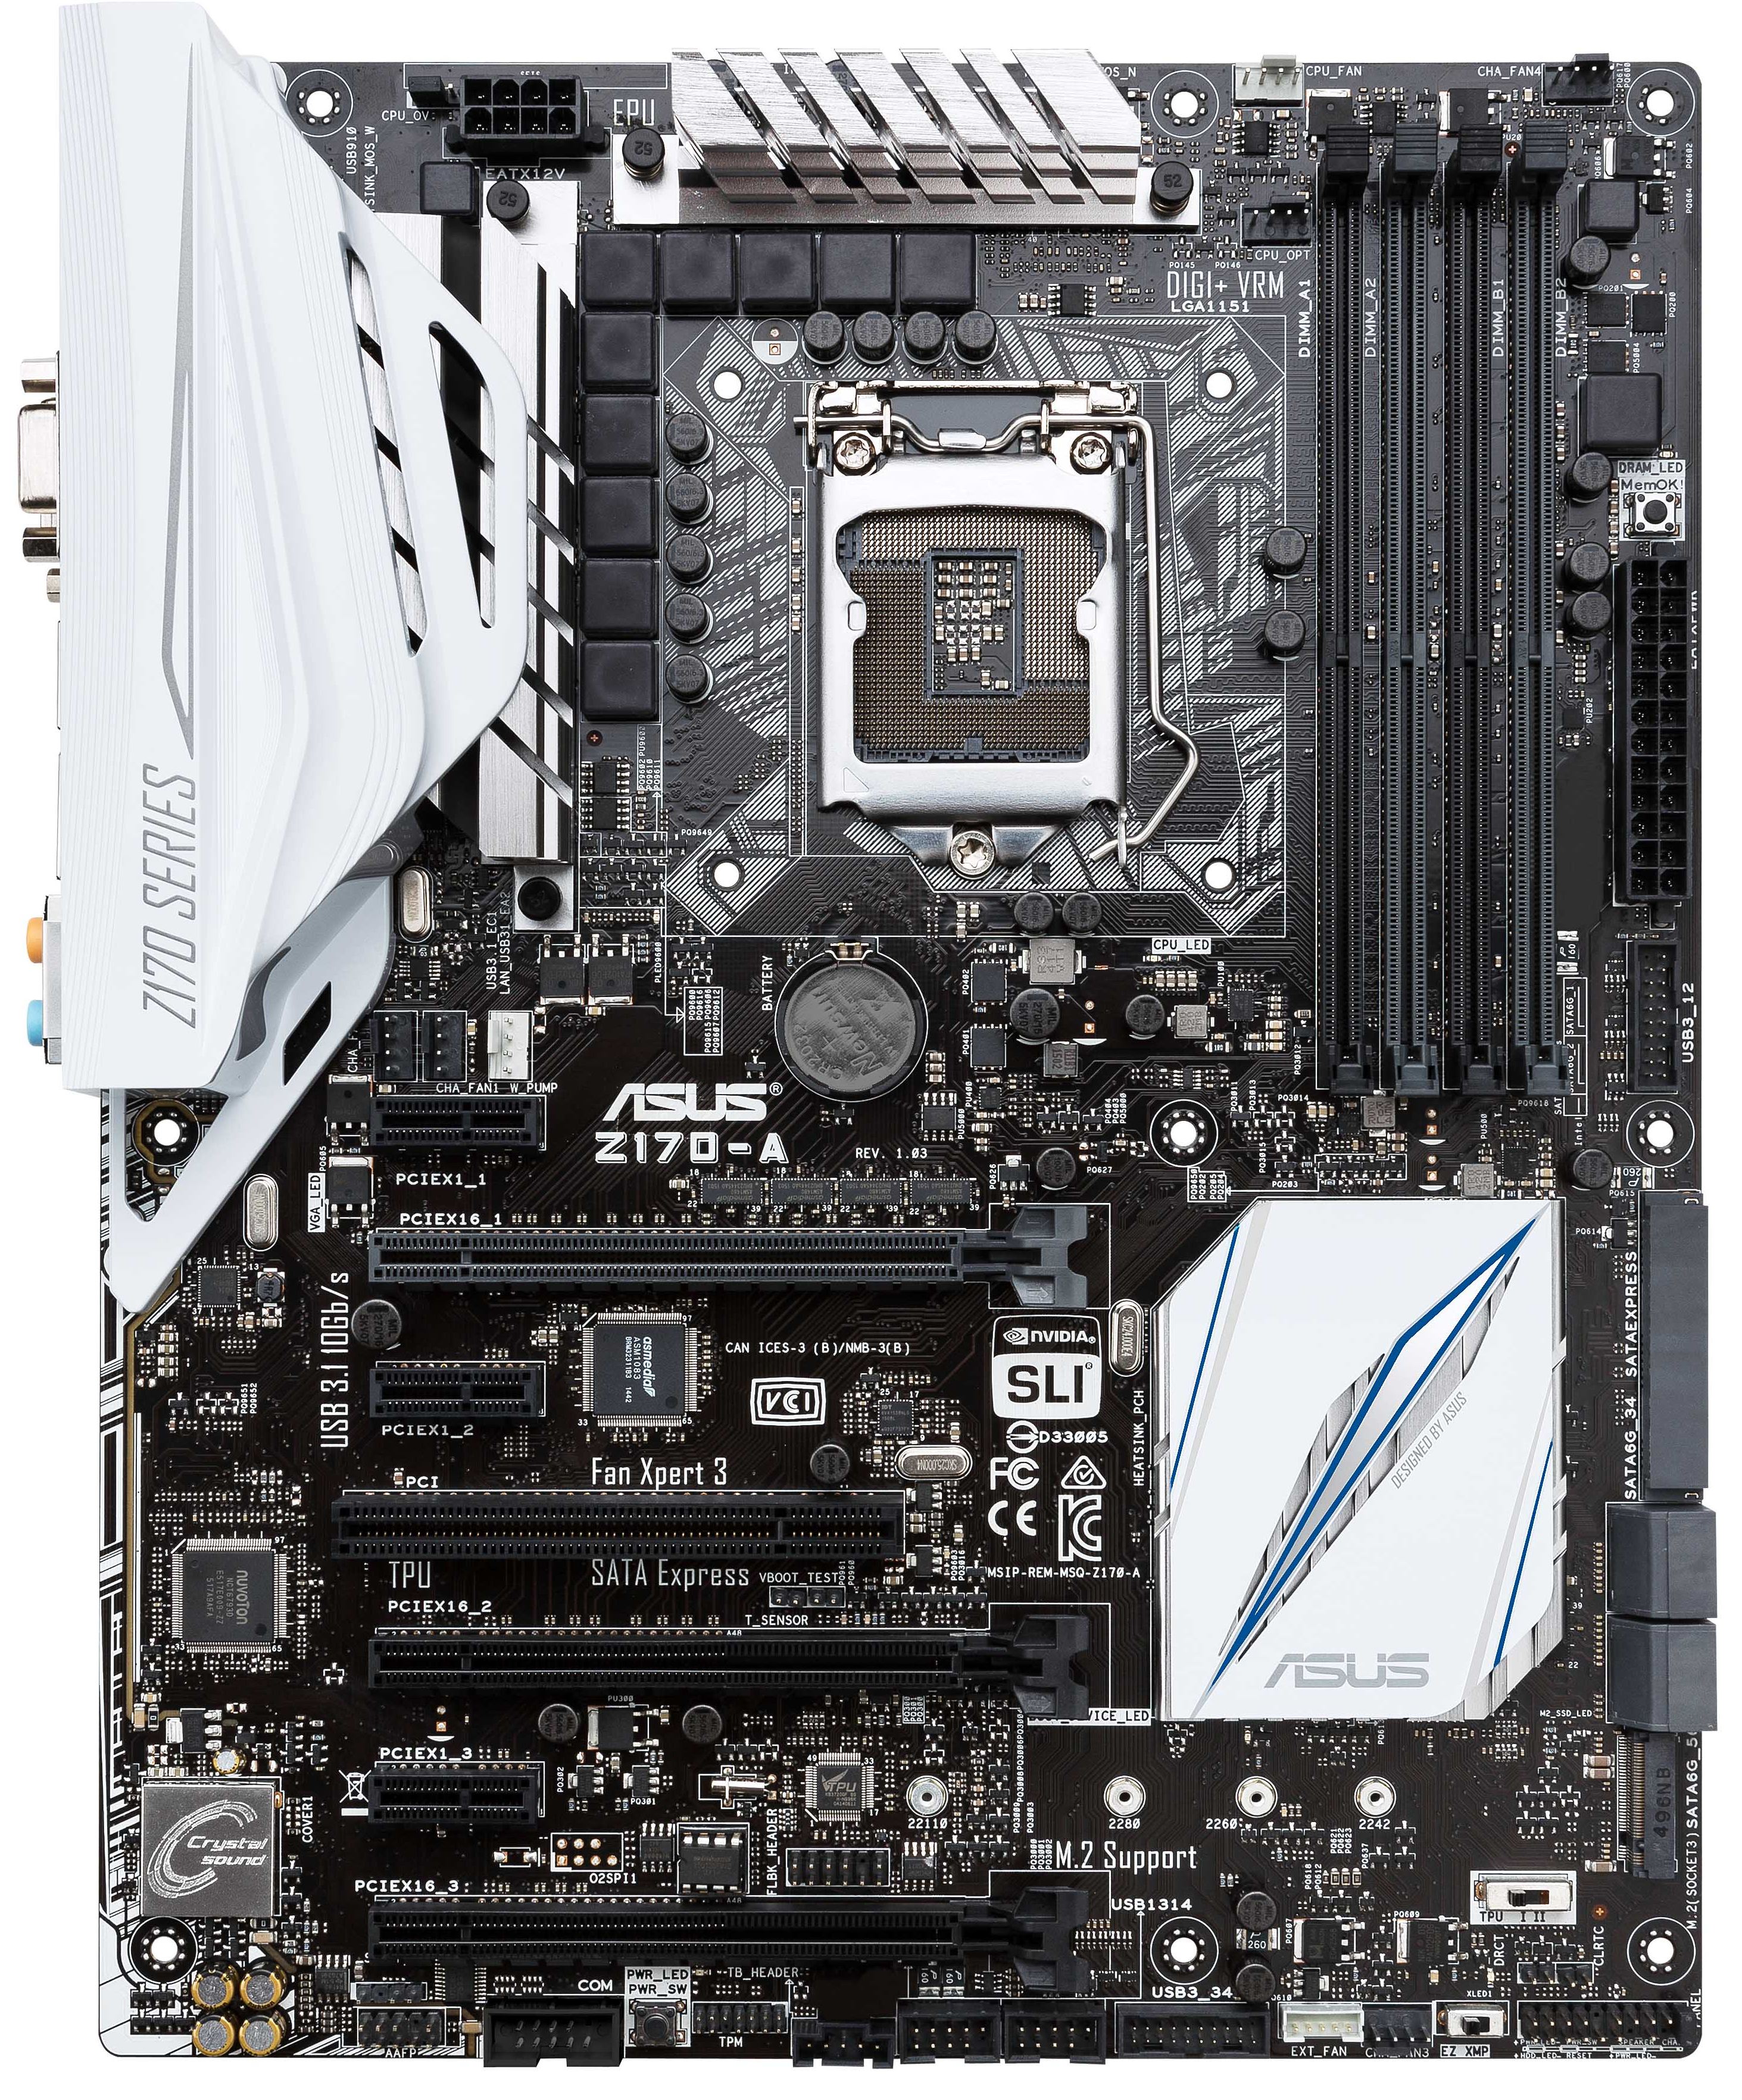
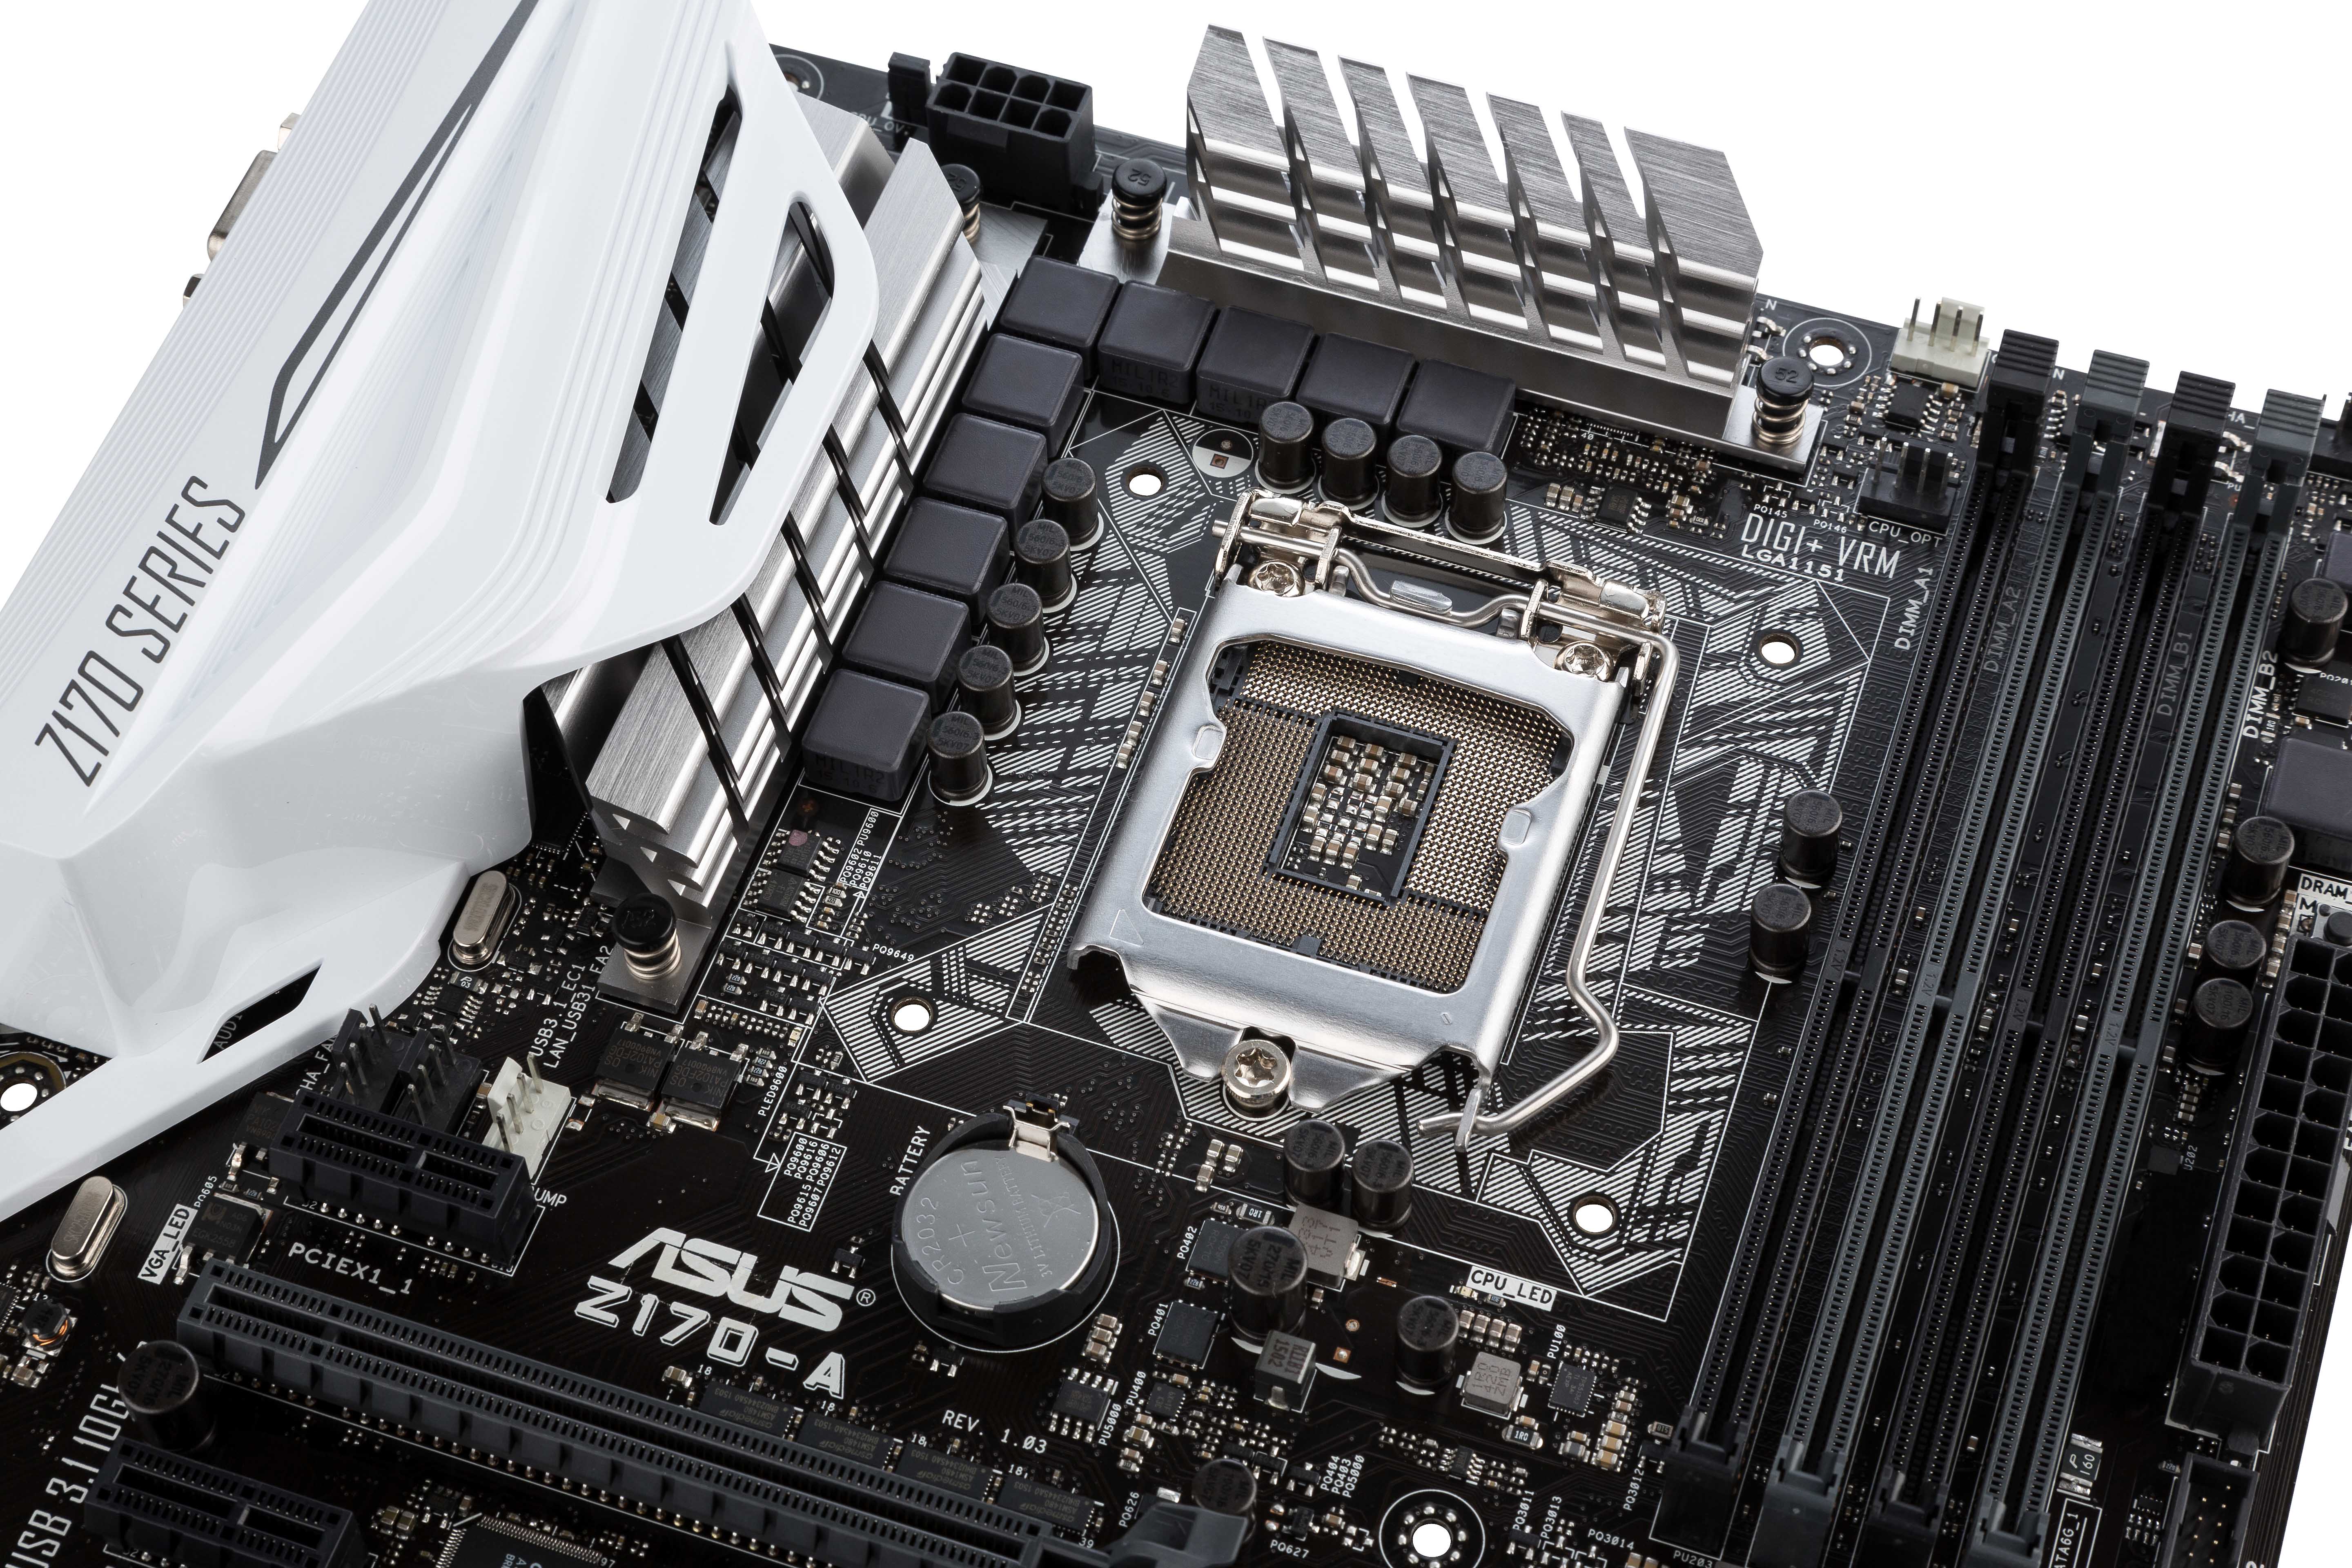
The socket area gets a small change as well, with ASUS going for an angled white design on the PCB that makes zero difference to the operation of the product but aims to catch the eye. One of the secrets to ASUS’ design is the lack of vertical and horizontal lines, which would disturb the flow (insert some interior design metaphor about style that I don’t understand). The 10-phase power delivery shows an array of chokes and heatsinks over the VRMs with that rear shield moving over to cover the USB 3.1 and network ICs near the rear. The socket has quick access to three fan headers to the top right and three fan headers to the bottom left. Some of these are derived from the same control, so will perform the same function, but there are in total five controllable fan header sets in the system. Another fan header is on the bottom of the board, with the fan extension header next to it.
The four DDR4 slots are alternately color coded, with priority going to the black slots. They use single side latches such that users can replace the memory with large PCIe devices installed – this does mean however that the user should take care to make sure they are firmly in place.
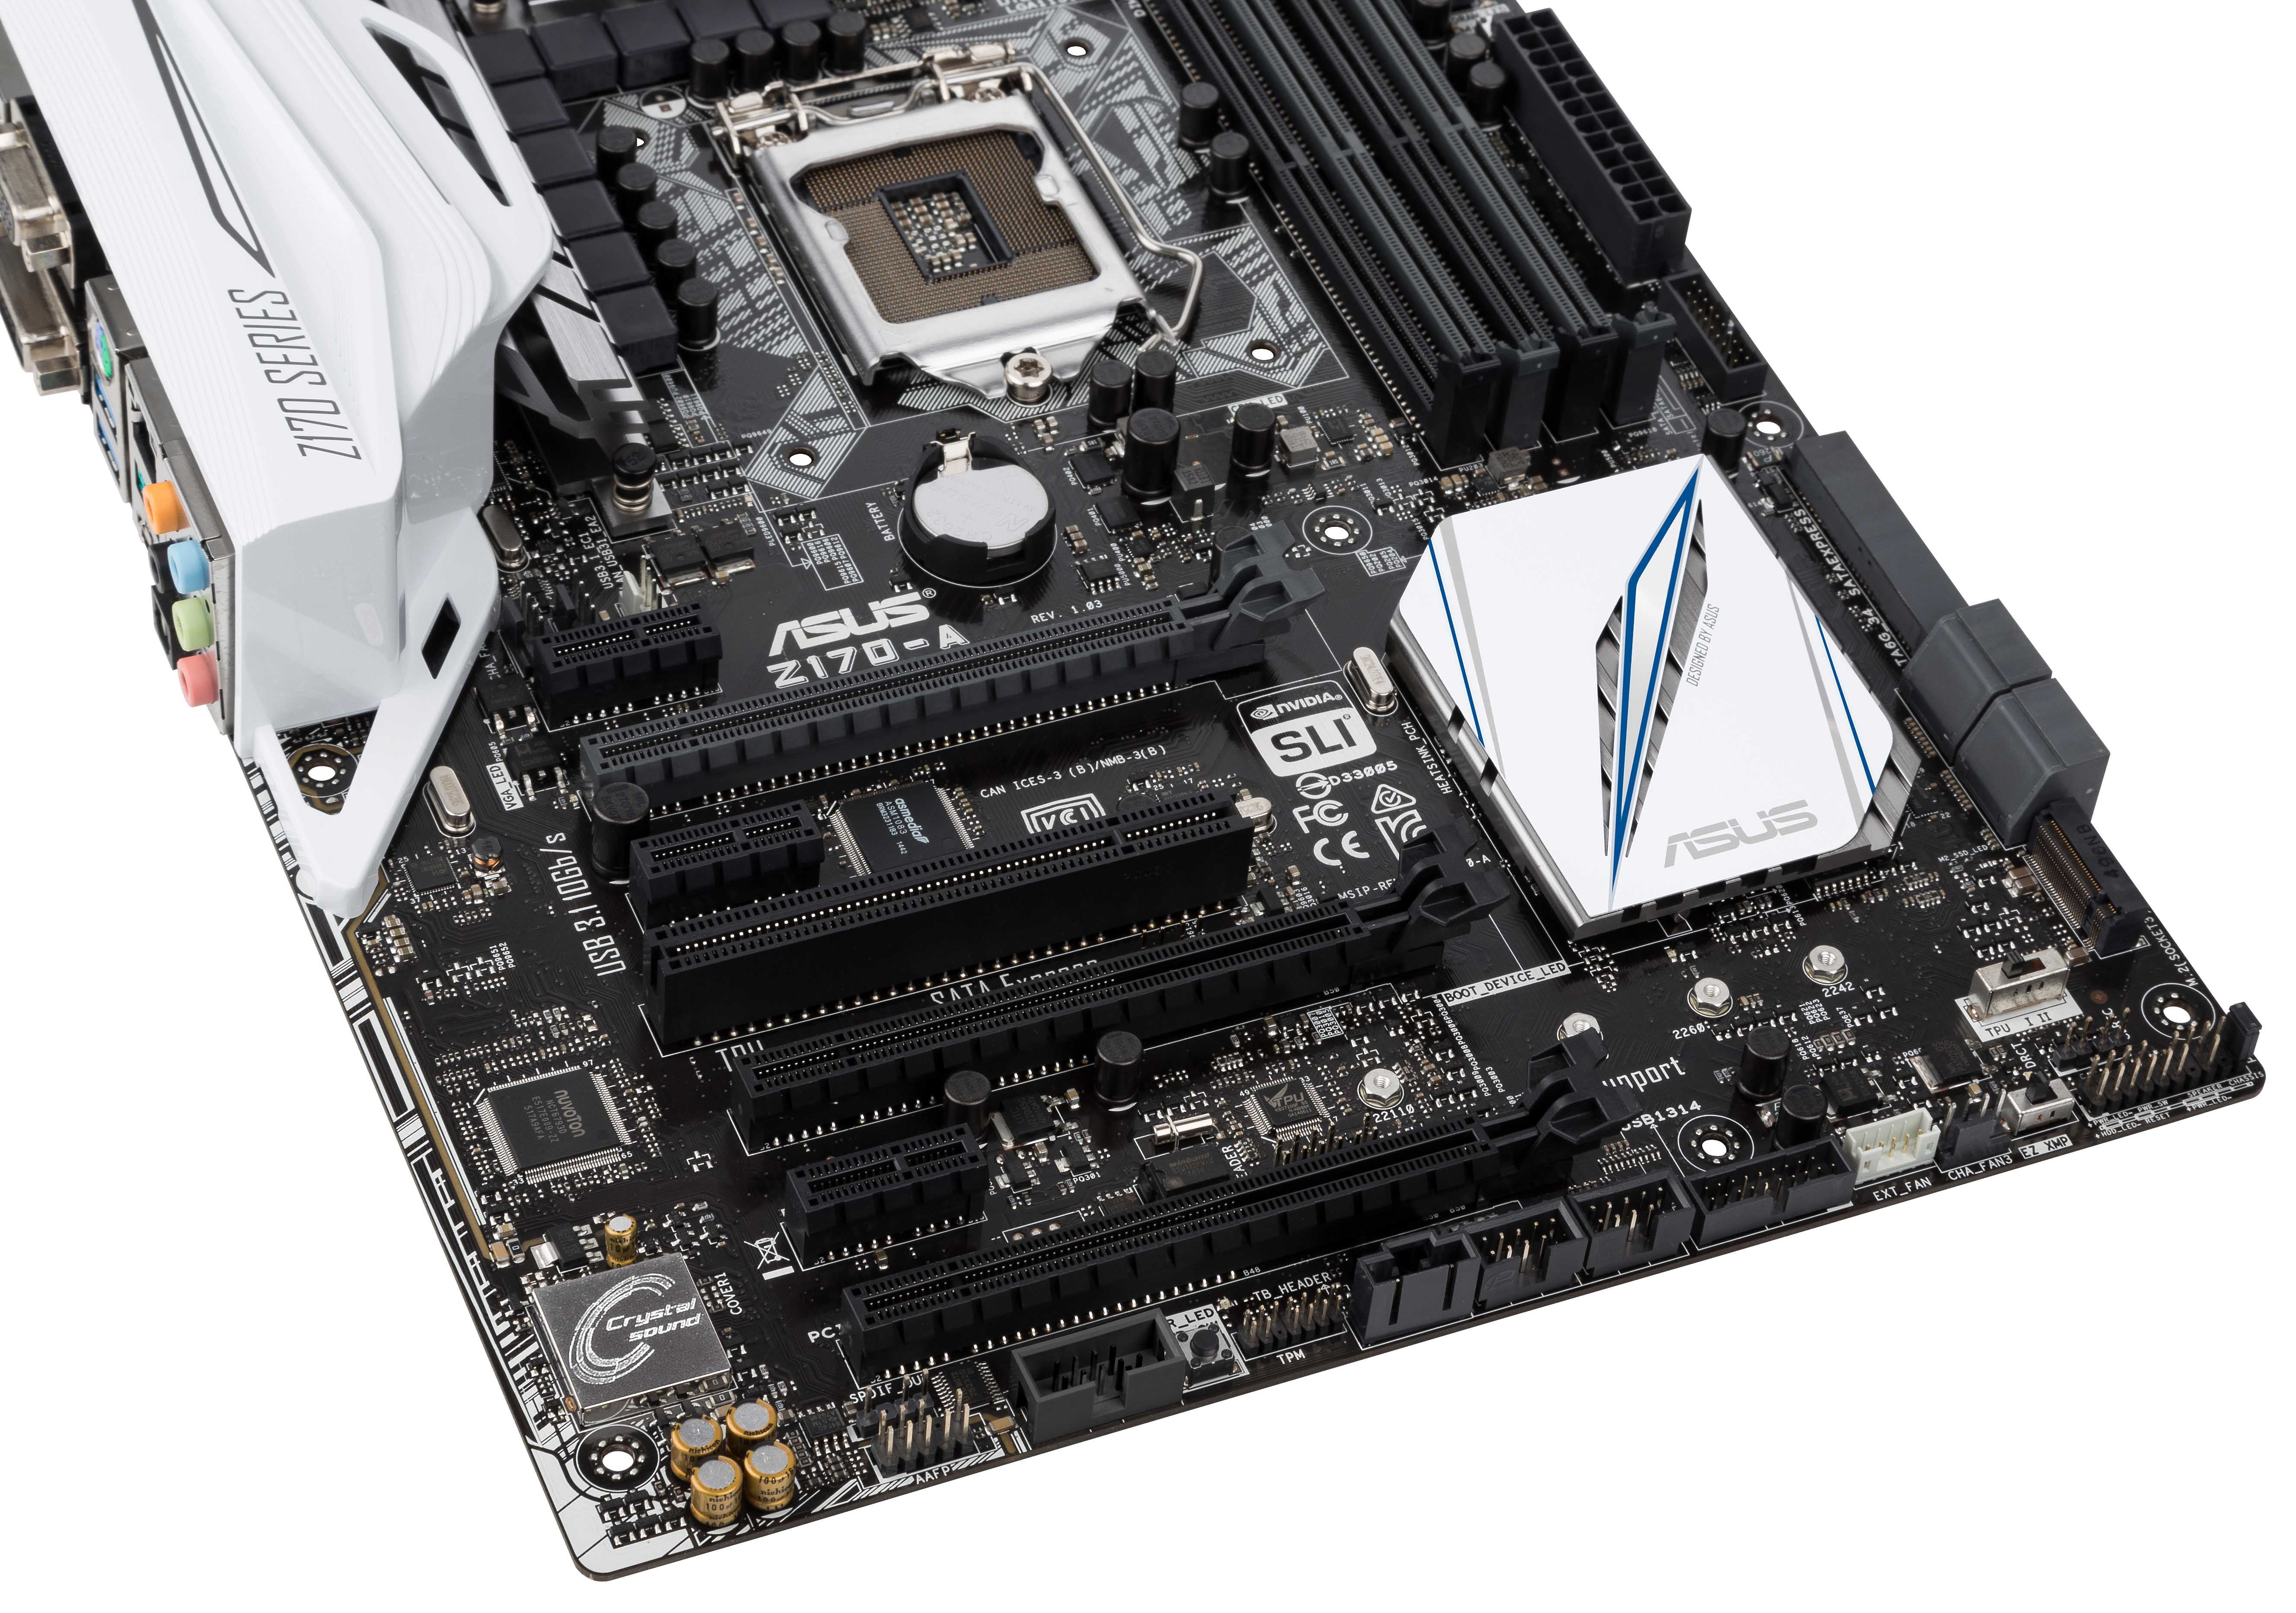
On the right hand side of the motherboard there is a MemOK! button to save the system from bad memory overclocks, then the 24-pin power and a USB 3.0 header. Storage connectivity then comes through a SATA Express port which also houses two SATA 6 Gbps ports, then four more SATA 6 Gbps ports, and finally an M.2 port. This M.2 allows for devices from 2242 to 22110 in both SATA and PCIe mode, with the latter supporting PCIe 3.0 x4 drives in AHCI or NVMe modes. When in SATA mode, the M.2 is switched with the two SATA ports that are part of the SATA Express sub-system, so they cannot be used together.
Directly below the M.2 slot is a TPU header, offering two stages of overclocking which we reported on the previous page. Then for the bottom motherboard features we get the front panel header, an EZ XMP button to enable extreme memory profiles, a fan header, a 5-pin fan extension header, another USB 3.0 header, two USB 2.0 headers, a Thunderbolt PCIe device header, a TPM header, the power button, a COM header and the front panel audio header.
The PCIe slots are a smörgåsbord of standards and bandwidths. The first two main PCIe x16 slots are from the CPU, offering x16 if the top is populated or x8/x8 if both are populated which for GPUs means 2-way SLI or Crossfire. The third PCIe x16 slot is an x4 variant from the chipset, which allows for tri-Crossfire. Along with these we get three PCIe 3.0 x1 slots for other devices, and a PCI slot for legacy hardware which is generated through a PCIe to PCI bridge.
On the left hand side of the board is our audio solution, which ASUS has equipped with boosted features such as PCB separation, an EMI shield and additional filter caps. What makes this interesting is that the audio codec underneath is the Realtek ALC892, whereas we normally see the ALC1150 when extra effort has been made on the audio side. There is a slight price difference for the manufacturer between the two, and one could argue that most users might not be able to tell the difference, but in our tests this means a difference in signal-to-noise for sure.
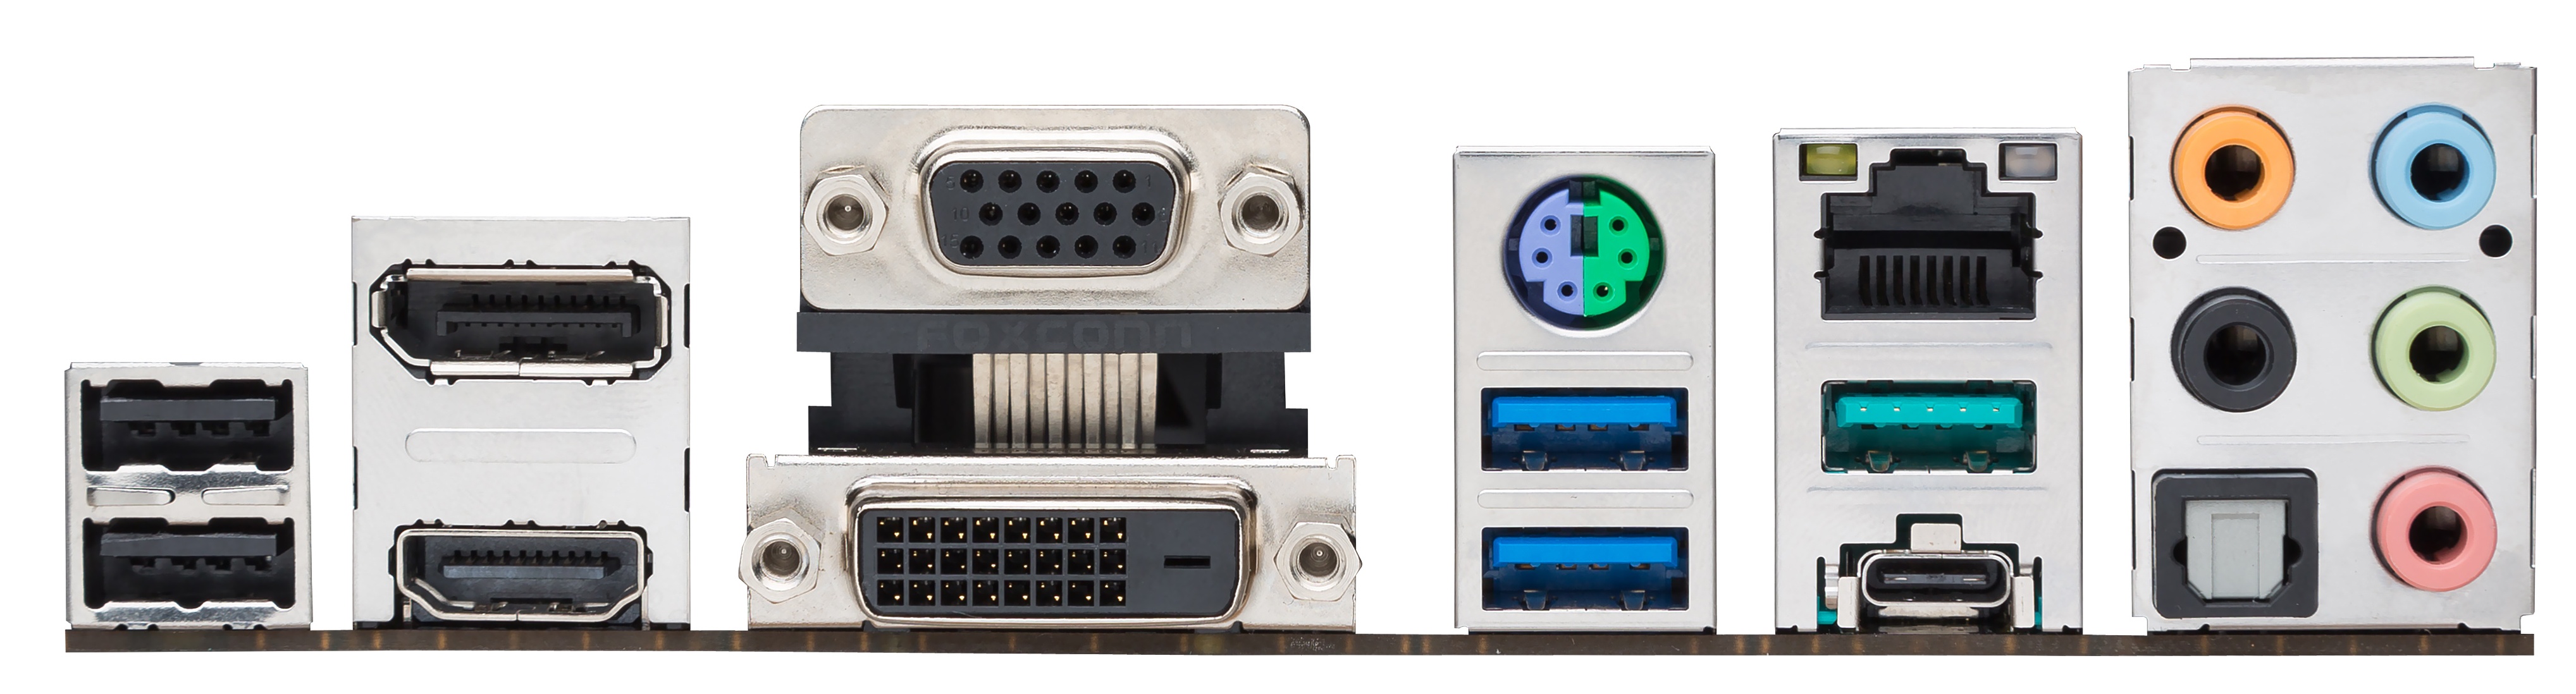
Like the PCIe slot arrangement, there is a lot to choose on the rear panel. USB is provided by two USB 2.0 ports in black, two USB 3.0 ports in blue, a USB 3.1-A (at 10 Gbps) in teal and a USB 3.1-C (at 10 Gbps) using the new Type-C connector. Video outputs from the integrated graphics are supplied by the standard digital trio of DisplayPort, HDMI and DVI-D, but ASUS also includes a bridge chip for analog VGA as well. A combination PS/2 port is above the USB 3.0 ports, Intel’s I219-V network controller powers the network port above the USB 3.1 ports, and the aforementioned Realtek audio codec provides the rear audio outputs.
Test Setup
| Test Setup | |
| Processor | Intel Core i7-6700K (ES, Retail Stepping), 91W, $350 4 Cores, 8 Threads, 4.0 GHz (4.2 GHz Turbo) |
| Motherboards | ASUS Z170-A |
| Cooling | Cooler Master Nepton 140XL |
| Power Supply | OCZ 1250W Gold ZX Series Corsair AX1200i Platinum PSU |
| Memory | Corsair DDR4-2133 C15 2x8 GB 1.2V or G.Skill Ripjaws 4 DDR4-2133 C15 2x8 GB 1.2V |
| Memory Settings | JEDEC @ 2133 |
| Video Cards | ASUS GTX 980 Strix 4GB ASUS R7 240 2GB |
| Hard Drive | Crucial MX200 1TB |
| Optical Drive | LG GH22NS50 |
| Case | Open Test Bed |
| Operating System | Windows 7 64-bit SP1 |
Readers of our motherboard review section will have noted the trend in modern motherboards to implement a form of MultiCore Enhancement / Acceleration / Turbo (read our report here) on their motherboards. This does several things, including better benchmark results at stock settings (not entirely needed if overclocking is an end-user goal) at the expense of heat and temperature. It also gives in essence an automatic overclock which may be against what the user wants. Our testing methodology is ‘out-of-the-box’, with the latest public BIOS installed and XMP enabled, and thus subject to the whims of this feature. It is ultimately up to the motherboard manufacturer to take this risk – and manufacturers taking risks in the setup is something they do on every product (think C-state settings, USB priority, DPC Latency / monitoring priority, overriding memory sub-timings at JEDEC). Processor speed change is part of that risk, and ultimately if no overclocking is planned, some motherboards will affect how fast that shiny new processor goes and can be an important factor in the system build.
For reference, the ASUS Z170-A, on our testing with BIOSes 0603 to 0901, MCT was enabled by default. Also, the FCLK 10x ratio was present from the 0901 BIOS at the time of testing.
Many thanks to...
We must thank the following companies for kindly providing hardware for our test bed:
Thank you to AMD for providing us with the R9 290X 4GB GPUs.
Thank you to ASUS for providing us with GTX 980 Strix GPUs and the R7 240 DDR3 GPU.
Thank you to ASRock and ASUS for providing us with some IO testing kit.
Thank you to Cooler Master for providing us with Nepton 140XL CLCs.
Thank you to Corsair for providing us with an AX1200i PSU.
Thank you to Crucial for providing us with MX200 SSDs.
Thank you to G.Skill and Corsair for providing us with memory.
Thank you to MSI for providing us with the GTX 770 Lightning GPUs.
Thank you to OCZ for providing us with PSUs.
Thank you to Rosewill for providing us with PSUs and RK-9100 keyboards.
BIOS
The system BIOS needs to perform a number of tasks. First, it needs to give access to the options that user needs, and actually implement those features when an option is changed. Secondly, the easier a user can access the options they want through a relevant interface, the better (aka ‘the user experience’). The motherboard industry has a handful of main players, a number of second tier players and several OEMs who all have to craft the BIOS into something their users want. On the enterprise side, as well as laptops or vertically integrated industries (health, finance, oil/gas), very little effort is made on the user experience side as the only person going into the BIOS should be a system administrator who should know what they are doing regardless of the interface. For the consumer market however, more users and system integrators have to go into the BIOS in order to enable various features on their builds either by virtue of bandwidth or there’s a special something that needs to be enabled which can’t be done through software (such as extreme memory profiles or NVMe).
This has led to several representations of what a ‘BIOS’ should be. (For clarification, even though these are UEFI/EFI graphical variants, BIOS is still the common term used by the manufacturers and support teams for any entry into the F2/Del firmware options on a modern PC.) At this point in history, most motherboard manufacturers have gone down the bimodal route, offering an easy and an advanced mode that caters to two main parts of the user spectrum based on experience. ASUS was one of the first companies to do this, and we’ve covered every iteration since.
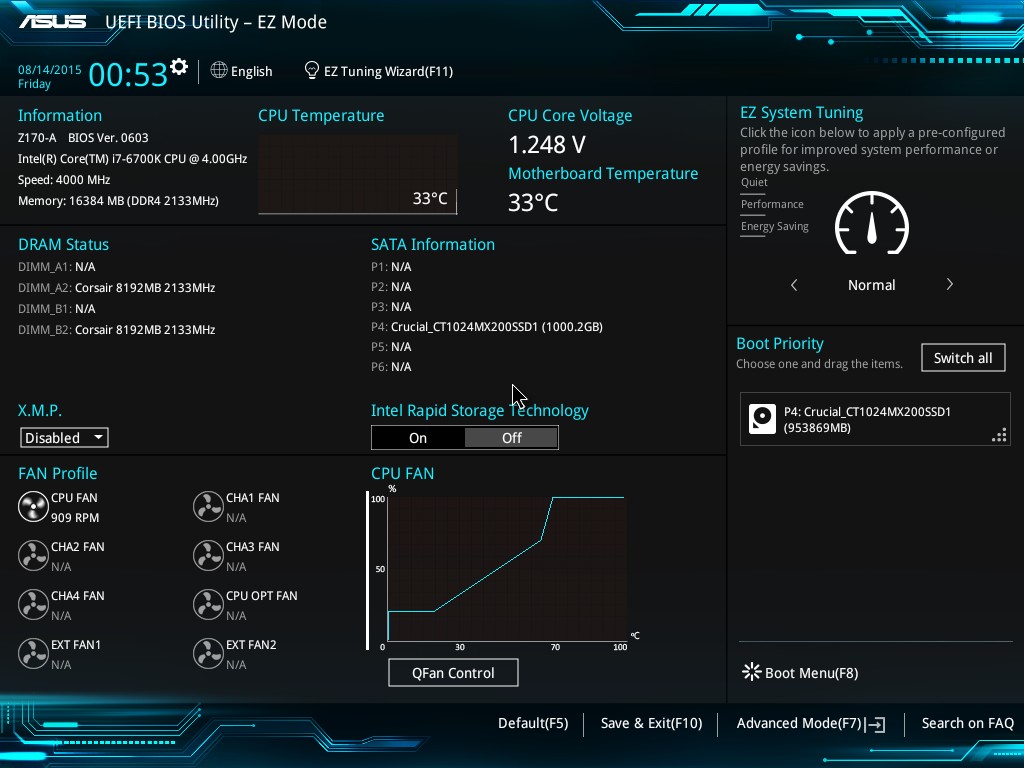
For Z170, this iteration looks a lot like what we have seen in X99. The first front screen is EZ Mode, which contains a wealth of information. On the top left is the name of the motherboard, the BIOS version, the CPU installed, the current maximum speed of that CPU, the amount of DRAM installed, the speed of the DRAM, a graph of the current CPU temperature, the CPU voltage and the motherboard temperature. Underneath this is a per-slot breakdown of the memory installed, then an XMP button for memory modules that support it. There is also a breakdown per SATA port, although this does not extend to PCIe storage devices as of yet. The current fan speeds are in the bottom left, while next to it is a graph of the CPU fan profile. Selecting the QFan Control option underneath this gives the fan profile modifier:
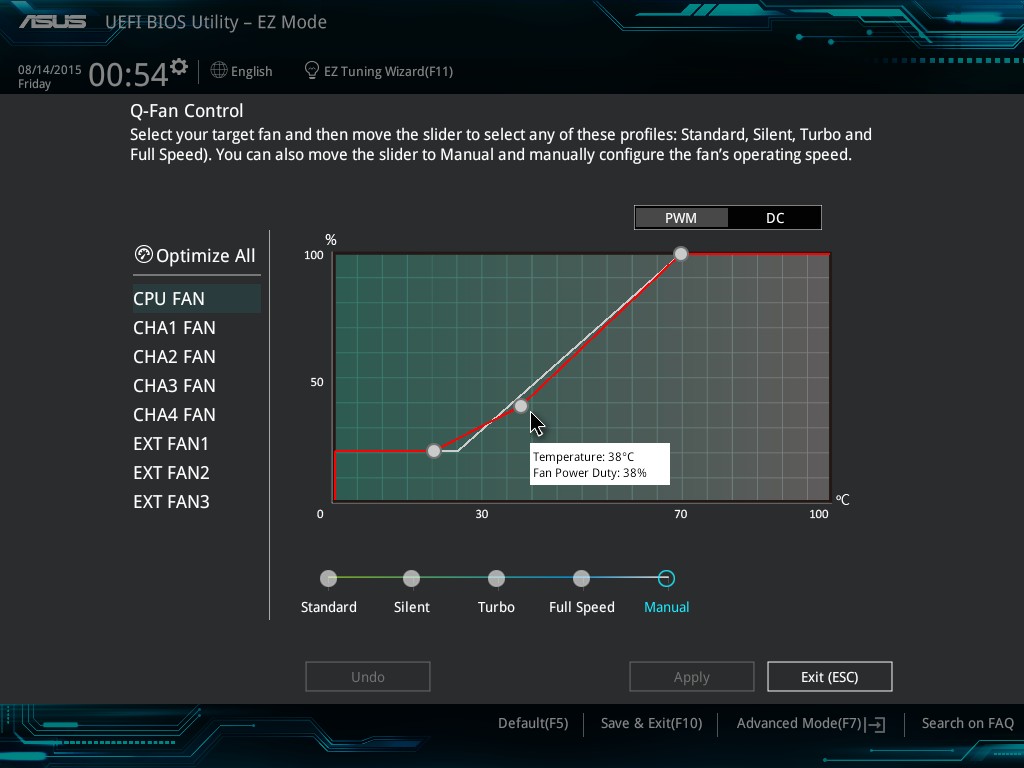
All the fan headers support PWM and DC control, with each of the fan segments allowing for adjustments or predefined fan speeds. New for Z170 is the ‘Optimize All’ option, which performs automatic fan profile selection we had in the advanced section of the BIOS previously.
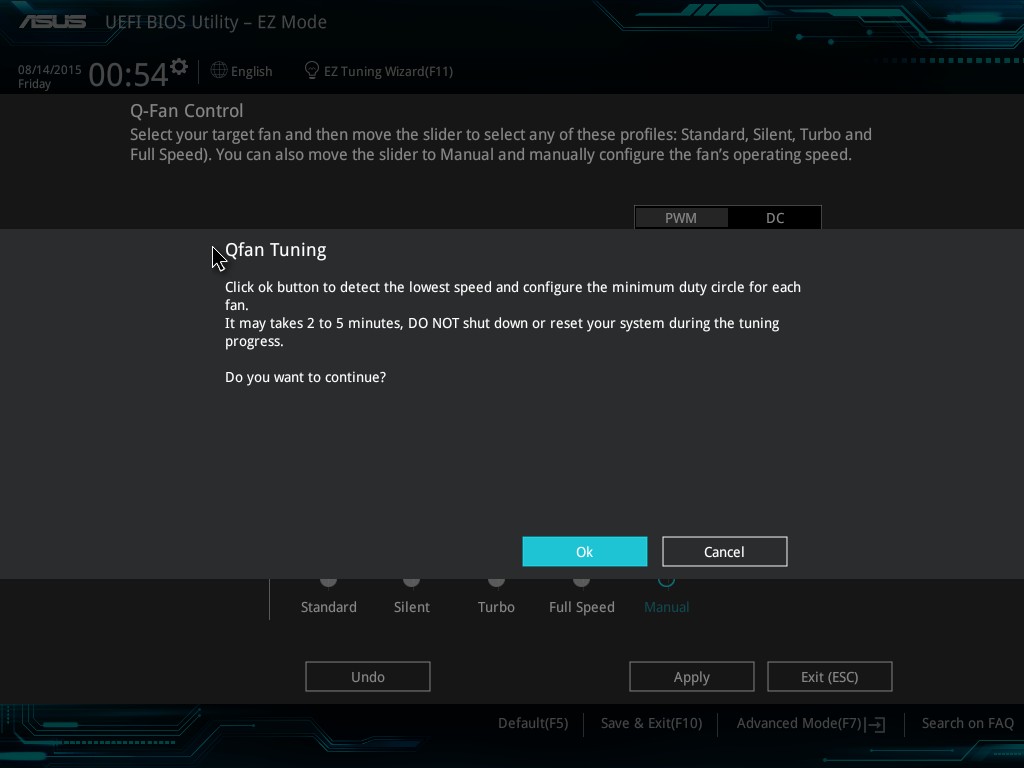
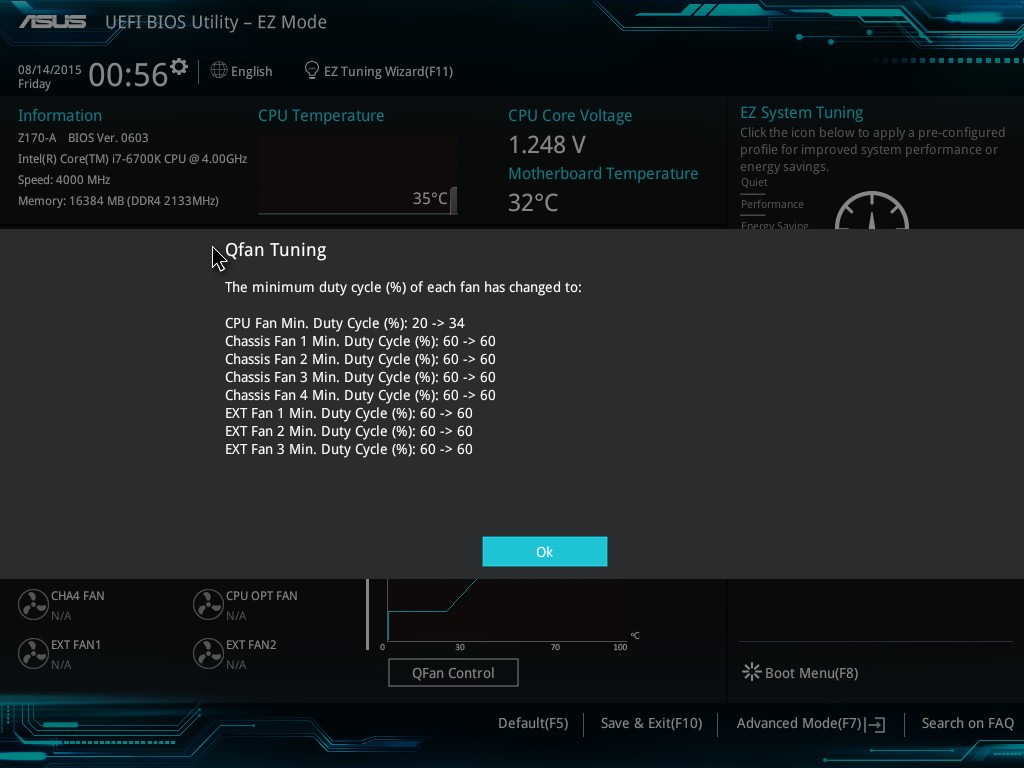
We still haven’t got a button to allow for the same fan profile to be applied across the board (such as full speed on all fans), but I've been told that it will come in a future update.
Also in the BIOS is the EZ Tuning Wizard that takes a user through the step-by-step overclocking or RAID selection options.
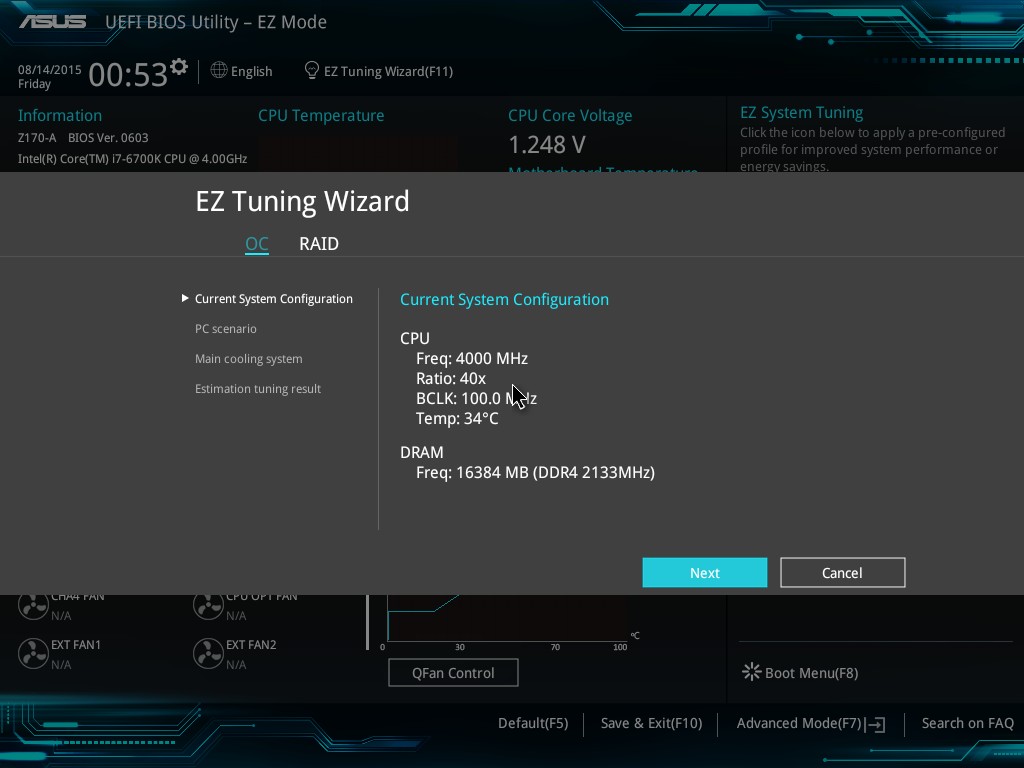
For the overclocking options, the BIOS will ask the user to select the type of overclock they want to focus on (daily computing vs. gaming/media) as well as the level of CPU cooling (stock cooler, tower cooler, water cooler, unknown). The combination of these two will give a recommended overclock, and an option to apply the change:

In this case we chose daily computing and a box cooler, and the system suggested a 7% boost to CPU speed and no change on the DDR4-2133 DRAM we had installed.
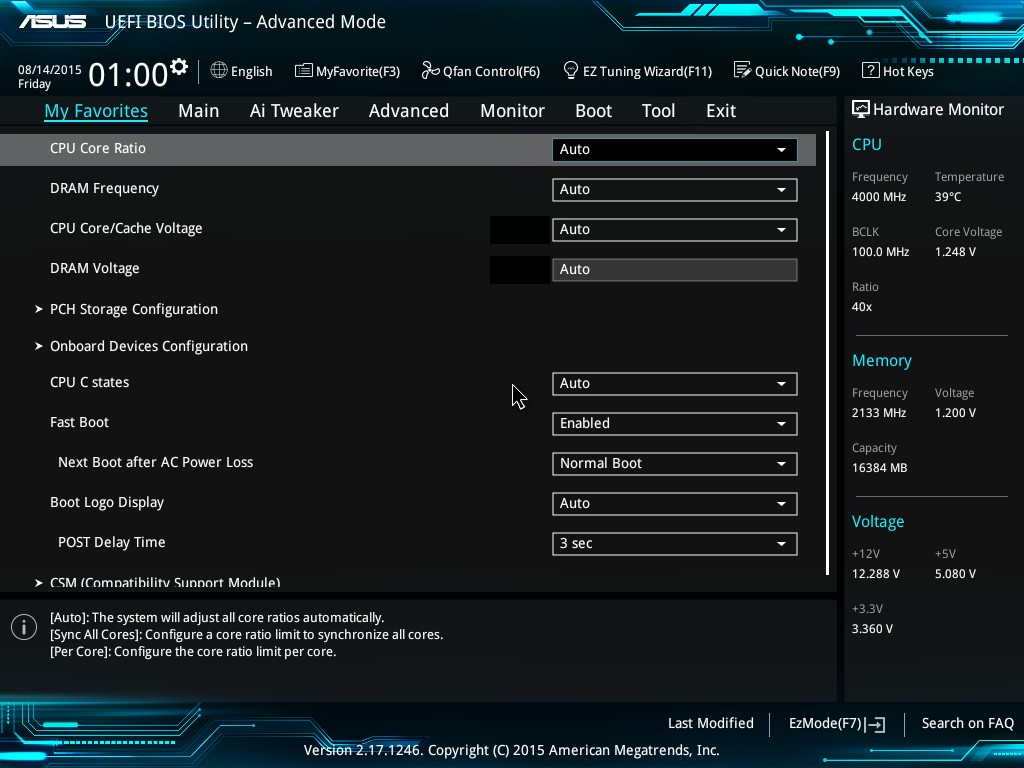
Beyond EZ Mode is the Advanced Mode, which in this case also has some minor tweaks to the Z170 platform but no significant changes.
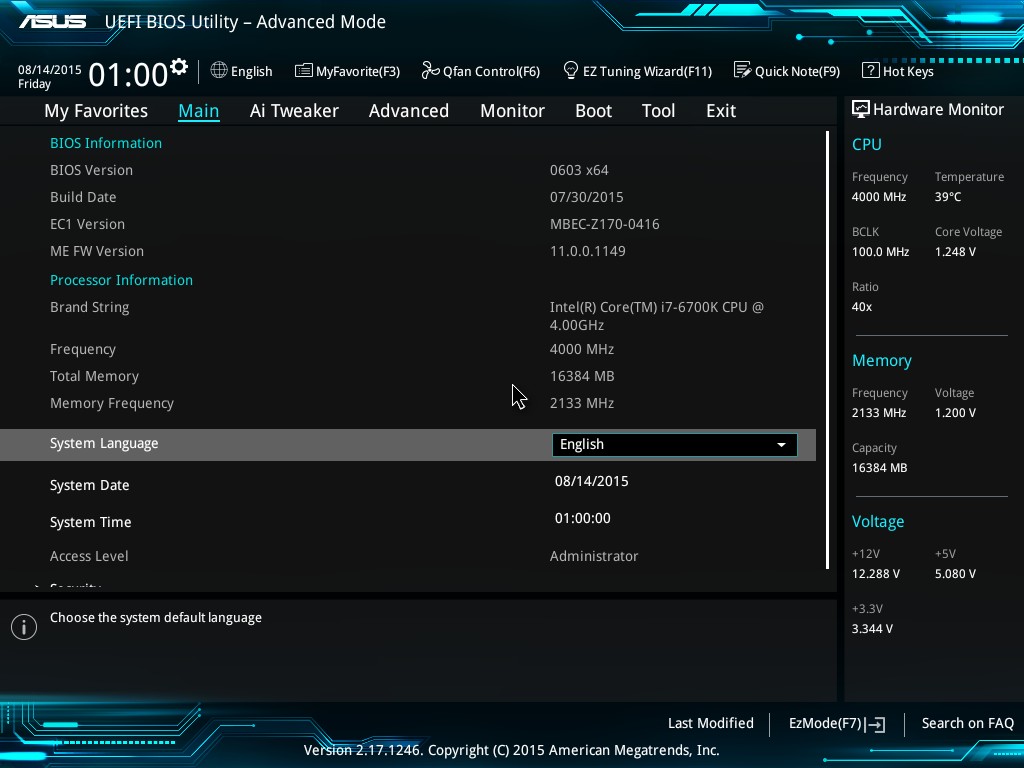
At the top of the screen are the selection tabs, with the main window in the center, a hardware monitor on the right and an information banner at the bottom. From within Advanced Mode, a user can select a series of commands to be copied into the ‘My Favorites’ menu and choose to boot into this instead of EZ Mode:
For users looking to overclock, this will be pre-populated with ASUS-recommended overclocking options as shown above, which is new for Z170. These are normally found in the AI Tweaker menu.
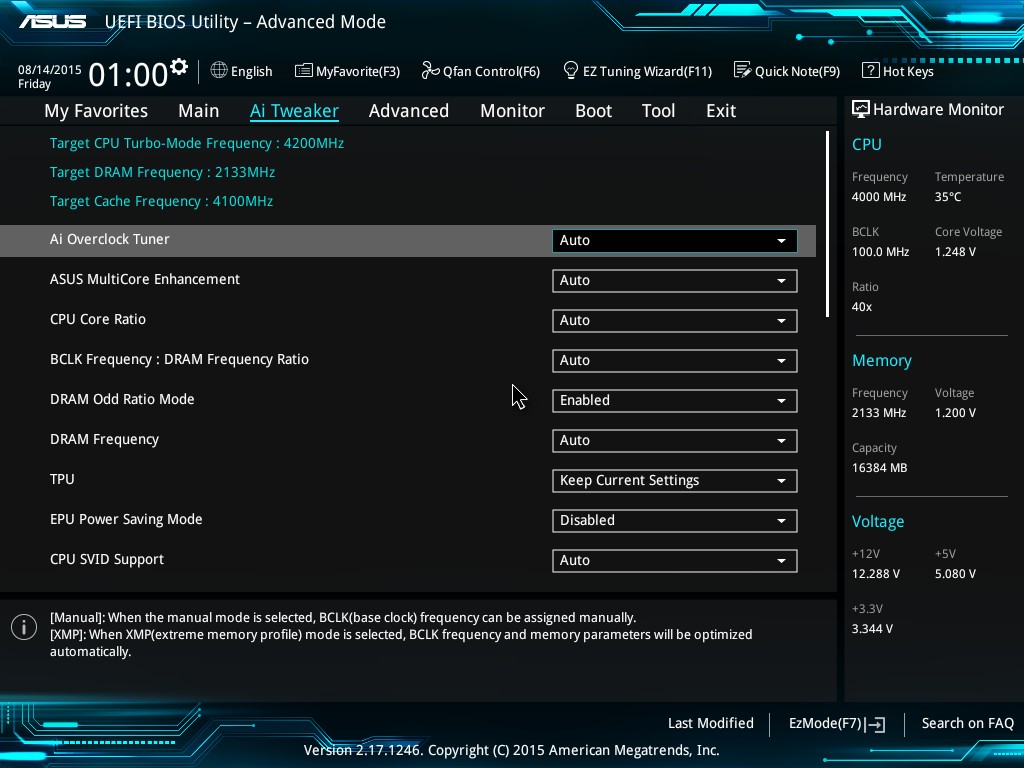
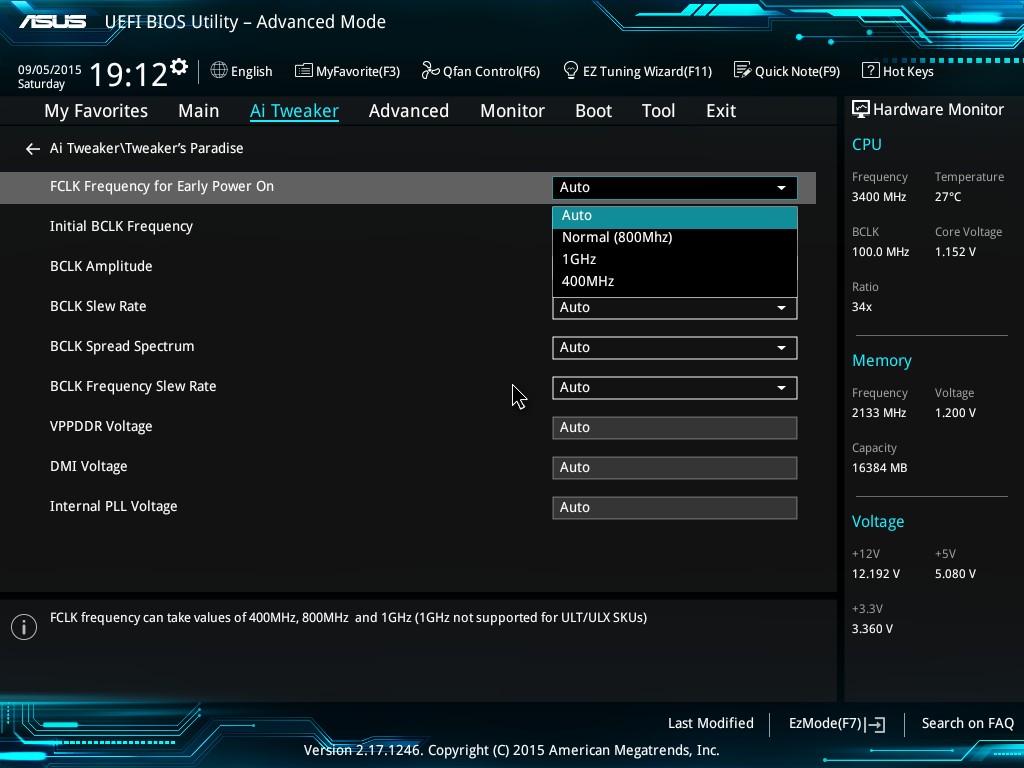
There isn’t much more to see here than on previous ASUS Z97/X99 motherboards – a series of options to select CPU/DRAM/Cache frequencies, then voltages, then a sub-menu for power options, a sub-menu for DRAM options, a sub-menu for a ‘Tweaker’s Paradise’ and a further sub-menu for internal CPU power management. Nothing out of the ordinary here.
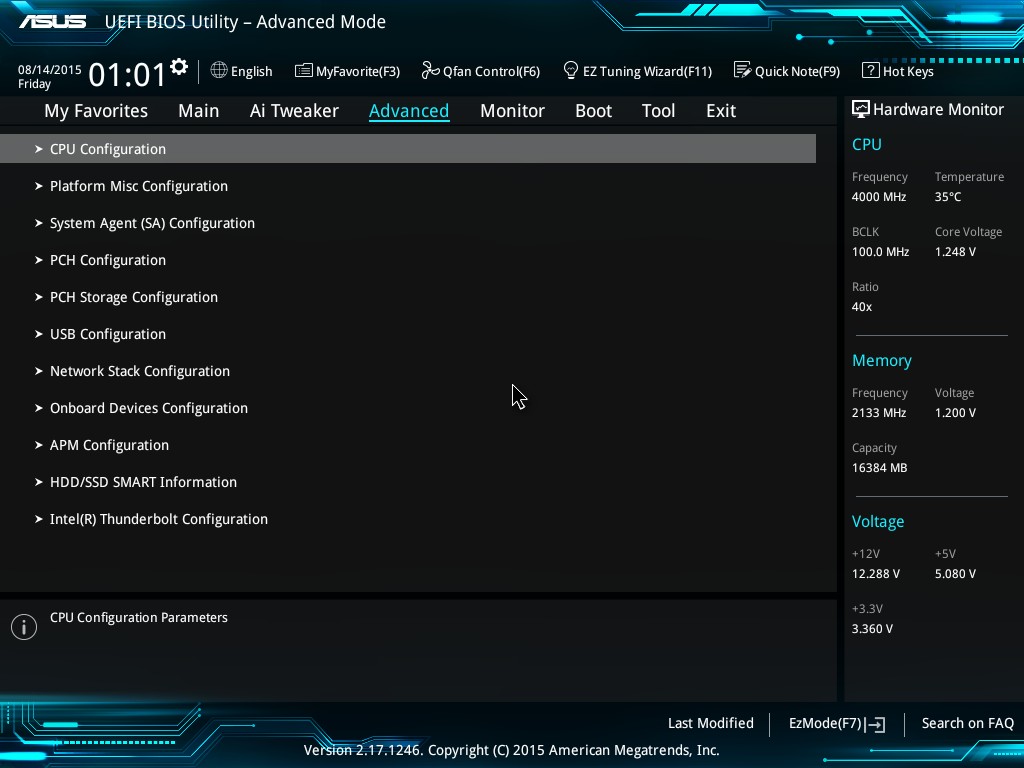
The Advanced Menu is also similar to previous models, with standard options for CPU core enabling, hyperthreading, SATA configurations, RAID, per-port USB control and the Onboard Devices Menu for per-controller adjustments.
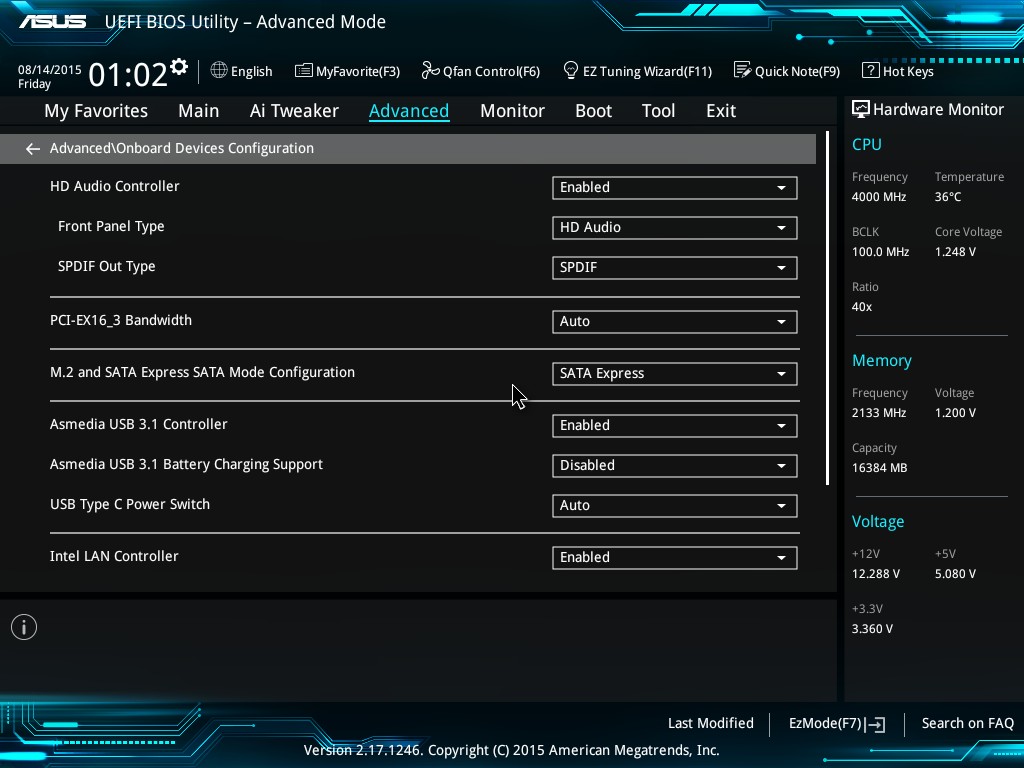
For users wanting to enable SATA M.2 drives, or SATA Express, this Onboard Devices menu will be the place to come to ensure full-bandwidth is being required. For users wanting to implement any U.2 drives via an M.2 Hyper Kit, the PCH Storage Configuration Menu has the option to enable it:
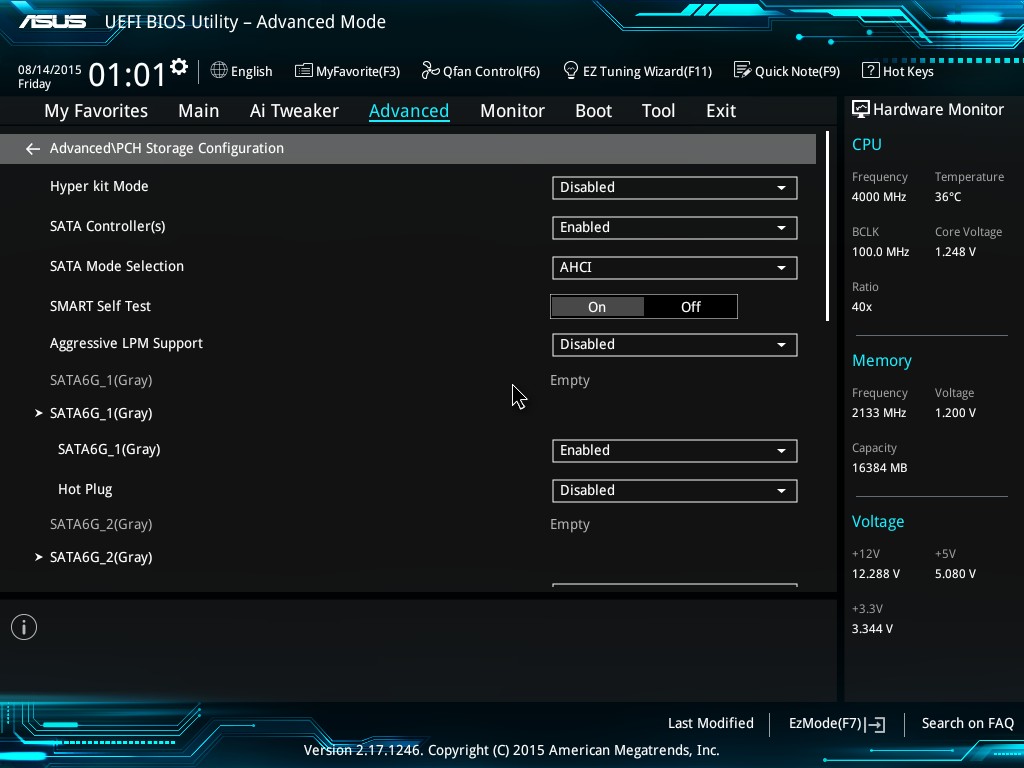
This will also give another menu to enable NVMe.
ASUS has also added a HDD/SSD SMART reader, showing information on read errors and power cycles:

The Monitor tab at the top is for menu adjustments of the temperature sensors and fan controls. Again, this has been carried over from previous platforms.

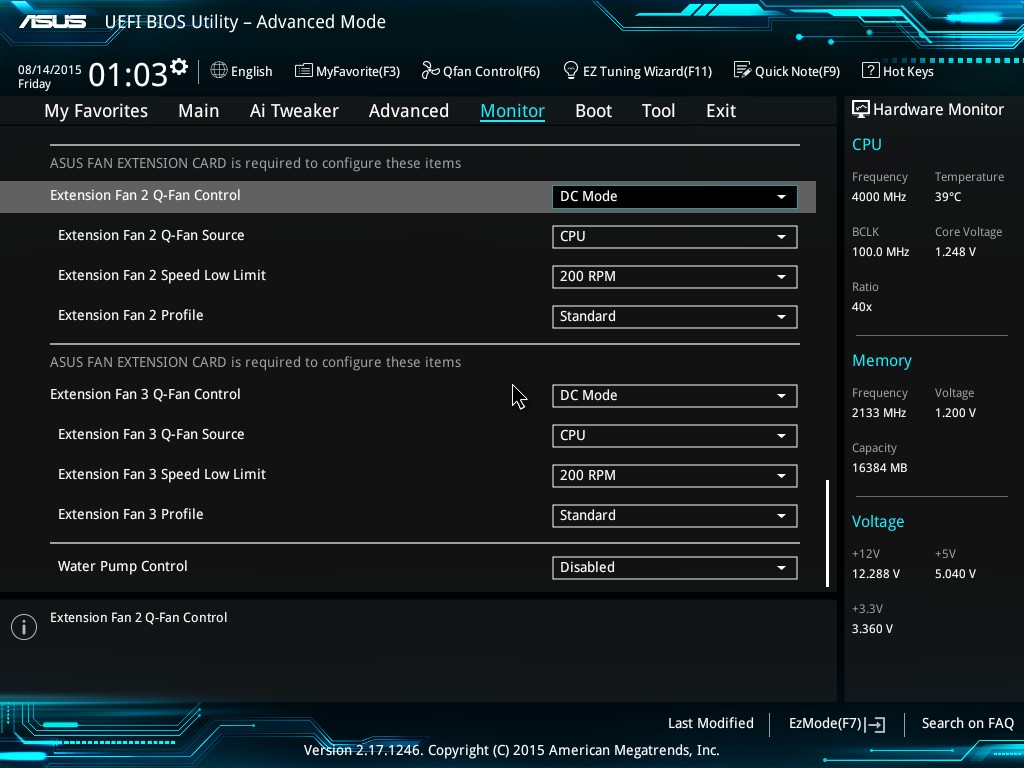
If a FAN_EXT card is equipped to the board, these can be adjusted here also.
ASUS has made some small changes to the Tools menu:
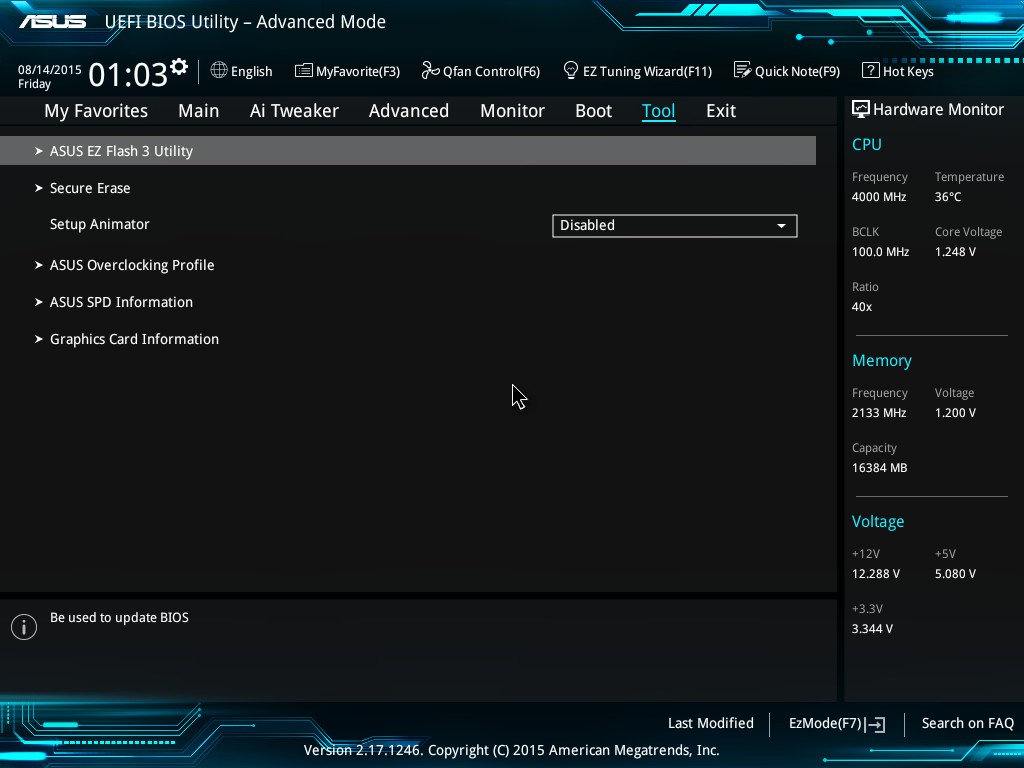
Secure Erase has now moved to the channel motherboards having previously been an ASUS ROG-only option before. The EZ Flash 3 utility gets an update as well, enabling instant updates through a network connection to the latest BIOS versions.


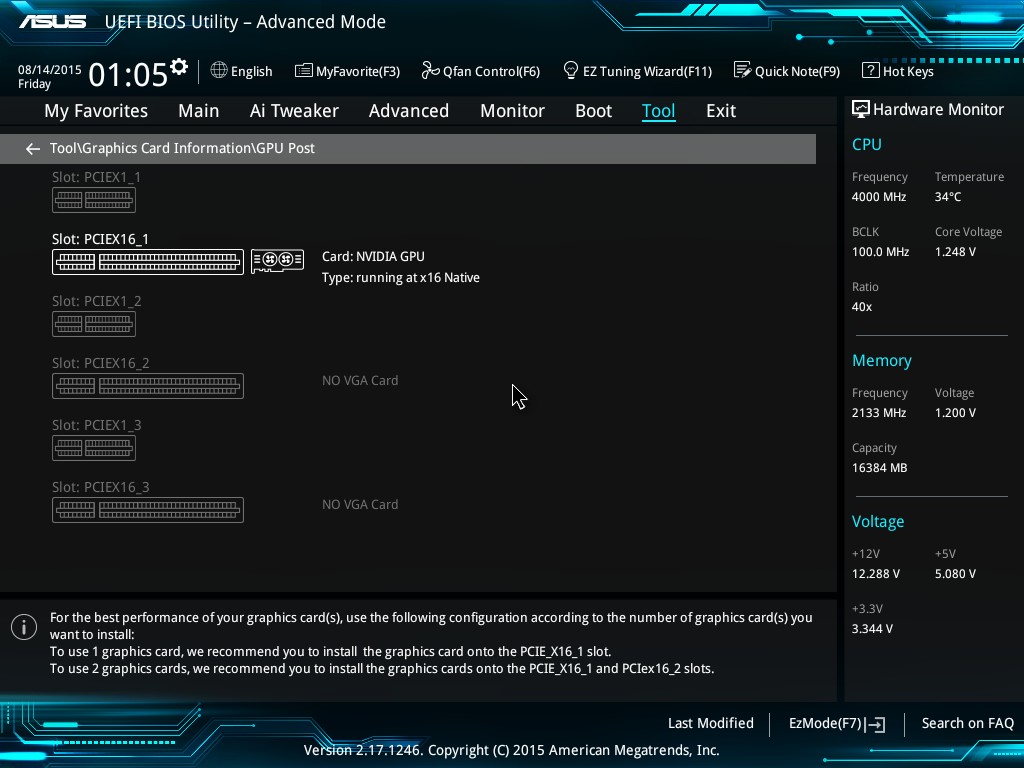
Elsewhere in the Tools menu we have GPU Post which can give a direct breakdown of the PCIe devices installed in the system.
We are still missing a form of a ‘Board Explorer’ we see on MSI and ASRock motherboards that shows exactly what is detected at POST and what is not, which means that ASUS’ detection tools are more spread out than the others.


ASUS Z170-A Software
The software package from ASUS is also part of the evolutionary process from chipset to chipset, and over the years AI Suite has come forward in attempting to be the all-in-one access tool featuring ASUS’ sub-applications. The base of AI Suite revolves around the 5-Way Optimization panel, offering overclock, power, fan, turbo and digital power management alongside an adaptive auto-overclocking functionality. The sub-menus contain other features, such as fast charging, BIOS Flashback and newer tools.
Boot Setting
However we start with one tool that sits outside AI Suite: ASUS’ Boot Setting.
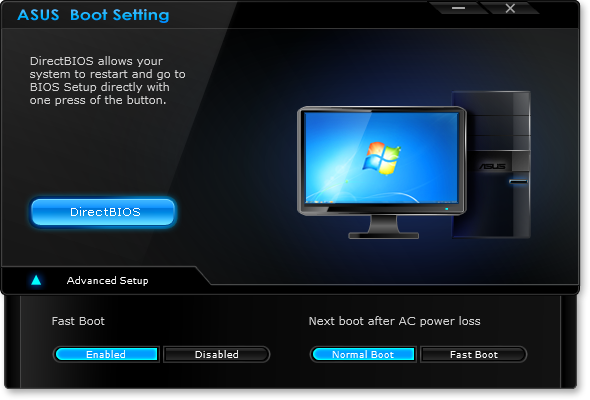
For overclock testing, this is actually a nice little tool as it allows one click restart and entry into the BIOS settings. It is also useful for systems that implement UEFI Fast Boot technology that skips the BIOS entry routine on startup. Boot Setting also gives options around Fast Boot enabling as well in an attempt to improve non-UEFI POST times.
Turbo LAN
Network management software, or the ability to configure and prioritize network traffic, has been a stable of the software package on most motherboards for a couple of years. Solutions tend to include Realtek’s own, Killer’s own, licensed cFos software or home-brew applications on top of open APIs. For the ASUS Z170-A we get a custom interface from ASUS on top of the cFos package.
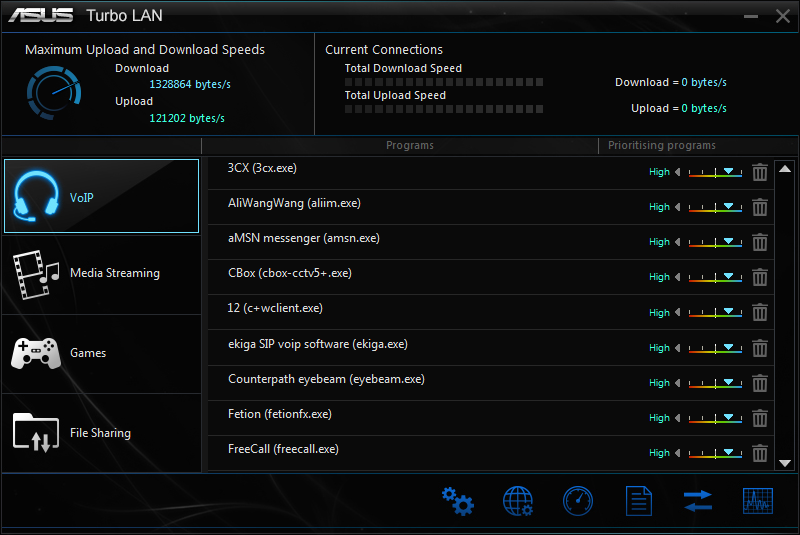
The simple menu allows the user to select a predefined priority list on the left or individual priority on the right.
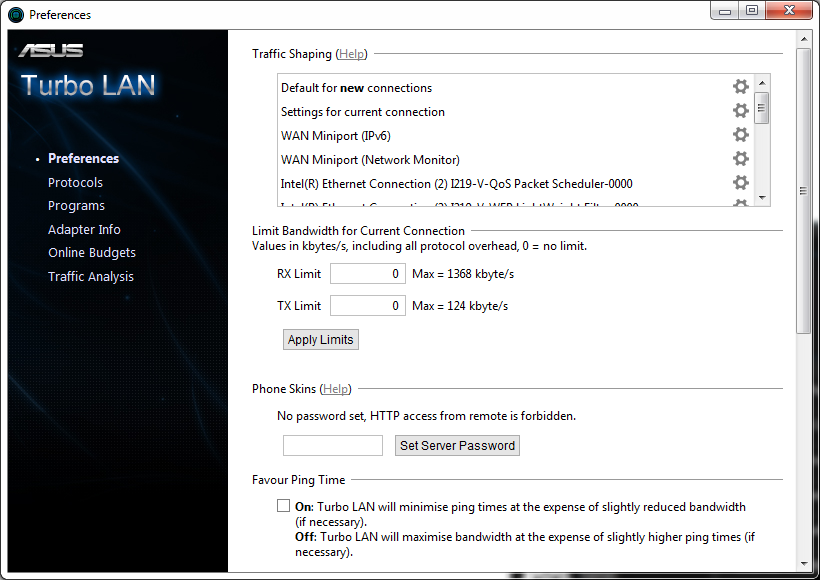
The advanced menus open up the options for experienced users.
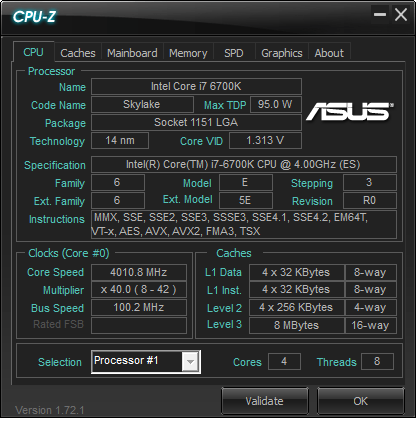
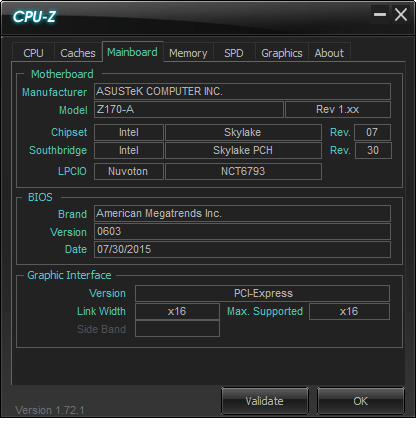
ASUS CPU-Z
For computing enthusiasts and overclockers, the CPU-Z tool is often used as a quick identification tool to find out what is happening under the hood as well as processor validation. The software is third party, but allows licenses for customization, which is what we get here.
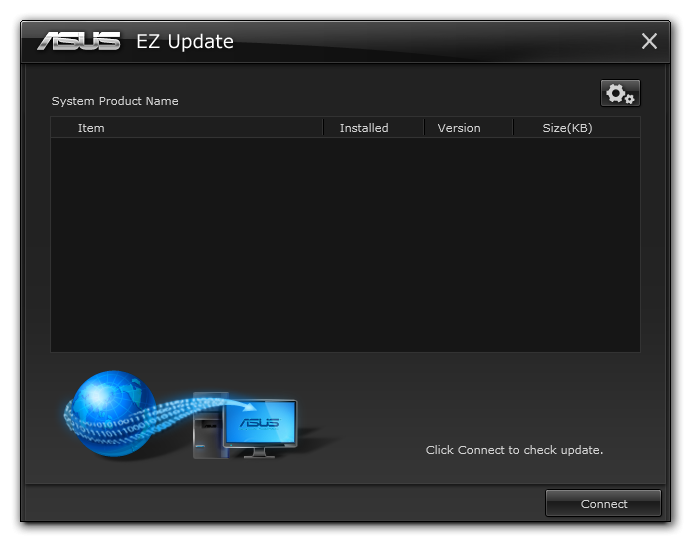
EZ Update
The update manager straddles being a separate tool and being part of AI Suite, but falls far from MSI’s implementation. ASUS has been using this tool for over two years now, and it still has not once worked for me. But the idea is that it identifies the system, probes ASUS’ servers for driver/software updates, and then asks the user if they want to update them.
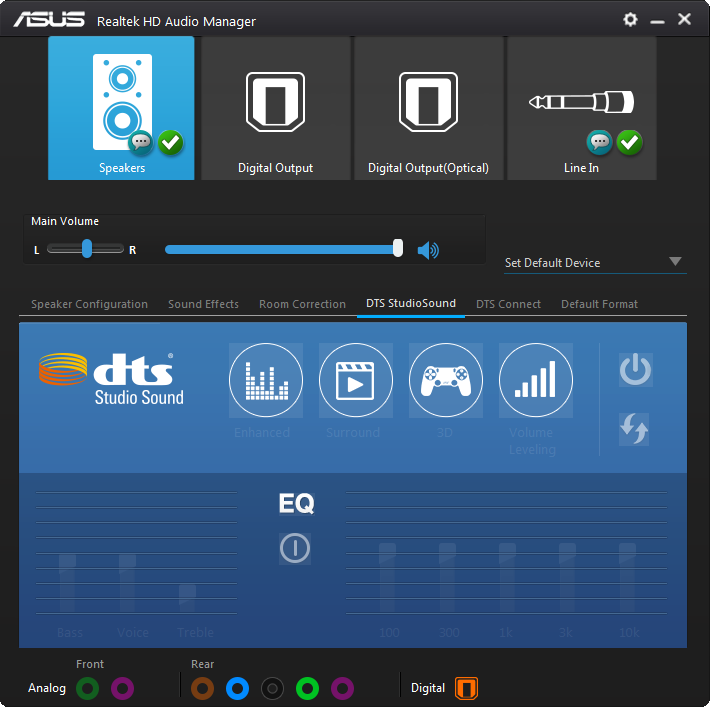
Realtek HD Audio Manager
Similar to CPU-Z and cFos, the company that makes 90%+ of all home-built PC audio codecs Realtek provides licences for customized software for audio control. In this case, ASUS has modified the look slightly and also added in features around DTS support.
AI Suite
The big meat of the software package is in AI Suite.
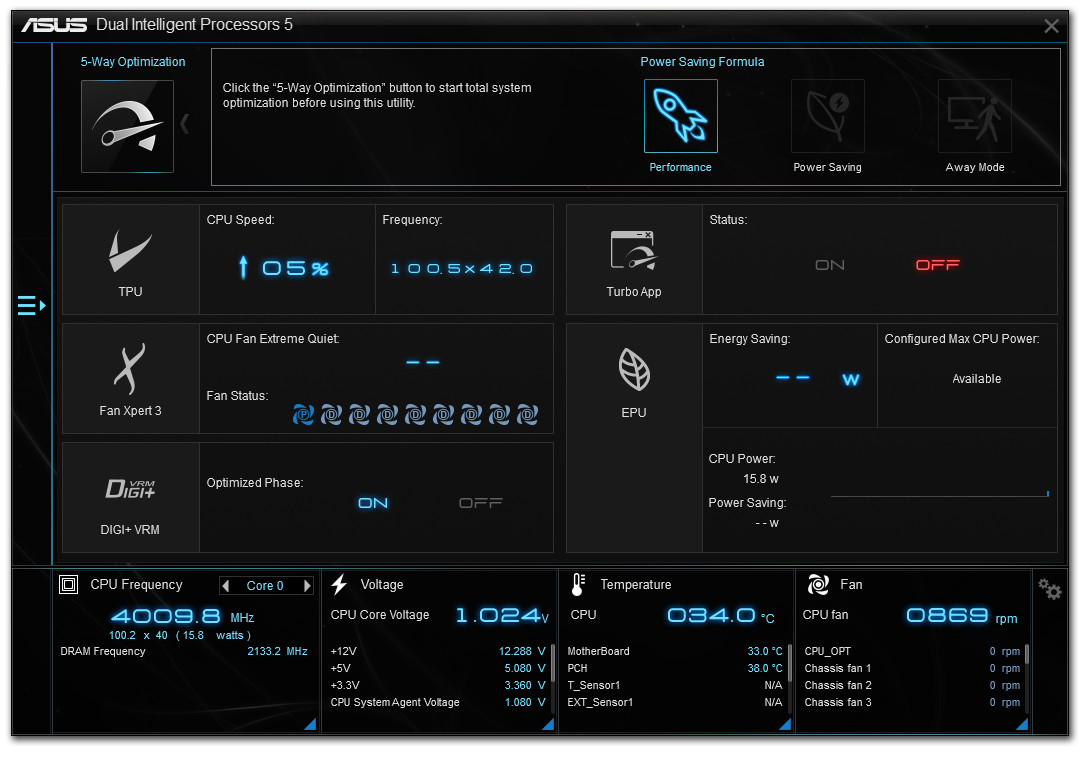
The main entry screen gives the aforementioned 5-Way Optimization apps: TPU (overclocking), Fan Xpert 3, DIGI VRM, Turbo App and the EPU (energy saving). Underneath this shows the values of the various probes on the motherboard, from frequency to voltage, temperature and fan speeds.
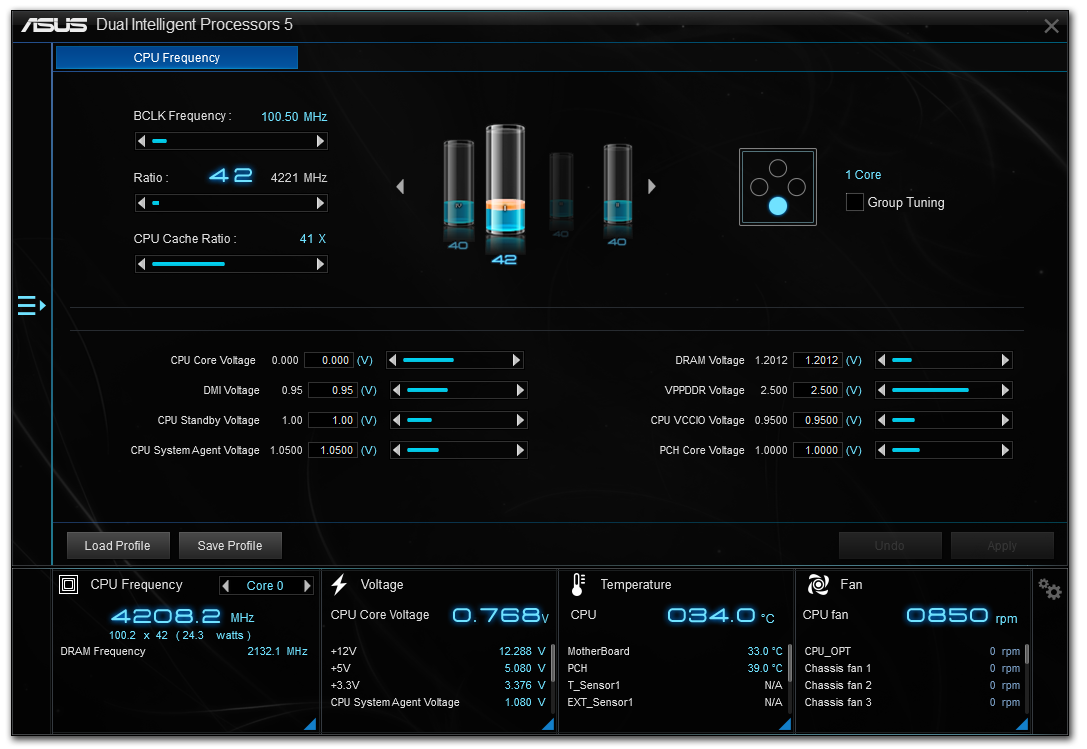
The TPU menu for overclocking allows all-core and per-core selections of the main processor, adjustments for the CPU cache ratios and also the variety of voltage options. It’s worth noting that in the past ASUS used to have a better visual representation of this, but for some reason it has regressed back.
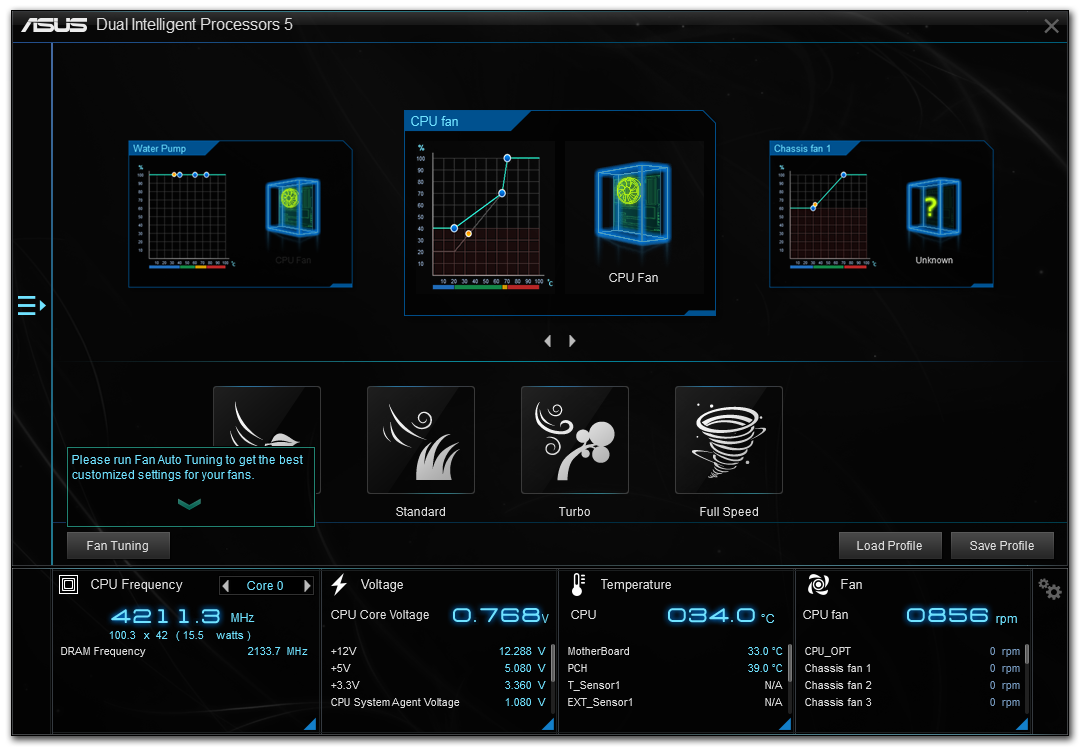
The Fan Xpert menu allows for an instant selection of all-fan profiles, a per-fan profile customization, or an automatic fan tuning guide.
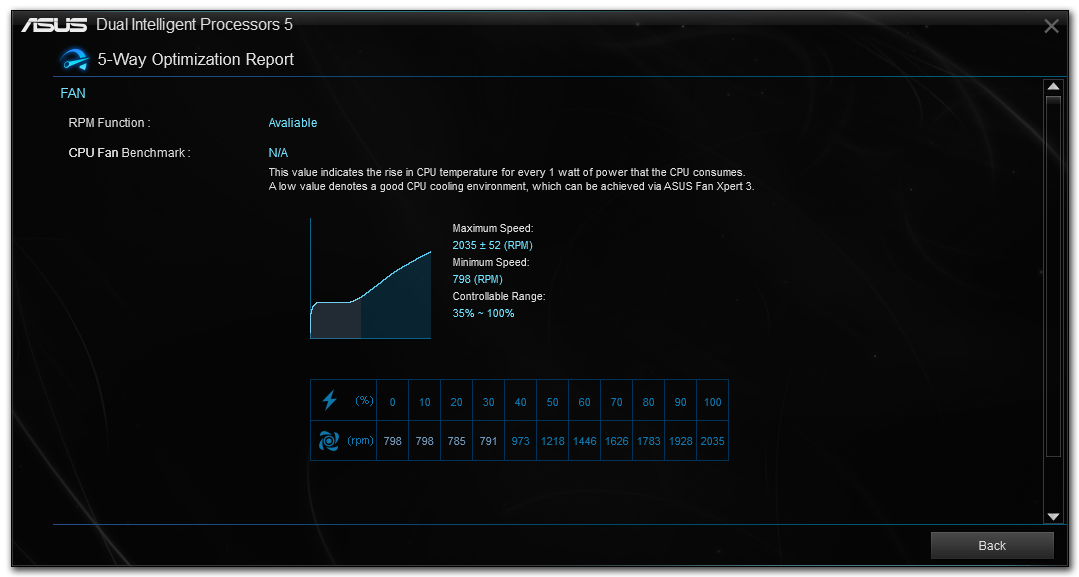
Here is the result from my CPU fan tuning, showing that the fan RPM response to power is non-linear. Some motherboard manufacturers still don’t get this concept, unfortunately, but ASUS gets it right.

The digital power configuration menu allows for the adjustment of load-line calibration, switching frequencies and duty controls. It is typically more extreme overclockers that will have to adjust these.
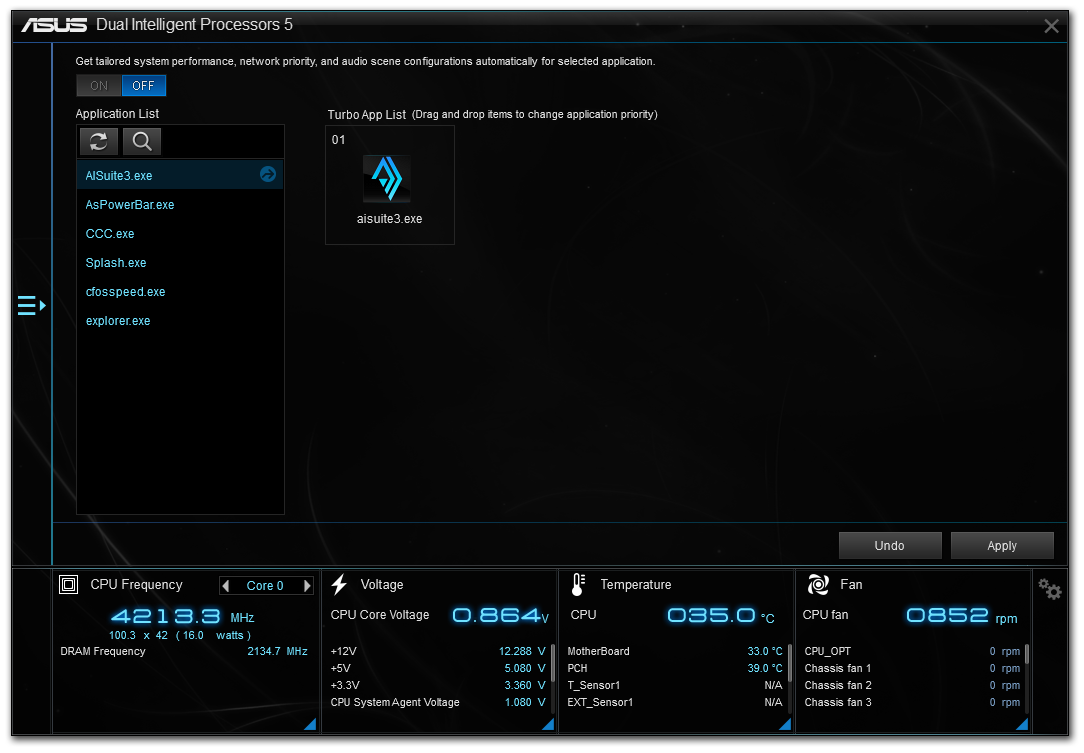
The Turbo App module allows a set of programs to run with associated overclocks. They are ordered in priority, so the program with the highest priority will have the overclocks associated with it enforced. This software is primarily here for users that have programs that take advantage of single thread speed, or when the system needs to go into a low power/underclock state.

In a similar vein, the EPU (energy processing unit) menu options allow the user to configure the system to work within certain power profiles at given times.
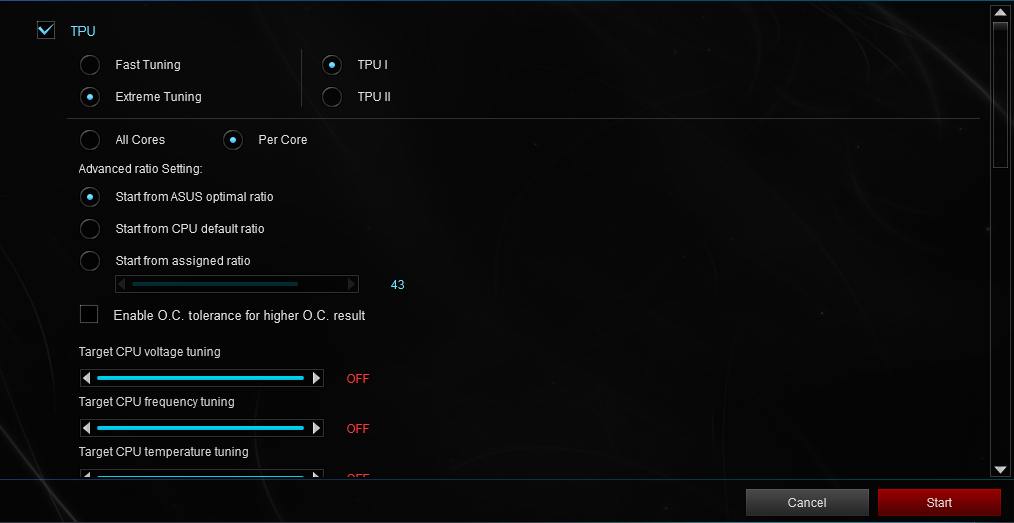
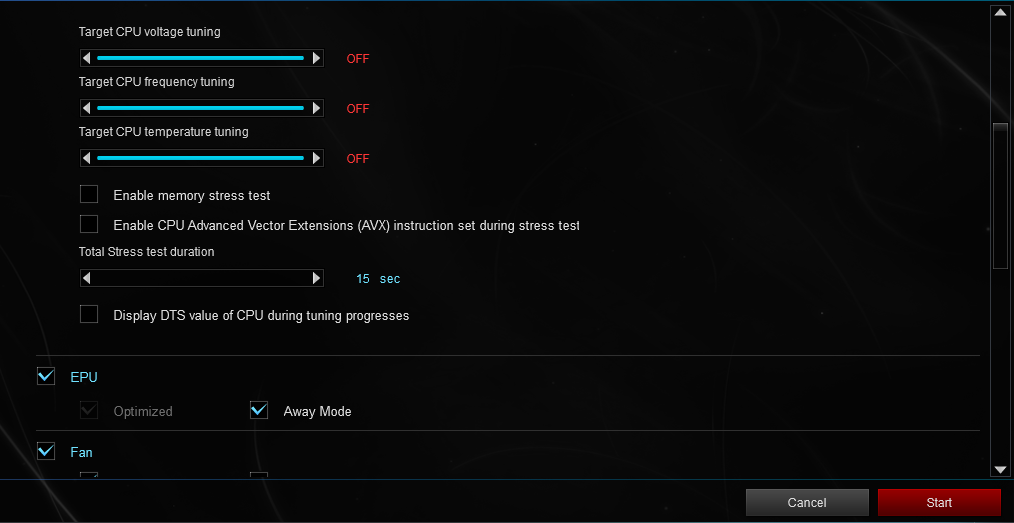
As part of the 5WO interface, the automatic overclocking options from ASUS are some of the best on the market. Here we get an option to apply base TPU settings or configure an overclocking test routine. We can make the software slowly move through the CPU multipliers with extreme tests lasting from 5 seconds to an hour, mark target voltages and temperatures, and the latest version of the software even includes an extreme stress test mode that uses a portion of the ROG RealBench workload to really knock the beans out of an overclocked processor.
Free Space
One of the new features with ASUS’ Z170 software package is the Free Space utility. It does what it says on the tin:
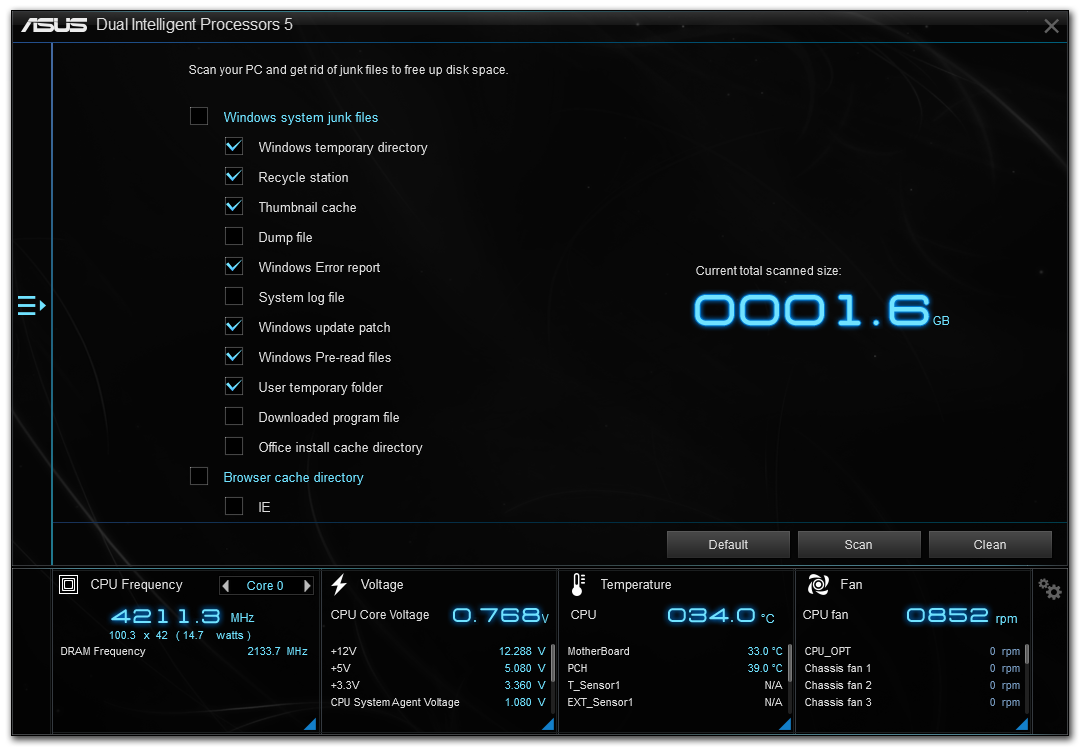
As a first iteration ASUS has got most of the basics down pat for a space removal tool. I typically use a software tool called CCleaner to do this, and it has a metric ton of options as well as letting the user look at the files to be removed before they are done so. This becomes important when we’re dealing with cookies or per-site details on the various web browsers being used.
Other software in AI Suite we have covered in previous reviews:
- AI Charger: Allows quick charging on BC1.1 compliant devices on certain USB ports.
- USB 3.1 Boost: For suitable devices, implements a newer USB protocol to improve USB 3.0 and USB 3.1 speed.
- System Information: Breakdown of the hardware specifications for motherboard, CPU and DRAM.
- USB BIOS Flashback: Prepare a USB with a BIOS for updating, or save the current BIOS.


System Performance
Not all motherboards are created equal. On the face of it, they should all perform the same and differ only in the functionality they provide - however this is not the case. The obvious pointers are power consumption, but also the ability for the manufacturer to optimize USB speed, audio quality (based on audio codec), POST time and latency. This can come down to manufacturing process and prowess, so these are tested.
Power Consumption
Power consumption was tested on the system while in a single MSI GTX 770 Lightning GPU configuration with a wall meter connected to the OCZ 1250W power supply. This power supply is Gold rated, and as I am in the UK on a 230-240 V supply, leads to ~75% efficiency > 50W, and 90%+ efficiency at 250W, suitable for both idle and multi-GPU loading. This method of power reading allows us to compare the power management of the UEFI and the board to supply components with power under load, and includes typical PSU losses due to efficiency. These are the real world values that consumers may expect from a typical system (minus the monitor) using this motherboard.
While this method for power measurement may not be ideal, and you feel these numbers are not representative due to the high wattage power supply being used (we use the same PSU to remain consistent over a series of reviews, and the fact that some boards on our test bed get tested with three or four high powered GPUs), the important point to take away is the relationship between the numbers. These boards are all under the same conditions, and thus the differences between them should be easy to spot.
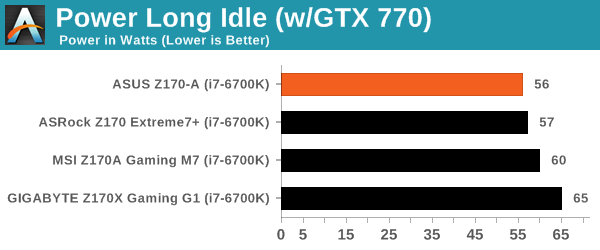
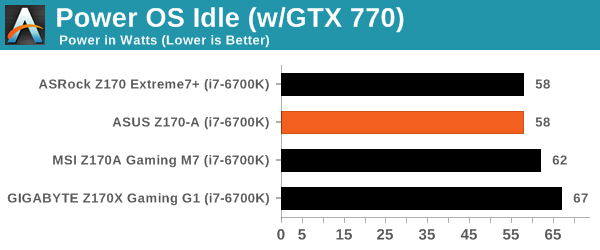
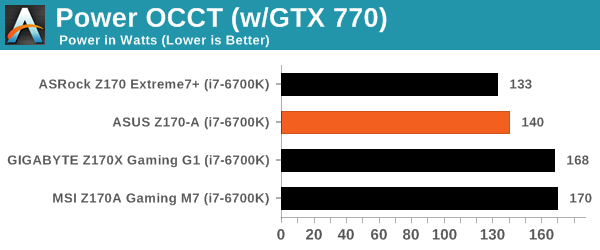
The power profile of the ASUS Z170-A when idle and loaded does well, but it is worth noting here that with these motherboards, those that implement a form of MultiCore Turbo on the K series processors also seem to increase the voltage, especially at load.
Non UEFI POST Time
Different motherboards have different POST sequences before an operating system is initialized. A lot of this is dependent on the board itself, and POST boot time is determined by the controllers on board (and the sequence of how those extras are organized). As part of our testing, we look at the POST Boot Time using a stopwatch. This is the time from pressing the ON button on the computer to when Windows 7 starts loading. (We discount Windows loading as it is highly variable given Windows specific features.)
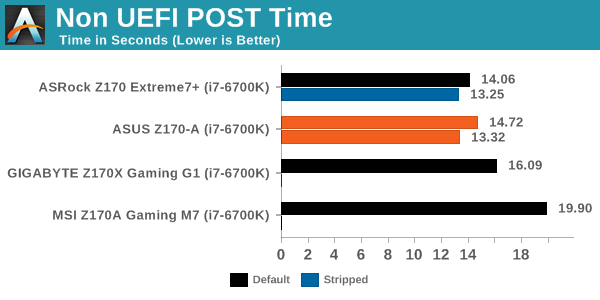
We're still in the early days for non-UEFI POST time optimization, but at this point in testing a sub-15 second result seems to be what to aim for.
Rightmark Audio Analyzer 6.2.5
Rightmark:AA indicates how well the sound system is built and isolated from electrical interference (either internally or externally). For this test we connect the Line Out to the Line In using a short six inch 3.5mm to 3.5mm high-quality jack, turn the OS speaker volume to 100%, and run the Rightmark default test suite at 192 kHz, 24-bit. The OS is tuned to 192 kHz/24-bit input and output, and the Line-In volume is adjusted until we have the best RMAA value in the mini-pretest. We look specifically at the Dynamic Range of the audio codec used on board, as well as the Total Harmonic Distortion + Noise.
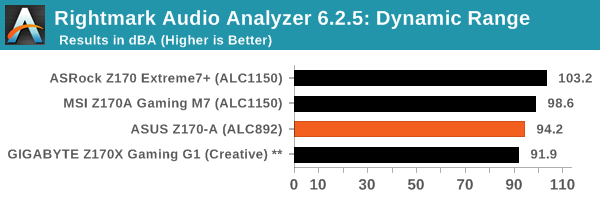
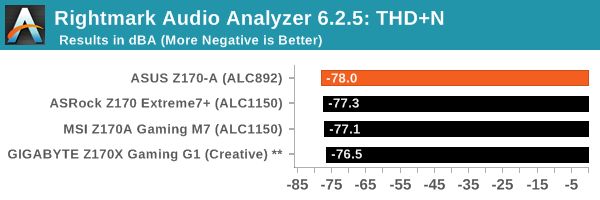
ASUS' use of the ALC892 naturally gives it an SNR disadvantage for dynamic range, but we see it do well in the distortion plus noise test.
USB Backup
For this benchmark, we transfer a set size of files from the SSD to the USB drive using DiskBench, which monitors the time taken to transfer. The files transferred are a 1.52 GB set of 2867 files across 320 folders – 95% of these files are small typical website files, and the rest (90% of the size) are small 30 second HD videos. In an update to pre-Z87 testing, we also run MaxCPU to load up one of the threads during the test which improves general performance up to 15% by causing all the internal pathways to run at full speed.
Due to the introduction of USB 3.1, as of June 2015 we are adjusting our test to use a dual mSATA USB 3.1 Type-C device which should be capable of saturating both USB 3.0 and USB 3.1 connections. We still use the same data set as before, but now use the new device. Results are shown as seconds taken to complete the data transfer.
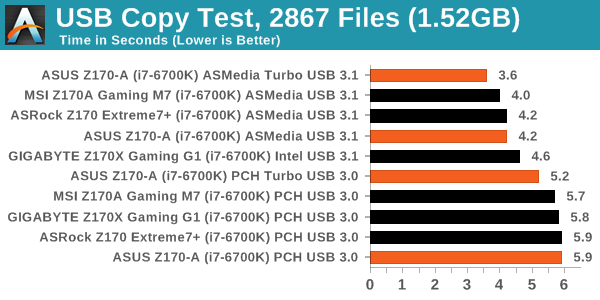
ASUS' use of Turbo drivers puts it at the top of the list for USB 3.0 and USB 3.1, although the stock speeds fall near the bottom in our small sample.
DPC Latency
Deferred Procedure Call latency is a way in which Windows handles interrupt servicing. In order to wait for a processor to acknowledge the request, the system will queue all interrupt requests by priority. Critical interrupts will be handled as soon as possible, whereas lesser priority requests such as audio will be further down the line. If the audio device requires data, it will have to wait until the request is processed before the buffer is filled.
If the device drivers of higher priority components in a system are poorly implemented, this can cause delays in request scheduling and process time. This can lead to an empty audio buffer and characteristic audible pauses, pops and clicks. The DPC latency checker measures how much time is taken processing DPCs from driver invocation. The lower the value will result in better audio transfer at smaller buffer sizes. Results are measured in microseconds.
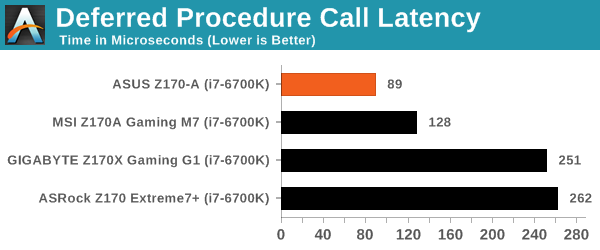
DPC is still something that needs to be optimized for, and we're still early in the lifespan of the 100-series motherboards so we would expect this to improve over time. Nonetheless, the ASUS has scored best so far.
CPU Performance
For our motherboard reviews, we use our short form testing method. These tests usually focus on if a motherboard is using MultiCore Turbo (the feature used to have maximum turbo on at all times, giving a frequency advantage), or if there are slight gains to be had from tweaking the firmware. We leave the BIOS settings at default and memory at JEDEC (DDR4-2133 C15) for these tests, making it very easy to see which motherboards have MCT enabled by default.
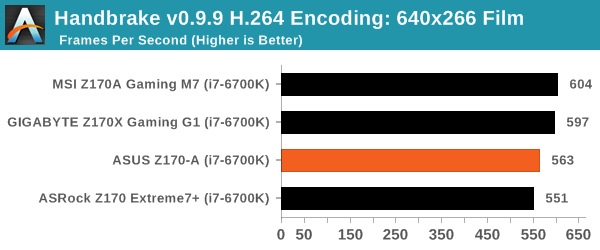
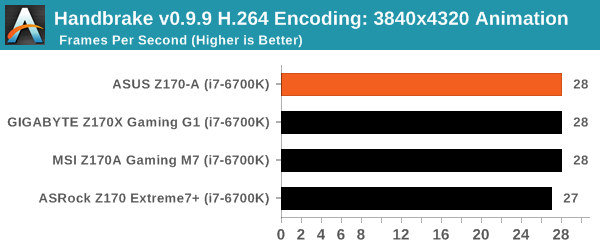
Video Conversion – Handbrake v0.9.9: link
Handbrake is a media conversion tool that was initially designed to help DVD ISOs and Video CDs into more common video formats. The principle today is still the same, primarily as an output for H.264 + AAC/MP3 audio within an MKV container. In our test we use the same videos as in the Xilisoft test, and results are given in frames per second.
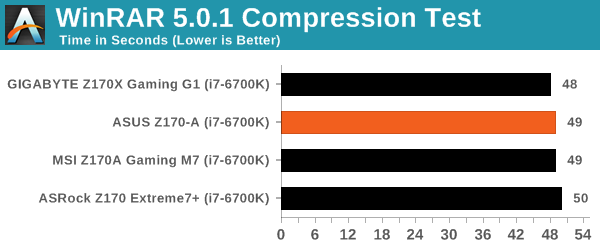
Compression – WinRAR 5.0.1: link
Our WinRAR test from 2013 is updated to the latest version of WinRAR at the start of 2014. We compress a set of 2867 files across 320 folders totaling 1.52 GB in size – 95% of these files are small typical website files, and the rest (90% of the size) are small 30 second 720p videos.
Point Calculations – 3D Movement Algorithm Test: link
3DPM is a self-penned benchmark, taking basic 3D movement algorithms used in Brownian Motion simulations and testing them for speed. High floating point performance, MHz and IPC wins in the single thread version, whereas the multithread version has to handle the threads and loves more cores. For a brief explanation of the platform agnostic coding behind this benchmark, see my forum post here.
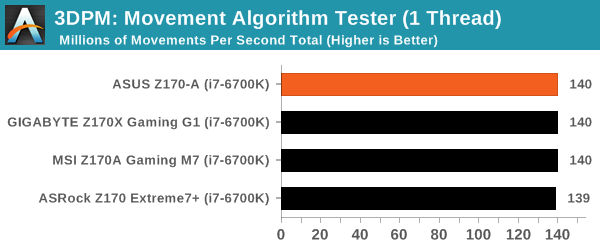
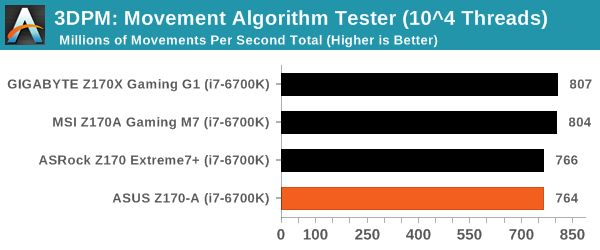
The lack of MultiCore Turbo with our K processor on the Z170-A means that during the mulithreaded test it runs at a lower frequency with the system on default, giving a slight disadvantage in performance (but advantage in power as we saw in the previous page).
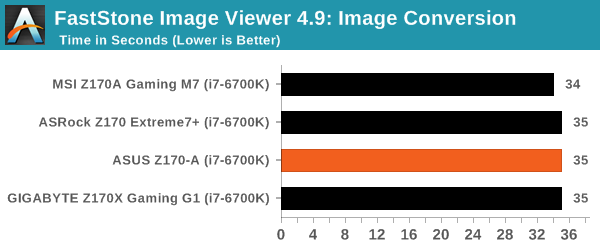
Image Manipulation – FastStone Image Viewer 4.9: link
Similarly to WinRAR, the FastStone test us updated for 2014 to the latest version. FastStone is the program I use to perform quick or bulk actions on images, such as resizing, adjusting for color and cropping. In our test we take a series of 170 images in various sizes and formats and convert them all into 640x480 .gif files, maintaining the aspect ratio. FastStone does not use multithreading for this test, and thus single threaded performance is often the winner.
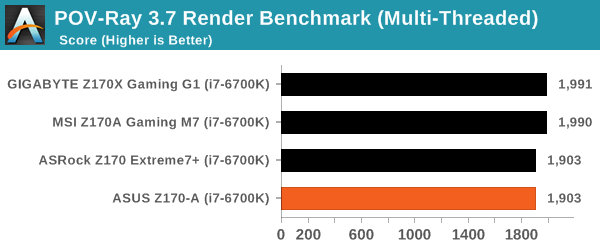
Rendering – PovRay 3.7: link
The Persistence of Vision RayTracer, or PovRay, is a freeware package for as the name suggests, ray tracing. It is a pure renderer, rather than modeling software, but the latest beta version contains a handy benchmark for stressing all processing threads on a platform. We have been using this test in motherboard reviews to test memory stability at various CPU speeds to good effect – if it passes the test, the IMC in the CPU is stable for a given CPU speed. As a CPU test, it runs for approximately 2-3 minutes on high end platforms.
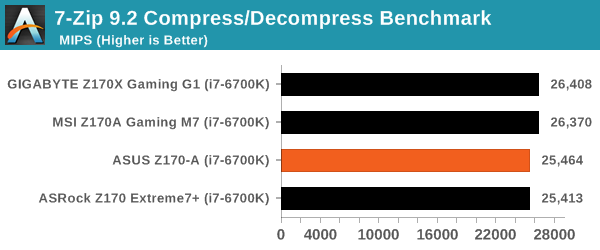
Synthetic – 7-Zip 9.2: link
As an open source compression tool, 7-Zip is a popular tool for making sets of files easier to handle and transfer. The software offers up its own benchmark, to which we report the result.
Gaming Performance 2015
Our 2015 gaming results are still relatively new, but the issue of FCLK settings might play a big role here. At launch, the default setting for the communication buffer between the CPU and PCIe stack was 800 MHz, even though Intel suggested 1000 MHz, but this was because of firmware limitations from Intel. Since then, there is firmware to enable 1000 MHz, and most motherboard manufacturers have this - but it is unclear if the motherboard will default to 1000 MHz and it might vary from BIOS version to BIOS version. As we test at default settings, our numbers are only ever snapshots in time, but it leads to some interesting differences in discrete GPU performance.
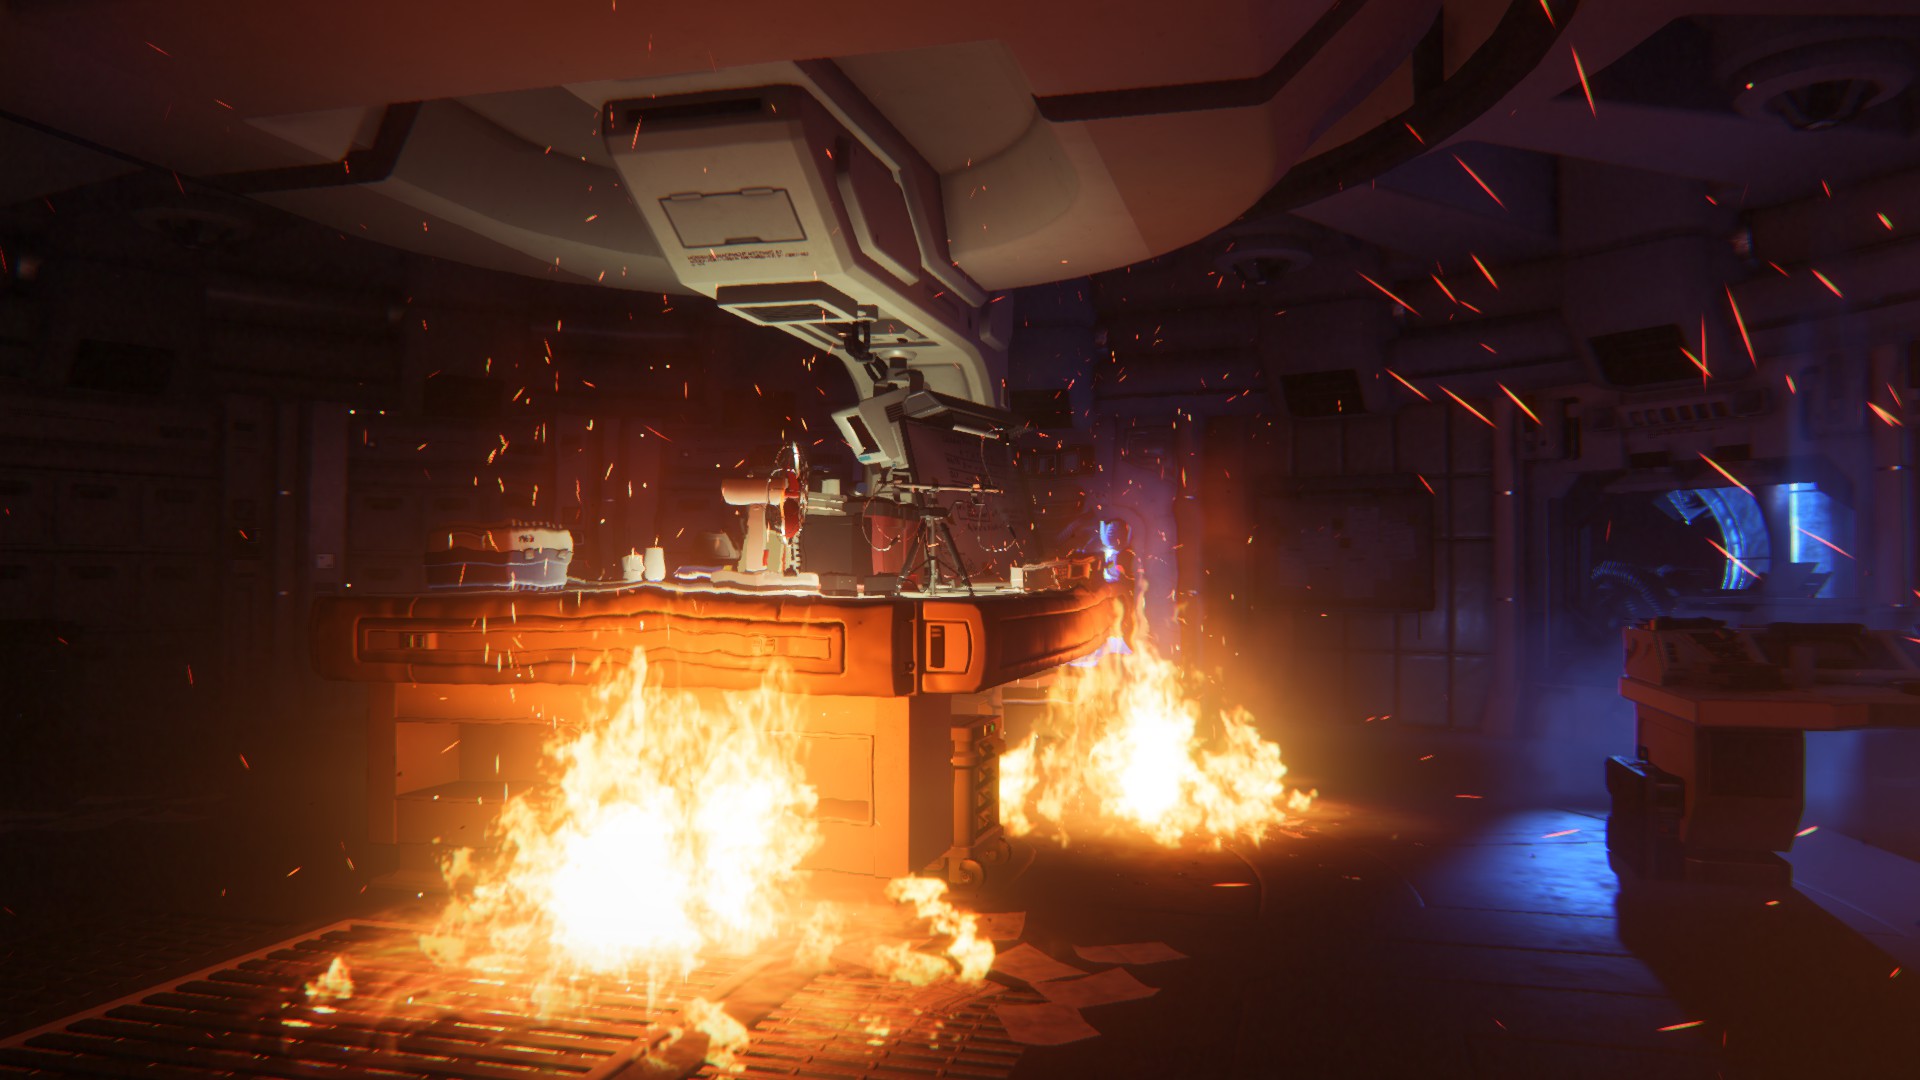
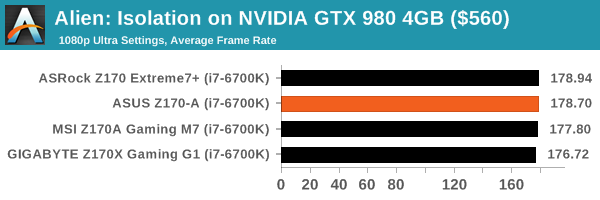
Alien: Isolation
If first person survival mixed with horror is your sort of thing, then Alien: Isolation, based off of the Alien franchise, should be an interesting title. Developed by The Creative Assembly and released in October 2014, Alien: Isolation has won numerous awards from Game Of The Year to several top 10s/25s and Best Horror titles, ratcheting up over a million sales by February 2015. Alien: Isolation uses a custom built engine which includes dynamic sound effects and should be fully multi-core enabled.
For low end graphics, we test at 720p with Ultra settings, whereas for mid and high range graphics we bump this up to 1080p, taking the average frame rate as our marker with a scripted version of the built-in benchmark.


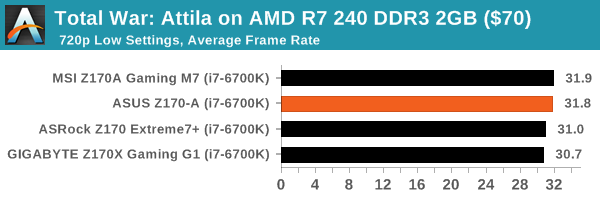
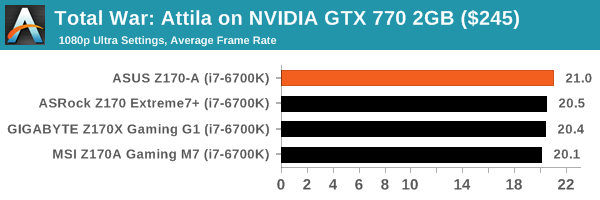
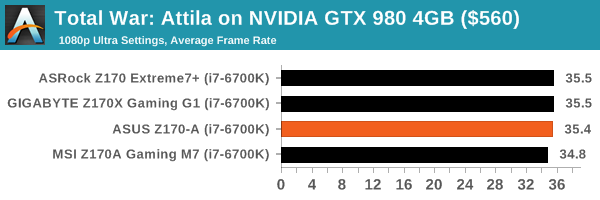
Total War: Attila
The Total War franchise moves on to Attila, another The Creative Assembly development, and is a stand-alone strategy title set in 395AD where the main story line lets the gamer take control of the leader of the Huns in order to conquer parts of the world. Graphically the game can render hundreds/thousands of units on screen at once, all with their individual actions and can put some of the big cards to task.
For low end graphics, we test at 720p with performance settings, recording the average frame rate. With mid and high range graphics, we test at 1080p with the quality setting. In both circumstances, unlimited video memory is enabled and the in-game scripted benchmark is used.

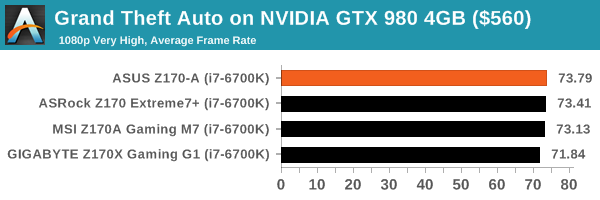
Grand Theft Auto V
The highly anticipated iteration of the Grand Theft Auto franchise finally hit the shelves on April 14th 2015, with both AMD and NVIDIA in tow to help optimize the title. GTA doesn’t provide graphical presets, but opens up the options to users and extends the boundaries by pushing even the hardest systems to the limit using Rockstar’s Advanced Game Engine. Whether the user is flying high in the mountains with long draw distances or dealing with assorted trash in the city, when cranked up to maximum it creates stunning visuals but hard work for both the CPU and the GPU.
For our test we have scripted a version of the in-game benchmark, relying only on the final part which combines a flight scene along with an in-city drive-by followed by a tanker explosion. For low end systems we test at 720p on the lowest settings, whereas mid and high end graphics play at 1080p with very high settings across the board. We record both the average frame rate and the percentage of frames under 60 FPS (16.6ms).


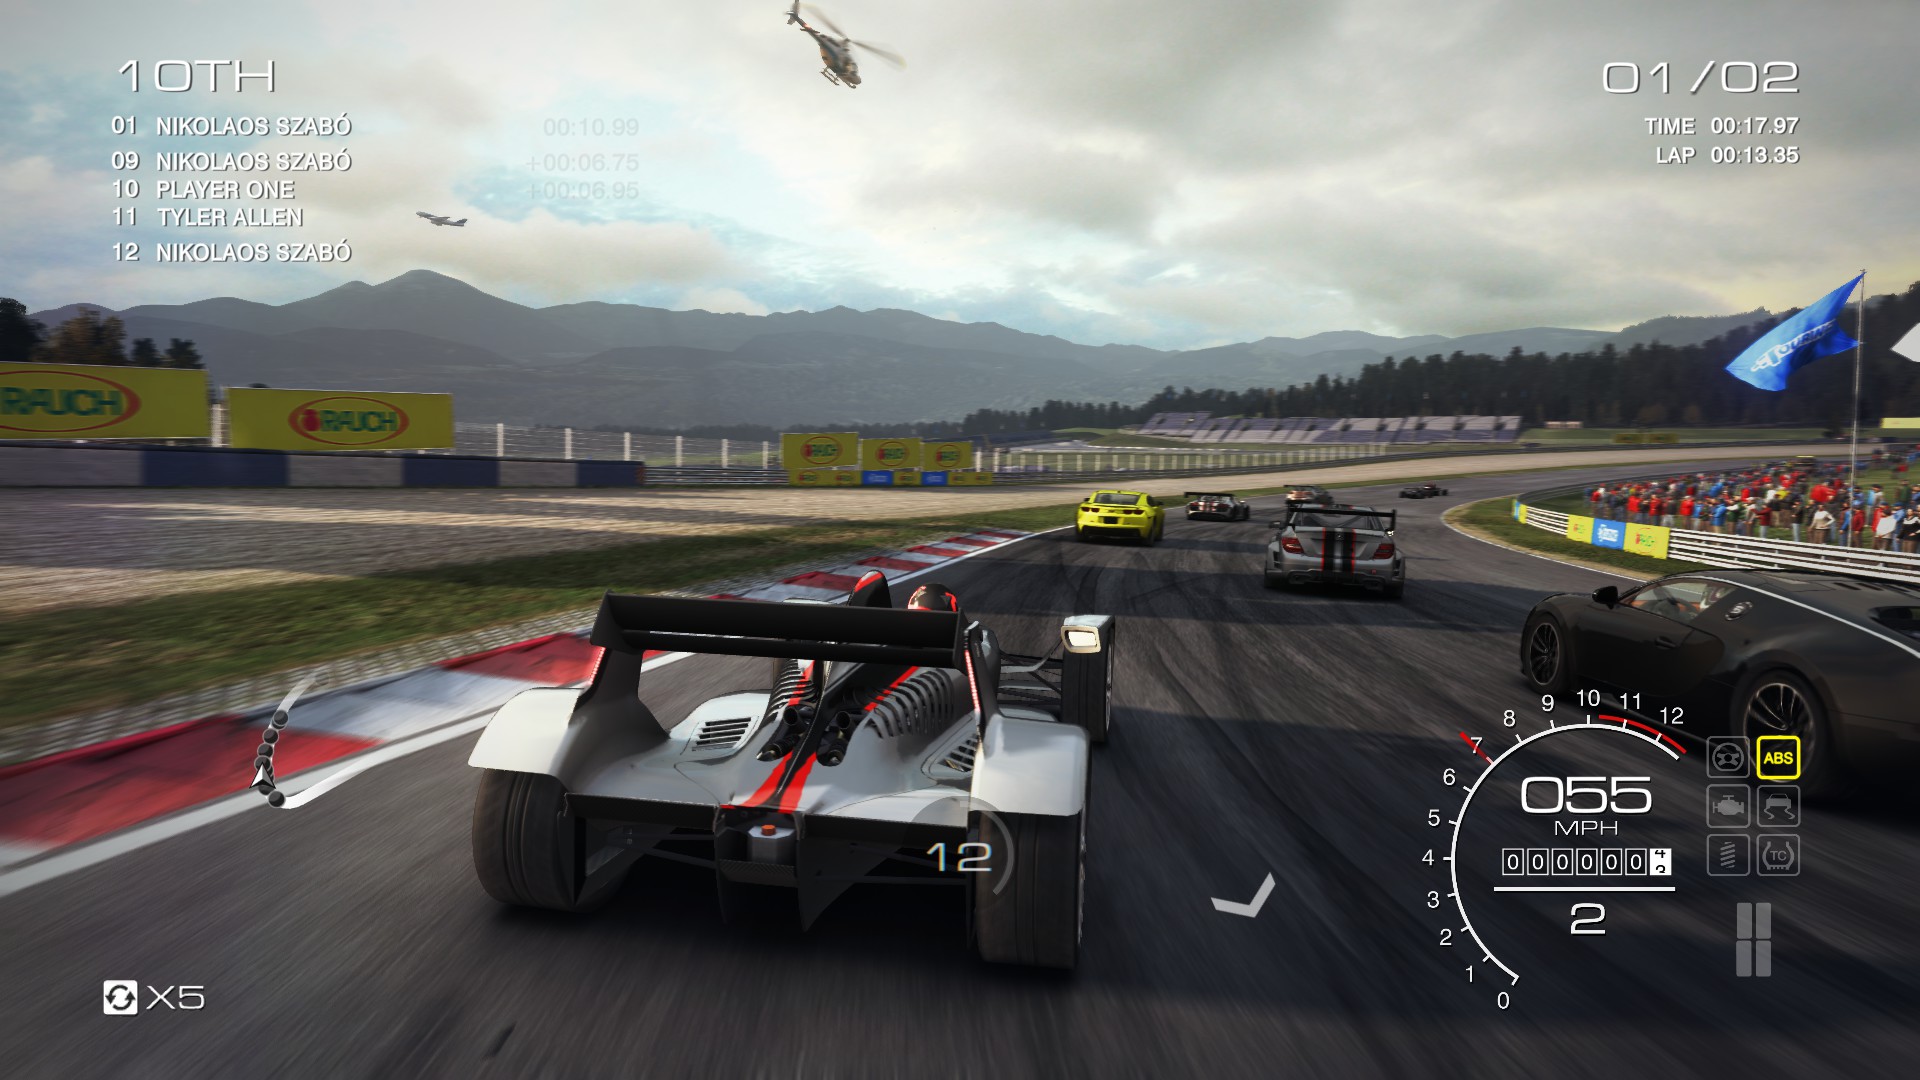
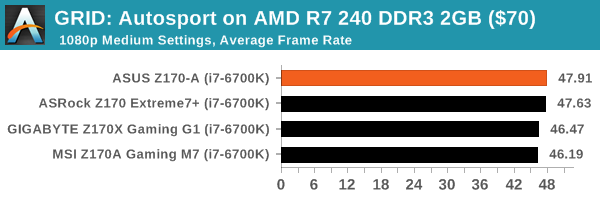
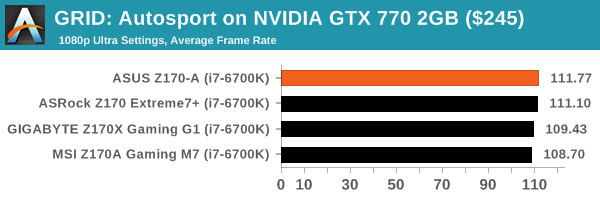
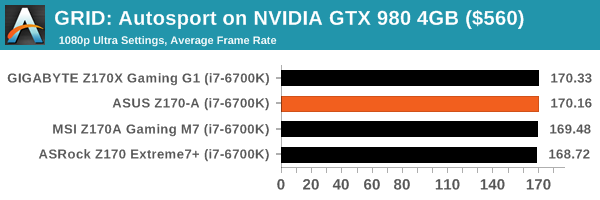
GRID: Autosport
No graphics tests are complete without some input from Codemasters and the EGO engine, which means for this round of testing we point towards GRID: Autosport, the next iteration in the GRID and racing genre. As with our previous racing testing, each update to the engine aims to add in effects, reflections, detail and realism, with Codemasters making ‘authenticity’ a main focal point for this version.
GRID’s benchmark mode is very flexible, and as a result we created a test race using a shortened version of the Red Bull Ring with twelve cars doing two laps. The car is focus starts last and is quite fast, but usually finishes second or third. For low end graphics we test at 1080p medium settings, whereas mid and high end graphics get the full 1080p maximum. Both the average and minimum frame rates are recorded.
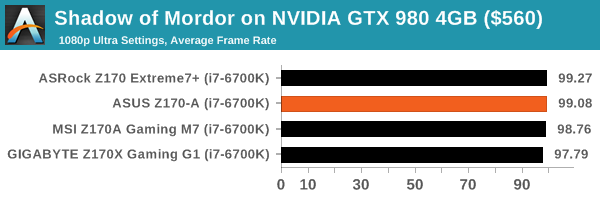
Middle-Earth: Shadows of Mordor
The final title in our testing is another battle of system performance with the open world action-adventure title, Shadows of Mordor. Produced by Monolith using the LithTech Jupiter EX engine and numerous detail add-ons, SoM goes for detail and complexity to a large extent, despite having to be cut down from the original plans. The main story itself was written by the same writer as Red Dead Redemption, and it received Zero Punctuation’s Game of The Year in 2014.
For testing purposes, SoM gives a dynamic screen resolution setting, allowing us to render at high resolutions that are then scaled down to the monitor. As a result, we get several tests using the in-game benchmark. For low end graphics we examine at 720p with low settings, whereas mid and high end graphics get 1080p Ultra. The top graphics test is also redone at 3840x2160, also with Ultra settings, and we also test two cards at 4K where possible.


ASUS Z170-A Conclusion
At the start of this review I discussed the nostalgia elements of the industry. There is a fondness to reminisce about former glory days - personally this means setting up my Commodore 64 with a CRT and playing Mayhem in Monsterland, the Atari ST, getting to grips with DOS before moving up through gaming, building a system from an Athlon and seeing my X1900XT slowly degrade from too many overclocks before pushing my 2600K to 5.3 GHz for an overclocking league. The question is - what motherboards over time invoke these emotions, and what is going to be fondly remembered this generation?
From yesteryear there seems to be a fondness for DFI, a now defunct motherboard manufacturer, who made some hardcore products in garish color schemes. PC builders my age might remember those dual AGP/PCIe boards as the march to SATA occurred. Then who can forget Intel's dual CPU Skulltrail platform, or the EVGA X58 Classified that stormed the extreme overclocking charts? Will there be anything here today that is remembered in a similar light? What do all these boards have in common?
Perhaps a nod to nostalgia in this segment is not a consideration - no motherboard manufacturer goes out of their way to design a generational icon, just because it doesn't make financial sense in this industry. They have to attack high volume, high margin markets and provide better user experience in their market than the competition. Very few manufacturers try something off-the-wall because the industry requires a clinical approach. It makes for a very high base standard in a way that is different from how Apple designs smartphones - while aesthetics have become more important (especially in gaming builds) over the last two generations, the point of differentiation between manufactures hides in the build components and quality (which for most purposes has a passive effect) or the actual functionality (active effect), software and box contents.
When it comes to what we call the 'channel' line of motherboards, there is no impetus to go bold. The motherboard has to work, has to have the features, and not look like a brown or green potato. In the past, this felt like a high barrier that some failed to hit, but in 2015 it is now the base on which all motherboards must spring. From our tour at ASUS' headquarters and other motherboard HQs over the years, it is clear that motherboard manufacturers are recognizing that good build quality, value and function helps define the core of their brand.
This brings us back to the actual topic of this review, the ASUS Z170-A. As a functional tool, it aims to have at least one of everything for the modern chipset except Thunderbolt, so this means an M.2 slot running at PCIe 3.0 x4, USB 3.1-A at 10 Gbps, USB 3.1-C at 10 Gbps, Intel I219-V networking and SATAe. In the background is a Pro-Clock IC to extend the Base clock range, a TPU to improve automatic overclock control, an Auto-XMP switch to enable a memory extreme profile and a T-Topology memory design usually reserved for the high end platforms.
The Z170-A has a clean look which some will appreciate, as well as audio-side LEDs that can be enabled. Functionally, this board was used for this review and some of our other Skylake testing with few issues. Despite the fact that multicore turbo is not enabled by default, the latest BIOSes enable FCLK control and the automatic overclock engine gives 4.8 GHz without any issues. The Z170-A also scores well in our system benchmarks, particularly DPC Latency and USB speed when Turbo mode is enabled in AI Suite. The BIOS and software receive their respective updates for the new generation as well.
There are a number of motherboards floating in this $160-$170 price bracket, giving the ASUS Z170-A a good amount of competition. The main differences will be in exact implementation - another board might use an ALC1150/ALC898 audio codec over the ALC892, or dual M.2, or dual networking, or gaming branded technology, or come with a font USB 3.1 panel, often in exchange for a different feature elsewhere. From our testing, the ASUS Z170-A might never be a nostalgic icon, and there are a few things still to work on (namely update software) but it is well worth looking into for the price point given the feature-set, BIOS and software tools.
| ASUS Z170-A | |
| Warranty Period | 3 Years |
| Product Page | Link |
| Price | Amazon US Newegg |
| Size | ATX |
| CPU Interface | LGA1151 |
| Chipset | Intel Z170 |
| Memory Slots (DDR4) | Four DDR4, Supporting 64GB, Dual Channel, Up to 3466 MHz |
| Memory Slots (DDR3L) | None |
| Video Outputs | HDMI DisplayPort DVI-D D-Sub |
| Network Connectivity | Intel I219-V |
| Onboard Audio | Realtek ALC892 |
| PCIe Slots for Graphics (from CPU) | 2 x PCIe 3.0 (x16, x8/x8) |
| PCIe Slots for Other (from PCH) | 1 x PCIe 3.0 x4 3 x PCIe 3.0 x1 1 x PCI |
| Onboard SATA | 6 x SATA 6 Gbps, RAID 0/1/5/10 |
| Onboard SATA Express | One |
| Onboard M.2 | One, 2242 to 22110, SATA and PCIe 3.0 x4 modes, AHCI and NVMe |
| Onboard U.2 | None |
| USB 3.1 | 1 x Type-A 1 x Type-C ASMedia ASM1142 Controller |
| USB 3.0 | 2 x Rear Panel 4 via headers |
| USB 2.0 | 2 x Rear Panel 4 via headers |
| Power Connectors | 1 x 24-pin ATX 1 x 8-pin CPU |
| Fan Headers | 1 x CPU (4-pin) 1 x CPU_OPT (4-pin) 4 x CHA/SYS (4-pin) |
| IO Panel | 1 x Combination PS/2 2 x USB 2.0 2 x USB 3.0 1 x USB 3.1 Type-A 1 x USB 3.1 Type-C 1 x Network RJ-45 (Intel I219-V) HDMI DVI-D DisplayPort D-Sub Audio Jacks |
| Other Features | COM Header Thunderbolt Header EZ XMP Switch DirectKey Header MemOK! Button TPU Switch 5-pin FAN_EXT Header TPM Connector Power Button Front Audio Header Front Panel Header USB BIOS Flashback Header |


