Original Link: https://www.anandtech.com/show/1806
Investigations into Socket 939 Athlon 64 Overclocking
by Jarred Walton on October 3, 2005 4:35 PM EST- Posted in
- CPUs
Introduction
Note: This article is an in-depth look at overclocking. We'll cover how to do it, what sort of performance you can achieve, problems and potential solutions, etc. Overclocking can be frustrating, rewarding, fun, and dangerous. We don't mean "burn the house down" dangerous, but you could certainly end up ruining some or all of your computer components. We take no responsibility for any difficulties or losses you may experience by using the information in this article, and we certainly take no responsibility for any damage that may occur to any person, place, or object. The manufacturers of the parts that we are using are also not accountable for any loss/damage that may occur - most companies void your warranty for overclocking. It's a risk, and it's your risk - proceed with caution. Finally, overclocking is never a "guaranteed result". You may or may not match the results that we achieve. We'll be happy to offer suggestions if you need them, as will many of our forum members. Patience and research are part of overclocking as well, so please understand that you may have to do some work on your own. If you can accept those warnings, we hope that you enjoy this article.
Back in the day, overclocking was in some ways simpler than what we see now. You would typically buy a mid-range processor and then try to increase the bus speeds as much as possible in order to get the most performance out of your system. Older Pentium chips also allowed you to change the multiplier, so with some luck, you might get your 2.5X multiplier on a Pentium 166 up to 3.0X, resulting in a 33 MHz overclock. Other than a few special chips like the Pentium M and Athlon FX, increasing multipliers is no longer possible. The modification of bus speeds can still be used, but it isn't necessarily the best or only way to try to overclock your system. We have mentioned overclocking performance in many articles, but we haven't taken the time to really explore all the options out there. We also know that current Intel and AMD setups have very different options and performance when overclocking is used, so we want to look at that as well.
Before we branch out into AMD vs. Intel comparisons, however, let's talk about the past top performers. The Celeron 300A is fondly remembered by many people, and with good reason. Yes, we have had some other good parts in the intervening years, like the 2.4 GHz Northwood cores, the low end Prescott cores, and the Athlon XP-M Barton parts. However, when you look at the 50% overclock of the Celeron 300A (and it wasn't just possible, it was common), none of the other parts have really ever approached that level of overclocking without some serious investment in cooling options. (Some people even managed to get the 300A to 504 MHz - an amazing 68% overclock!) Northwood's 2.4 GHz to 3.2 GHz is still an impressive 33% overclock. The 2.4 GHz to 3.6 GHz Prescott overclock (using the 2.4A) actually matches the 50% of the 300A, but you sacrifice some features (HyperThreading and high FSB speeds) with the lower model parts. Meanwhile, the overclocking darling that was the XP-M 2500+ "only" managed a typical overclock of 1.87 GHz to 2.4 GHz, a 29% overclock.
That brings us to the part that we're investigating today. It is arguably the best overclocking platform since the old Celeron 300A: AMD's Venice core. One thing that we didn't mention above is the role that price plays for many overclockers. Sure, the Athlon-FX can reach clock speeds and performance that most other chips only dream about, but at a cost of roughly $900 just for the processor, a lot of people will only read about it. What made the 300A so attractive was that it was not only a monster overclocking chip, but it cost around $150 and competed with $500 chips. That's why the 2.4C and 2.4A Pentium 4 are also well regarded; they cost under $200 and could compete with chips that cost two to three times as much. The price of entry for the cheapest Venice core (the 3000+) is once again very low; $120 for the OEM model, or $145 for the retail version.
We'll get into the details more in a moment, but for now, we'll just say that the 3200+ may actually be a better choice, and that's what we are using for this article. We are also using the retail model, and some people will say that retail parts tend to overclock better than the OEM chips. We'll simulate 3000+ overclocking using a 9X CPU multiplier, but that may or may not be an entirely accurate representation of 3000+ overclocking performance. In general, though, what we're hearing is that almost all of the Venice cores can run at very high clock speeds with a bit of effort, so there isn't a huge difference between 3000+ parts binned for 1.8 GHz and 3800+ parts binned for 2.4 GHz. AMD has simply set the package to use a maximum 9X multiplier on the former and a 12X multiplier on the latter. Talking about CPU multipliers leads us into the real meat of the discussion, though, so let's get into it.
The Overclocking Platform
While the choice of processor certainly plays a major role in any overclocking endeavor, it is by no means the only meaningful part. Anyone who has tried their hand at overclocking can attest to the importance of choosing the proper motherboard. The motherboard choice also dictates the chipset and BIOS, and while many chipsets for Athlon 64 do well with overclocking, NVIDIA's nForce4 remains the current champion. (ATI's upcoming Crossfire chipsets hold a lot of promise, but they're only just becoming available at retail, so we will be using nForce4 for this article.)
The chipset still plays a secondary role to the BIOS, however. ASUS' A8V Deluxe showed that a great BIOS implementation could achieve good overclocking results with a VIA chipset. Conversely, a great chipset with a poor BIOS can seriously limit overclocking potential. We saw this in our nForce4 Ultra Motherboard Roundup, where despite using the same chipset, the maximum overclocks were relatively scattered. The design of the motherboards also played a part in those results, of course, as better voltage regulation, cooling, layout, etc. can impact stability. The good news is that BIOS updates are possible and can improve performance without changing the motherboard. The bad news is that it is rare to actually get substantially improved overclocking performance with a BIOS update. If the board manufacturer didn't feel that it was important enough to really focus on overclocking performance with the initial BIOS, they aren't likely to change their mind.
The above points all combine to create the idea of choosing a board maker that has a reputation for overclocking. That's generally sound advice, and there are quite a few companies that do more than pay lip service to the enthusiast market. Abit, ASUS, DFI, EPoX, Gigabyte, and MSI are all pretty good about catering to the overclocking crowd, although some products might still fall a bit short. Albatron, Aopen, Biostar, Chaintech, ECS, Foxconn, Jetway and Soltek (and any others that we failed to list) are less of a sure thing with overclocking support, though we would probably place Albatron, Chaintech, and Soltek above the others in that list. The final word can only be found on a board by board basis, of course, so look around for reviews before purchasing a motherboard with the intent to overclock.
At this point in time, the favored overclocking boards for AMD systems are all from the same place: DFI. We're comfortable in saying that's no accident, as DFI has pushed the limits in supported voltage levels for CPUs and RAM, and they have consistently come out at or near the top of our overclocking tests. Are you guaranteed to reach high overclocks with a DFI board? No. Could you reach higher speeds with a different brand? It's entirely possible - there is an element of luck involved with overclocking, as even two parts off the same assembly line one after the other may not reach identical performance levels. We're going to use a DFI board in this article. The EPoX 9NPA+ Ultra also received our Gold Editor's Choice award in the nForce 4 Ultra roundup, so it should offer similar results. If another board provides the necessary options, you can likely get roughly the same results; however, this article is not intended to be a full motherboard roundup/review. Let's take a minute to look a little closer at the motherboard features.
DFI nF4 Infinity
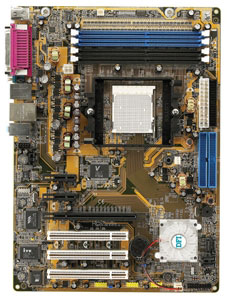
We wanted to spend a few minutes looking at the motherboard options before continuing - a mini review if you will, as we haven't officially reviewed this board and we want to compare it to the LANPARTY UT nF4 Ultra-D. We're using the DFI NF4 INFINITY, but it is actually just the new name for the DFI NF4-DAGF. There are multiple models of the INFINITY/DAGF, using everything from the base nForce4 4X chipset to the top nForce4 Ultra and SLI. We're using the "middle" model, the nForce4 Standard. The main difference is that all the networking features of the chipset are enabled and official support for 1000 MHz HyperTransport is also present. The only extra that the Ultra offers is SATA-II (3 Gbps) hard drive support, while the 4X limits the HT bus to 800 MHz. SLI adds dual PEG slots to the mix, of course. We heard directly from DFI that the DAGF was being renamed to "INFINITY", but if you still think that there's a difference, we offer these two shots obtained from Newegg and TigerDirect.
 |
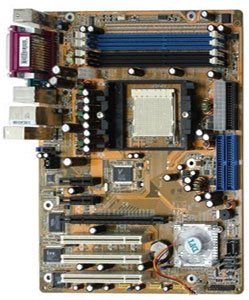 |
TigerDirect lists the board as the INFINITY while Newegg uses the older DAGF moniker. We've resized the images for comparison, with TigerDirect on the left and Newegg on the right. Other than a slight difference in contrast levels and viewing angle, we can't spot any changes. Besides, we're inclined to take DFI at their word. Here's a better shot of our particular board.
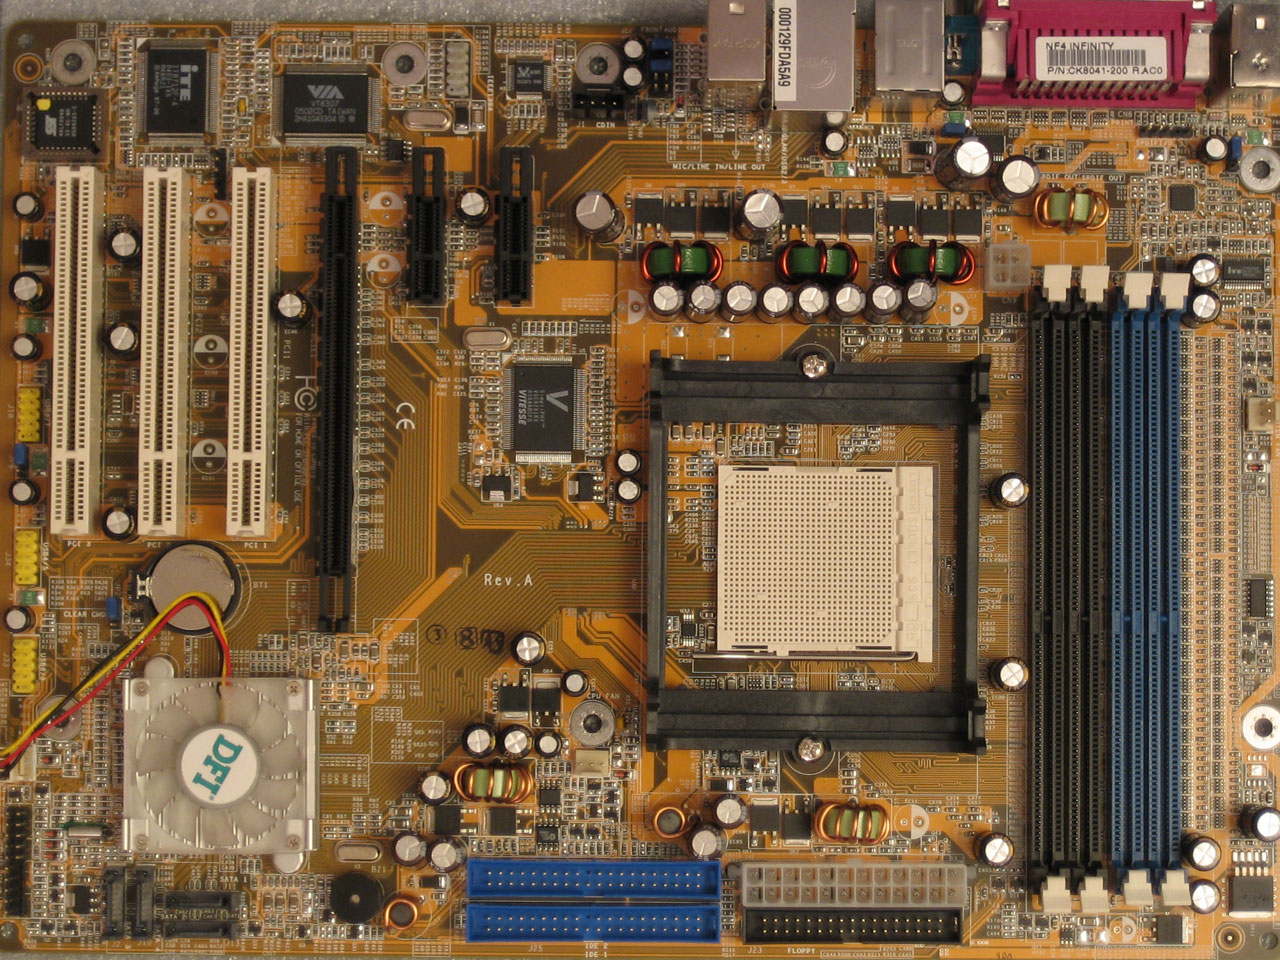
Click to enlarge.
Unlike the LanParty series, the Infinity is pretty boring in terms of looks. A standard brownish PCB with no UV reactive parts isn't the best fit for a windowed case, but if you're like me and don't care for case windows, it doesn't really matter. Also missing relative to the LanParty are the rounded cables and onboard power and reset buttons. Those buttons can be handy for testing outside of a case. (Of course, if you're adventurous, you can always just use a small metal item to short the required pins to accomplish the same result - don't blame us if you fry your system that way, though!) One complaint that we did have was with the X16 PEG retention mechanism. Many boards have a clip that locks the rear of the graphics card into place, but the Infinity has a sort of "hook" design. It works okay for holding the GPU in the slot, but removing the GPU can be a bit more difficult than what we'd like. We'd also prefer a larger heat sink on the Northbridge, perhaps with passive cooling. The NB did get quite warm at the highest overclocks, and there looks to be plenty of room to move it up closer to the CPU socket. The small fan did make a bit of noise, though "silent" and "overclocking" rarely go together.
| DFI nF4 Infinity Specifications | |
| CPU Interface | Socket 939 Athlon 64 |
| Chipset | nForce4 Standard (single chip) |
| BUS Speeds | 200MHz to 450MHz (in 1MHz increments) |
| PCI/AGP Speeds | Asynchronous (Fixed) |
| PCI Express | 100MHz to 145MHz in 1MHz increments |
| CPU Voltage | Auto, 0.800V to 1.850V in 0.025V increments |
| DRAM Voltage | 2.5V to 3.2V in 0.1V increments |
| Chipset Voltage | 1.5V, 1.6V, 1.7V |
| Hyper Transport Ratios | Auto, 1.0, 2.0, 3.0, 4.0, 5.0 |
| LDT Bus Transfer | 16/16, 16/8, 8/16, 8/8 |
| CPU Ratios | Auto, 4x to 25x in .5x increments |
| DRAM Speeds | Auto, 100, 133, 150, 166, 200 |
| Memory Command Rate | Auto, 1T, 2T |
| Memory Slots | Four 184-pin DDR Dual-Channel Slots Unbuffered ECC or non-ECC Memory to 4GB Total |
| Expansion Slots | 1 X16 PCIe Slots 2 X1 PCIe 3 PCI Slots |
| Onboard SATA | 4-Drive SATA by nF4 |
| Onboard IDE | Two Standard NVIDIA ATA133/100/66 (4 drives) |
| SATA/IDE RAID | 4-Drive SATA plus 4-Drive IDE (8 total) Can be combined in RAID 0, 1 |
| Onboard USB 2.0/IEEE-1394 | 10 USB 2.0 ports supported nF4 2 1394A FireWire ports by VIA VT6307 |
| Onboard LAN | Gigabit Ethernet PCIe by Vitesse VSC8201 PHY |
| Onboard Audio | Realtek ALC655 6-Channel codec 3 UAJ audio jacks CD-in, front audio, and coaxial SPDIF In and Out |
| BIOS | Award 8/11/2005 Release, CK84D811 |
The feature list of the board is very similar to the LanParty boards. The BIOS offers very good tweaking options, but voltages are slightly more limited than the higher-end boards. 3.2V maximum on the RAM is plenty for most people, but it did prove limiting on some OCZ VX Gold that we tried, reaching a maximum of 2-3-3-8-1T timings at DDR500. (That RAM was not used during testing for this particular article, so we mention it merely as a point of interest.) The CPU voltage topped out a 1.85V, which is a lot higher than the default voltage of most 90nm AMD chips. We're a little uncomfortable pushing our CPUs even to that level, though with water cooling or something more exotic, a higher voltage level might prove useful.
Overall, we're very impressed with this value offering from DFI. They basically stripped away the flash and the frills and knocked around $20 off the price of the LanParty UT nF4 Ultra-D. The question is: do you really want to save the $20? Modders can try turning the Ultra-D board into an SLI model, and the rounded cables and UT reactive design may appeal to some. On the other hand, the Infinity SLI guarantees SLI capability and costs about the same amount as the Ultra-D. If you want to push overclocking a little further, the LanParty boards (and competitors) might be a bit better. If you're trying to stick to a budget without cutting necessary features, the Infinity line keeps you covered.
Having selected the processor and motherboard, we're still only half way through our critical component choices. Hard drives, floppy drives, optical drives, and even graphics cards have little to no impact on overclocking, so you can get whatever you want in those areas. We'd question the purchase of a low end graphics card with such a system, unless there's a specific desire to have a fast processor for video/audio encoding. That sort of work is often for a real job, though, and we're hesitant to suggest that anyone overclock a system that is being used for important work. If a gaming PC crashes and somehow corrupts your entire hard drive, you reformat and reinstall. A work PC going through the same problems would be a lot more painful. We've already given our warnings about overclocking, however, so do what you will. What remains, then, are the last three components that will generally have an impact on your overclocking endeavors.
Memory Options
Memory has been a major part of overclocking since we shifted to locked CPU multipliers back in the Athlon/Pentium III era. With the move to DDR RAM on the Athlon and Pentium 4, it has become even more important. Since all processors other than the Athlon FX chips (and Pentium M) are multiplier locked - at least on the high end of the scale - increasing your CPU clock speed means that you have to increase the system/CPU bus speed. If your default bus speed is 200 MHz and you have a 10X multiplier, you end up with a 2000 MHz processor. Raising the bus speed to 220 MHz would give you a 2200 MHz CPU, but it would also require memory that could run at DDR440 speeds. That's the way it normally works, and so we have unofficial memory speeds of up to PC4400 (DDR550) that allow you to overclock your bus, CPU, and RAM beyond the standard specification.
However, there are alternative methods of overclocking that may not require ultra high speed RAM. High speed RAM generally costs quite a bit more, and if your goal in overclocking is to get higher performance without spending a lot more money, doubling the cost of RAM defeats that purpose. We'll be looking at the impact of using the lower memory ratios in order to keep standard PC3200 at or below DDR400 MHz speeds. This means that you could use any PC3200 memory. There will be some performance loss, but the question is: how much? That's what benchmarks are for...
On the other end of the RAM spectrum, we find the high performance and high cost parts. Yes, you can buy some untested DIMMs with similar ratings to the high performance RAM for less money, but we're more interested in exploring guaranteed RAM speeds in this article, so we won't be taking that route. However, even if you can't reach the RAM speed that you want, our value RAM will serve as a minimum performance metric. At the high end, there are a few major contenders.
First, there's the high performance, high voltage RAM like OCZ VX and Mushkin Redline. (They probably use Winbond CH5 blanks, and we'll just use CH5 to refer to this memory from here on out. We could be wrong on the actual chips used, however.) You'll need a motherboard that can supply up to 3.5V to the RAM to get the most out of such memory, with 2-2-2-6 1T timings possible for as high as DDR533, give or take. You'll also want to get active cooling on the memory if you go this route. The next option is to grab some of the re-released Winbond BH5 DIMMs, which are similar to CH5 in that high voltages allow for 2-2-2-7 1T timings up to DDR500 speeds. The price and performance of these two options are roughly equivalent, with the CH5 generally reaching somewhat higher speeds. The drawback of CH5 is that it also requires at least 3.0V just to run at 2-2-2 timings and DDR400 speeds, where BH5 can do the same with only 2.6V. The final option is to go for the tried-and-true Samsung TCCD (or TCC5) DIMMs. You'll sacrifice some performance and have to lower the timings as RAM speeds increase, but the good news is that you won't need more than 2.80 to 2.90V to reach maximum clock speeds. You can also get TCCD DIMMs up to DDR600 and even beyond, which serves to counterbalance the better timings of BH5/CH5. The cost of Samsung TCCD is roughly the same as the other two choices.
So, which RAM do you choose? There are several factors, and in order to keep the number of benchmarks from rapidly bloating, we only used one type of value RAM and one of the performance RAM options.
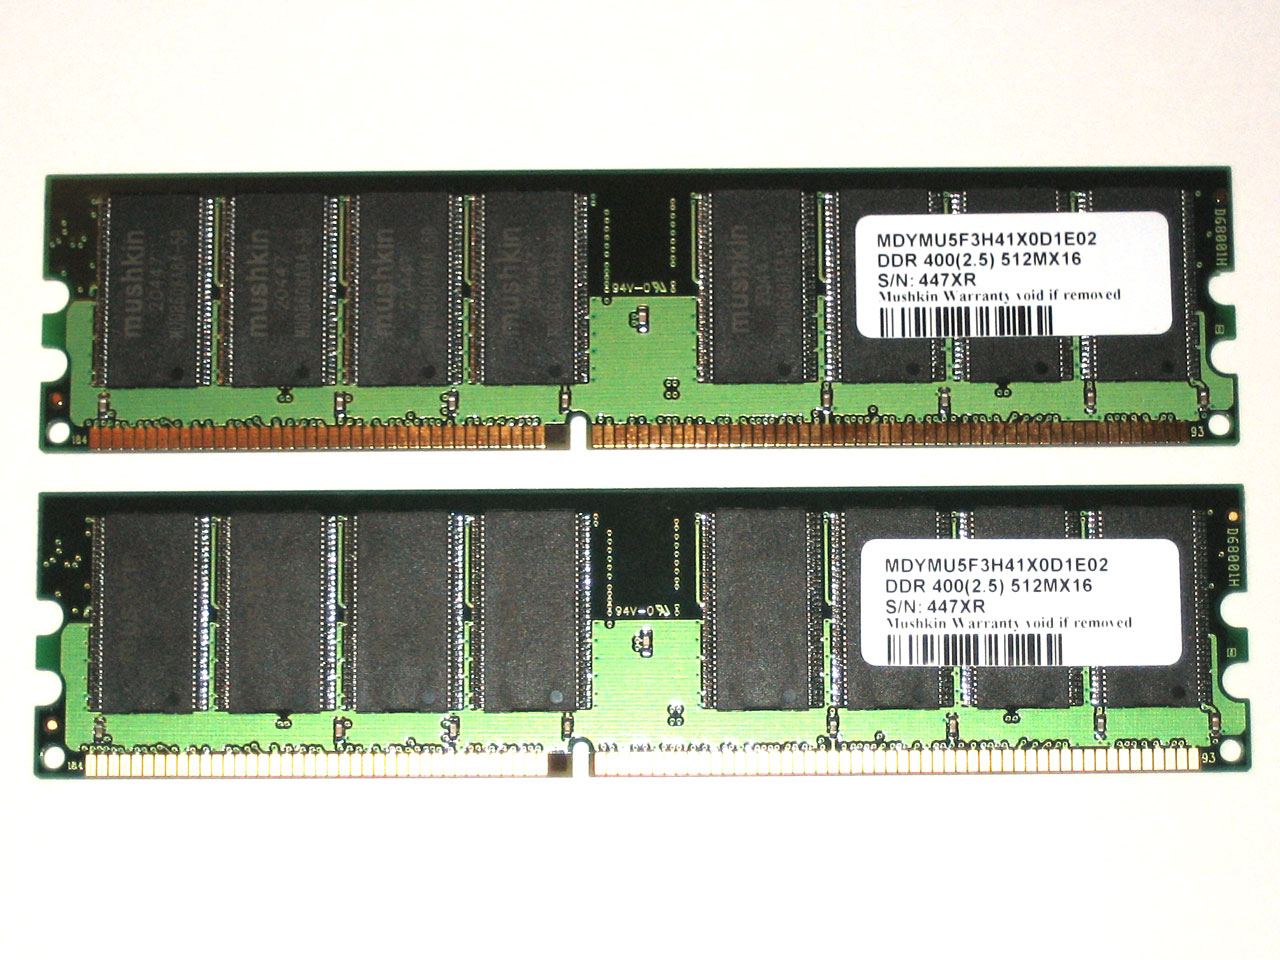
Clck to enlarge.
For our high end RAM, we used what we already had available: OCZ Rev. 2 Platinum (TCCD memory as opposed to the newer TCC5 memory). One of the benefits of this RAM is that it doesn't run as hot as the BH5 and CH5 when overclocked, so active cooling won't be required at maximum clock speeds. Active cooling means more noise from your PC, and while few overclocked systems are truly quiet (without resorting to water cooling), many people will agree that adding more fans to the case isn't really desirable. This doesn't mean that BH5 or CH5 is a bad choice, and in many instances, either would be slightly faster than TCCx RAM.
The final pieces of the overclocking puzzle are the choice of case and power supply. Case selection influences (to a large degree) the number and arrangement of fans that you can use for cooling, though anyone with a bit of skill and a Dremel tool can add extra fans if needed. We'll talk a bit about heat sinks and fans for CPU cooling as well. First, let's start with the power supply, as it is more directly comparable to the components that we've covered so far.
Power Supply
Despite what manufacturers might want you to believe, power supplies are less about wattage and more about the amount and quality of current that they can supply. In theory, the Watts rating of a PSU can be determined with the current and voltage ratings. Using the equation P = I x V (Power = Current x Voltage), you can come up with a Wattage for each voltage that the PSU provides, add them all together, and you have the rating. Simple enough, right? Unfortunately, there are problems with this method of rating a power supply.
The biggest problem is that PCs don't require equal amounts of power from each voltage, and the wattage rating simply serves to obfuscate the real power levels. The +12V rating is generally the most important rating, and modern ATX2.0 PSUs actually require two +12V rails (i.e. outputs form the PSU). Two 500W PSUs from different manufacturers could actually have wildly different characteristics in the type of power that they provide. In a really bad PSU, reality can be further distorted by providing high output ratings on the -5V and -12V lines. Computers draw very little power from the negative lines, so if a PSU were to rate the -12V line at 3A instead of a more common 1A (or less), they can inflate their wattage by 25W or more. As if that isn't bad enough, there are even more ways to "cheat" the rating.
Temperature plays a role in determining the output capacity of a power supply. You can read about it elsewhere, but the main concept is the following: "The thermal capacity of materials changes slightly with temperature primarily due to changes in density." Part of what allows a power supply to provide current at a specific voltage is the ability to transform the 115V input from the wall (or 230V in other areas of the world) to a different value. Such a change creates heat, and the heat has to be dissipated. Inside a power supply, you will find heat sinks much like what you see on a motherboard, along with a cooling fan or fans. Depending on how the power supply is rated, it might actually provide 450W at 10 degrees C and only 375 W at 30 degrees C. (You'd have to know the specific heat values for the various materials inside a PSU to really be able to calculate how temperature affects the output capacity for a specific PSU.) Nearly all modern computers will have a case temperature in the 30 degrees C or higher range, so a PSU rated using 10-25 degrees C values is far from a realistic representation of the PSU's output capacity.
Lastly, just because a power supply can provide a specific output doesn't mean it can do so well. In the US, power from the wall outlets comes at 115V, but variance is allowed. In fact, the output voltage can fluctuate between 110V and 121V (5%) while still being within spec. That may be fine for some household items like lamps and coffee makers, but computers tend to be a little more demanding in their requirements. A power supply that outputs 3.2V, 4.8V, and 11.5V is still technically within the required range, and there's a good chance that it will work with a typical PC. What really causes problems are fluctuations, which are usually influenced by the use of lower quality components as well as temperature changes. Even though a PSU might work in a regular PC, though, overclocking really pushes things to the limit, and it's far better to have a PSU that can output voltages exactly at spec than a few percent high or low.
One of the easiest ways to determine the quality of a power supply is to simply pick it up. A 500W power supply should weigh quite a bit more than a 350W power supply; if it doesn't, be suspicious. Reading the label on a power supply can be helpful, but that doesn't usually tell you the temperature at which it was tested, and of course, it could always be inaccurate. The saying "you get what you pay for" also applies, so if a PSU costs far less than the rating would suggest, it's likely that the unit isn't really as good as the sticker claims. A better idea is to just go with a respected name, as we suggested with motherboards. Our top picks for PSU manufacturers are Antec, Enermax, Fotron Source, OCZ, and Seasonic. Enermax, OCZ and Seasonic are probably the safest bets, as they don't really have "value" and "performance" parts right now, though the more expensive Antec and Fotron Source units are just as good. If you want a high quality power supply and you're shopping online, here's the fastest test: does it cost less than $75? If so, it's probably a moderate unit, and under $50 is an inexpensive unit. The good power supplies almost always cost $80 or more. If you're not sure, though, ask around! Some times, there are good deals to be had on high quality power supplies.
Click to enlarge.
With all the above talk about getting a quality power supply, we also ran some tests using a cheap PSU that came with an even cheaper case. The case was the MGE and 400W PSU that we recommended in our last Budget Buyer's Guide. The case is flimsy, made of thin aluminum, and the cables for the front USB and Firewire ports were very difficult to work with - they were separated into single-pin connectors rather than a block of pins. It's impossible to say what the long-term reliability of such a case is, but it's been running nearly 24/7 for a couple of months now without any problems. The highest overclocks seemed a bit less stable with the 20-pin power connection, but we did manage to match the overclock of the OCZ PowerStream 600W. Maximum power draw for the test configuration was measured at around 220W, so we never came close to the 400W power rating.
Case and CPU Cooling
For the case, things are a bit more straightforward. The cheapest cases can still work fine for any system, though they're usually more difficult within which to work, may have sharp edges, may be noisy, and could even warp or bend. As with power supplies, you get what you pay for. We'd suggest getting a case that has at least two 120mm fan locations, one in the front of the case and one in the rear. If you use 80mm fans, you pretty much need two 80mm models to equal the flow rate of a 120mm model. Blow holes on the top, bottom and side of the case can be added if you really want, though the effectiveness varies. What you really want is to get a nice flow of air going through the case without a lot of turbulence. A single 120mm fan at the front of the case acting as an intake with a second 120mm fan at the rear blowing out is generally adequate, once you add in the PSU fan, which would also be blowing out. Going beyond that to get more air flow is possible, but you get diminishing returns and increased noise. We've seen cases with seven fans all blowing in different directions that couldn't overclock at all, so more is definitely not always better.
We used an (old) Antec SX635BII for our testing, equipped with three 80mm fans. A case with two 120mm fans like the Antec SLK3700-BQE would be a bit quieter, though we didn't focus on noise levels as part of the setup. Antec cases can be really heavy, as they're built of thick steel, but they're also easy to work within. If you plan on moving your PC around a lot or putting it on top of your desk, we'd definitely recommend getting a lighter case - perhaps a SFF might be an option, if you can afford the luxury. I've picked up the massive Thermaltake Armor with a full system installed, and it was still noticeably lighter than either the Antec SX635BII or the SLK3700-BQE. (I can't comment on which is easier to work with, as the Armor system was assembled by someone else.)
Lastly, you need a decent cooler for the CPU. The stock AMD cooler will get the job done for basic overclocking, but if you want to get above 2.3 or 2.4 GHz, you'll need better. There are many options out there right now, but unlike other components, a more expensive cooler may not actually be better. Solid copper designs cost more and should cool a bit better (due to their lower specific heat and increased mass), but there's no guarantee. For overall cooling quality at a reasonable cost, we'd go with either a Zalman CNPS7000B (either the AlCu or Cu version is fine) or else get a Thermalright XP-90 with a Panaflo 92mm M1A fan. With shipping, either option should run $33 to $45, give or take. The Zalman is probably a bit quieter and it comes with a fan speed control while the Thermalright is much easier to mount onto the CPU in our opinion.
 |
 |
| Click to enlarge. | |
System Assembly
Once you have all the parts, it's time to put everything together. We're going to assume that you know the basic process, but here's our order for assembling a new system.
- Remove all components from boxes and lay them out on the workbench in an orderly fashion. (Check for order errors.)
- Install the CPU into the motherboard socket with the motherboard resting on the padded foam cushion with which it shipped.
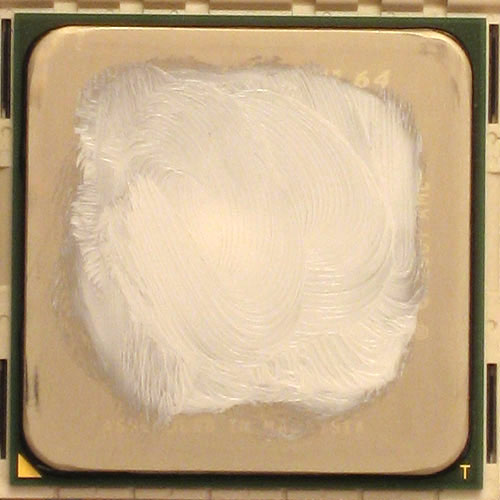
Click to enlarge. - Apply a small amount of thermal paste to the center of the CPU heat spreader, then smooth it out a bit using your finger, a razor blade, etc. The idea is to get a thin layer on the heat sink, and you don't need to cover the whole CPU surface; once the HSF is installed, the thermal grease will flatten out to cover the rest of the CPU surface and you don't want a lot of extra grease. (Technically, AMD voids your CPU warranty if you don't use approved thermal grease. We've never had to deal with a failed Athlon 64 chip yet, so we can't comment on how they would respond. Overclocking is already voiding the warranty, so we're not worried about "approved" thermal compounds.)
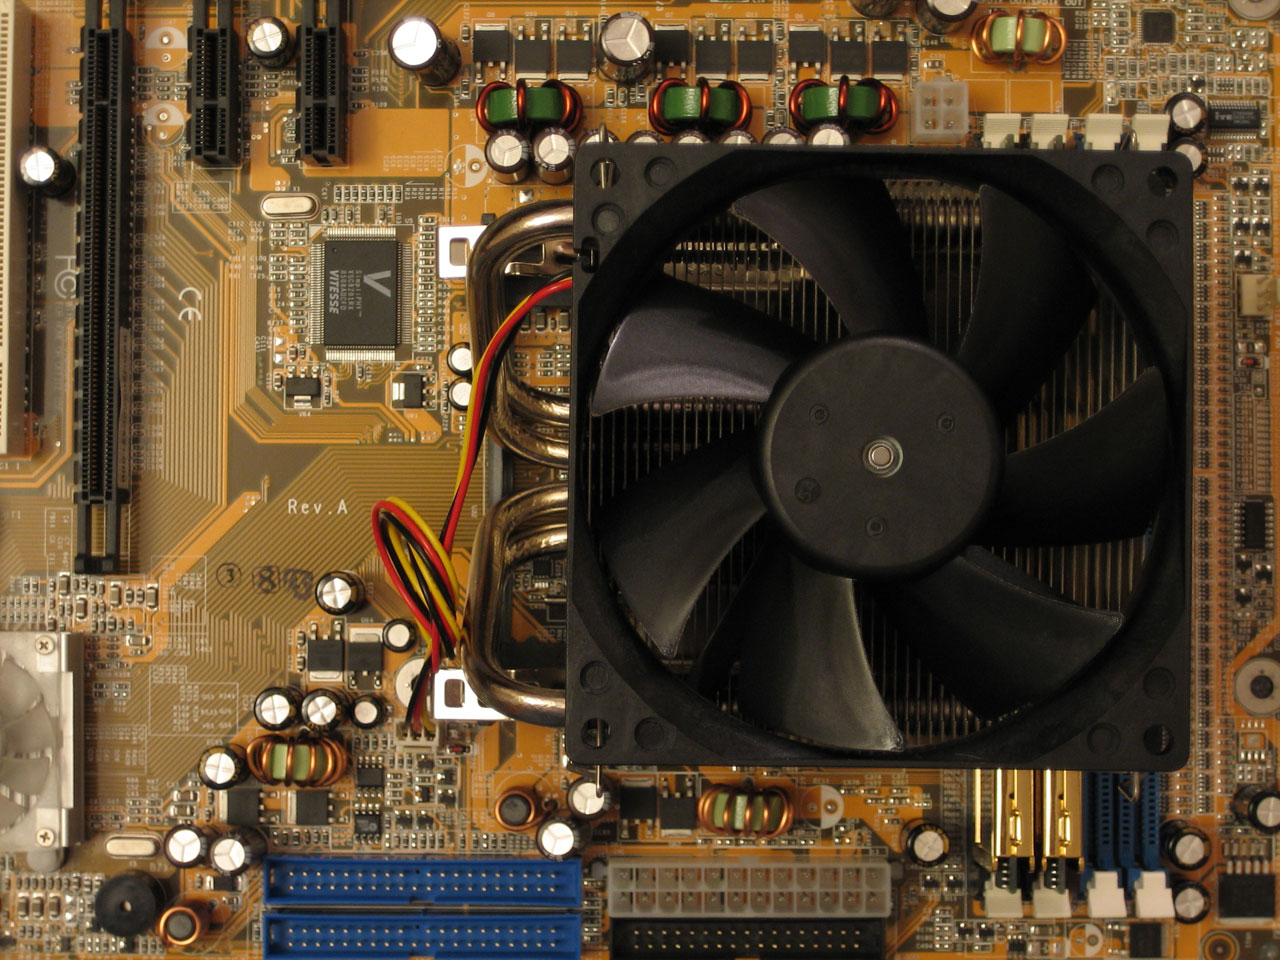
- Install the heat sink onto the CPU - carefully. Depending on which HSF that you decide to purchase, you may need to change the mounting bracket, back plate, etc. One of the reasons why we like the Thermalright HSF is because you don't need to change the back plate (which is sometimes "glued" onto the motherboard). Don't forget to connect the fan to the 3-pin CPU header on the motherboard.
- Install the RAM into the appropriate slots. For the DFI board, that would be slots 3 and 4 (the two closest to the CPU). Other manufacturers number their slots differently and may separate the RAM for dual channel operation. Read the manual for your motherboard.

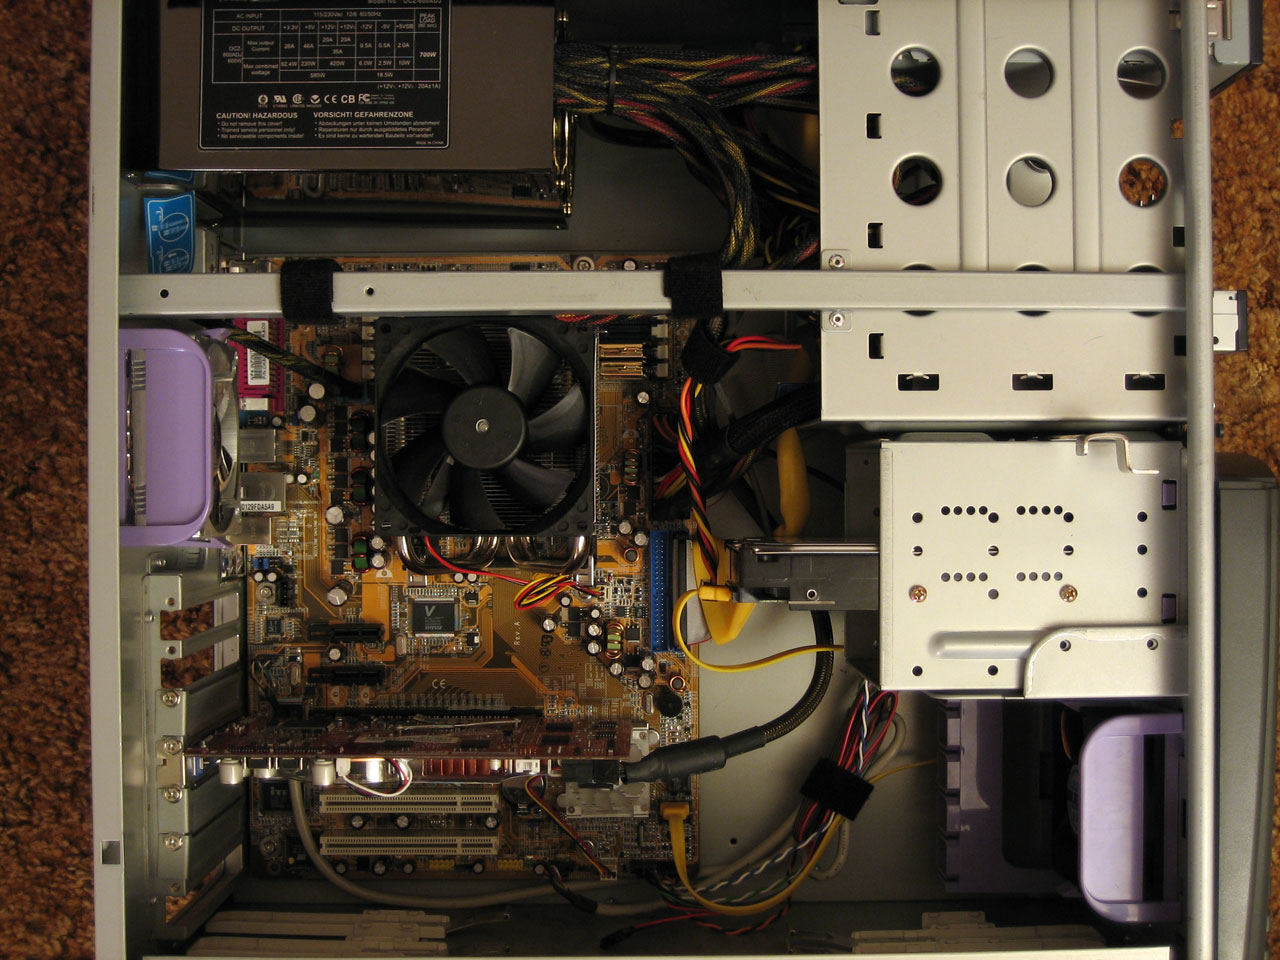
Click to enlarge. - If your case doesn't already have the power supply installed, it's generally best to install that now. Otherwise, the HSF for the CPU can get in the way. This varies by case, of course, but we almost always find it easier to get the PSU in before anything else.
- Install the motherboard mounts (usually little brass colored screws/bolts) into the case. Only put the mounts in places that match up to the holes on the motherboard. The DFI INFINITY has seven holes and thus requires seven mounts. You don't want extra mounts installed, as they could create a short on the bottom of the motherboard. Also, swap out your case's backplate for the one provided with your motherboard. (We have yet to encounter a case with a backplate that matches any motherboard that we've purchased.)
- Place the motherboard carefully into the case; you may have to work a little to get the backplate to line up with the rear I/O panel of the motherboard. Don't force anything. Once the board is in place, install the screws that secure the motherboard. Note that before installing the motherboard, depending on the case and your dexterity, it might be easier to connect the wires for the front panel of the case - power and HDD LEDs, reset and power switches, and speaker are almost always present. In our experience, the colored wires are usually the positive feed and the black (or white) wires are for ground. (I still get the LEDs backwards half the time, I think. If your HDD/Power lights don't come on, reverse the pins.)
- Install your graphics card, hard drive(s), DVD drive(s), cables, etc. We try to keep all the cables tidy, and you can use zip ties, velcro wraps, or even twisty ties if you don't mind a slightly ghetto approach. You might want to wait a minute before really securing all cables, just to be sure that all of the parts work properly. For now, plug the main SATA drive into SATA port 1. (If you're dead set on using RAID for your OS drive, you'll need a floppy disk with a driver on it.)
- Install any other fans or components, and make sure everything has power. Check the voltage switch on the rear of the PSU to make sure that it's set to 115V (or 230V depending on your location). Then plug in the power cord from the wall to the rear of your PSU, hold your breath, and turn on the system. Verify that all the fans are spinning.

Click to enlarge. - If the computer doesn't turn on, check that everything is seated properly and begin troubleshooting. Take it slow and don't jump to conclusions (i.e. "My RAM is bad!") Check the connections from the front panel of the case, as you might have simply installed the power switch cable incorrectly. Check all the other cables as well. If you have spare parts that you know work properly, try swapping them one at a time. Try running with just the CPU, graphics and RAM installed (no HDD or DVD). You might also want to remove the motherboard from the case and try powering on the system with the board sitting on the padded cushion (and anti-static bag) on your work area. If that works, check for anything in the case that might be grounding the board. You can try fully disassembling the PC and trying again, with the hope that perhaps you'll find your error in the process. Beyond that, you're on your own. Try the forums for help if you can't figure it out, but be patient and polite.
With the system up and running, install the OS and drivers. We use SATA drives almost exclusively for new PCs, which is why it's important to check the BIOS settings. Installing XP and the drivers is pretty simple, so we're not going to go into much detail. Use your CD and key, and then when XP is installed, you use the driver CD that comes with your motherboard. That will get you network, sound, and chipset drivers. You might want to check for newer versions online once you have networking installed, or else download them in advance on another PC and copy them to the new system. We also grab all the latest Windows Updates for any system with Internet access, though not necessarily for performance testing. Since we're only using one board, we installed all the Windows Updates along with a bunch of other software that we'll use in benchmarking. We also recommend switching your SATA hard drive to port 3 or 4 (or one of the extra ports) once Windows is installed. SATA ports 1 and 2 generally don't behave well when you begin overclocking beyond a certain threshold, and with the drivers installed, Windows should boot fine whether your primary drive is connected to port 1 or 3 or something else.
You'll note that up to this point, we haven't even talked about overclocking our new system. If you don't realize this already, let's make this clear: get your OS installed and running and test all your programs before you start overclocking! Setting up a new PC is a complex process, and even experienced system builders encounter problems. You don't want to have the Windows XP install program crash at 95% complete due to an overclock. It's not nearly as bad to have the system crash once you have it working, which is why we say to wait. Even then, it is possible to have an overclocked system crash and corrupt files, forcing you to reinstall applications or even XP from scratch. (It happened at least once in my testing, though not with socket 939.) There's a risk, but for many, the potential rewards outweigh the risk.
BIOS Settings
Once everything is working properly and you're sure that the PC doesn't have any problems, it's time to approach the actual process of overclocking. You might want to give the PC a few days of heavy use (system burn-in) just to be sure that it's stable. All of the FutureMark benchmarking utilities are a good start for stress testing a system, and if you buy the registered versions, you can set them to loop continually - at least, the 3DMark versions can be looped; a quick batch file will get the PCMark applications to loop as well. If you can loop 3DMark03/05 and PCMark04/05 for several days, you can be relatively sure that the computer is running stable. We'll use that same approach later to stress test our overclocked configurations.
Here's where things get more complex, and virtually every motherboard BIOS is going to be at least slightly different from what we present here. If you have a socket 939 motherboard, you'll need to refer to its manual (or figure out where the settings are on your own), but most of the names and/or values will be similar to what DFI uses. The key areas that will need adjustment for overclocking are the CPU bus speed, CPU multiplier, HyperTransport (HT) multiplier, memory speed, memory timings, and voltages for RAM, CPU, chipset, etc. Let's cover each of these quickly to explain the process. We'll include BIOS images from our particular motherboard, so you can look for the matching setting in whatever board you're using.
Click to enlarge.
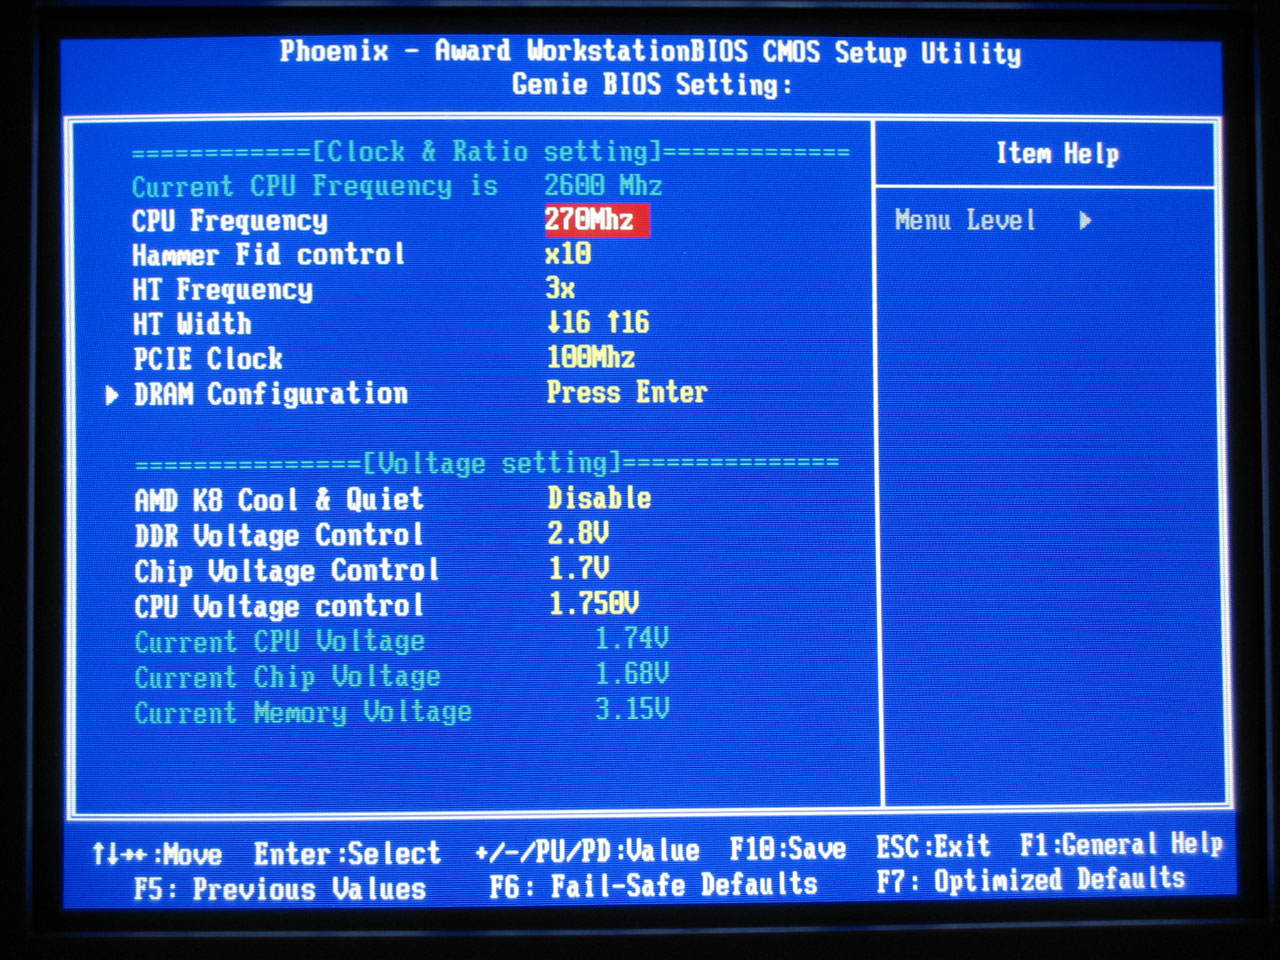
The CPU bus speed is also referred to by other names. The DFI board labels it "CPU Frequency", while you may find HyperTransport Frequency in many BIOSes. (Some people will also call it the "Front Side Bus speed", which is not technically correct.) CPU Frequency, CPU Bus, HT Bus, etc. all mean the same thing, as the CPU communicates over an HT bus. Along with the CPU multiplier, there is also a HT multiplier (also called LDT - Lightning Data Transport - multiplier in some BIOSes). Most socket 939 motherboards support a 1000MHz HT speed, which is a 5X HT multiplier with a 200MHz base clock. The HyperTransport bus is sensitive to overclocking, so we need to keep its total speed in check. You may be able to run the HT bus at over 1000 MHz, but depending on motherboard and cooling, you will begin to have problems beyond a certain point. We'll keep our HT bus speed at or below 1050MHz by adjusting the HT multiplier as we increase the CPU bus speed (and we may at times drop lower if that brings stability). We can use the 4X multiplier with up to a 260MHz bus, and 3X will get us up to a 350MHz CPU bus (which is more than what most people are likely to reach, and more than what we'll test in this particular article). It is also possible to adjust the width of the HT bus from 16-bits up and down to 8-bits, but rarely does that help stabilize an overclock, so we'll leave it at 16/16.
We've covered the CPU and HT speed adjustments, but there's more to it than simply picking a target clock speed. In order to reach a stable overclock, you will often need additional voltage to the CPU and chipset - which affects the CPU speed and HT bus speed respectively. The default voltage of our Venice chip is 1.300V, but we will definitely increase the voltage as we go beyond a 10% overclock. Extreme overclocking (with liquid Nitrogen or phase change cooling) might go so far as to double the CPU voltages, but on air cooling that would be disastrous (not to mention few if any motherboards would even support that in the first place). We'll report the voltages required for each setting later on, but there are really two voltages: what we set in the BIOS, and what we actually get from the system. They may or may not be the same.
Something else that you should disable while in the BIOS is the Cool 'n Quiet feature of the Athlon 64. As that alters CPU voltage and multipliers dynamically in response to demand, it doesn't usually agree with overclocking. We also disable video and BIOS caching, as those are more relics of the DOS era than useful features (as far as we're aware). If you're interested in seeing the default settings that we used on the remaining BIOS screens, we have all the BIOS screens available for download in a Zip file.
RAM BIOS Settings
The final area that will need attention with overclocking is the RAM. The type of RAM used will dictate the approach to overclocking that RAM.
Click to enlarge.
 |
 |
| Click to enlarge. | |
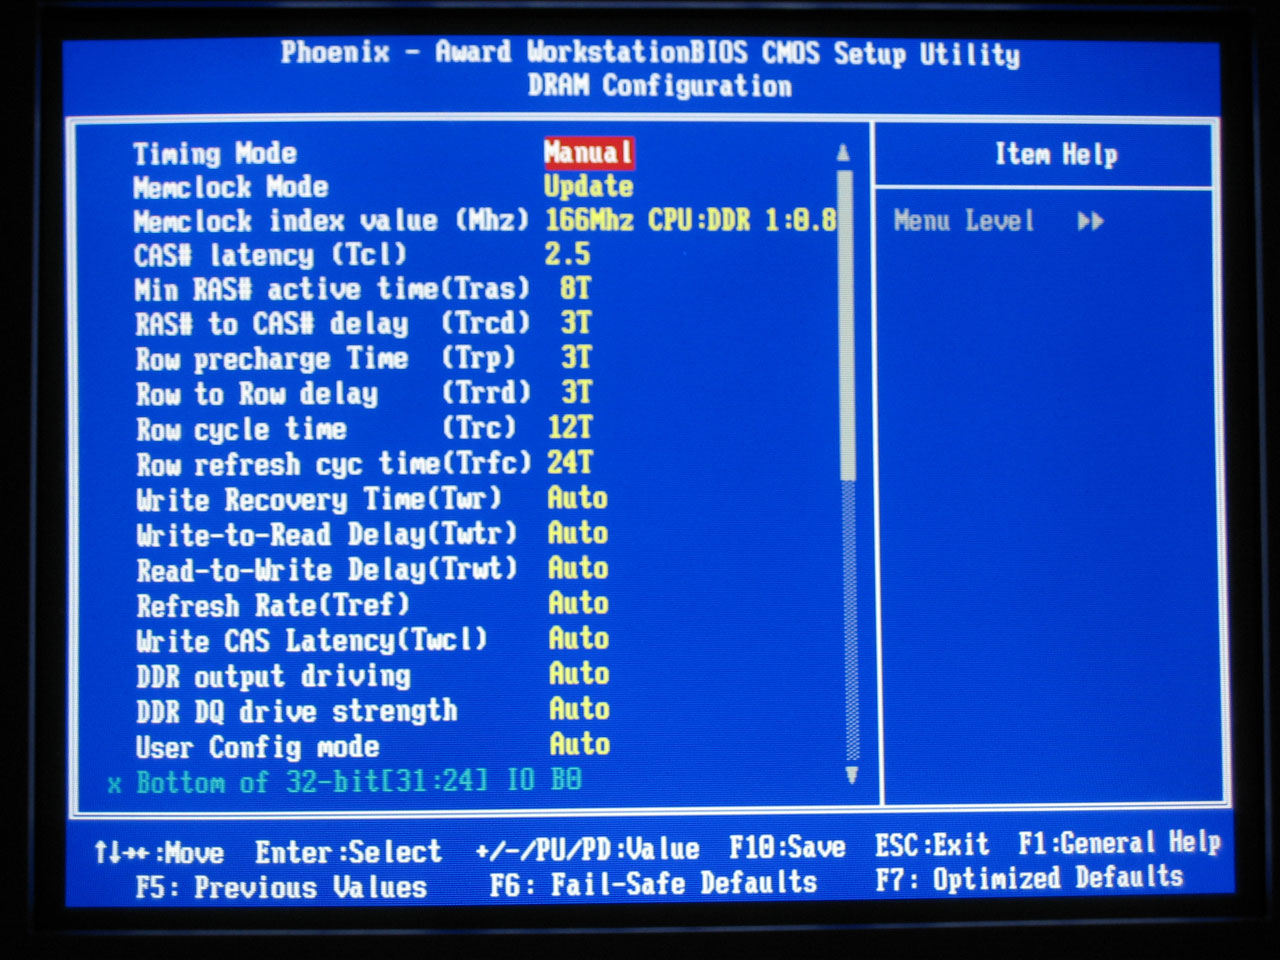
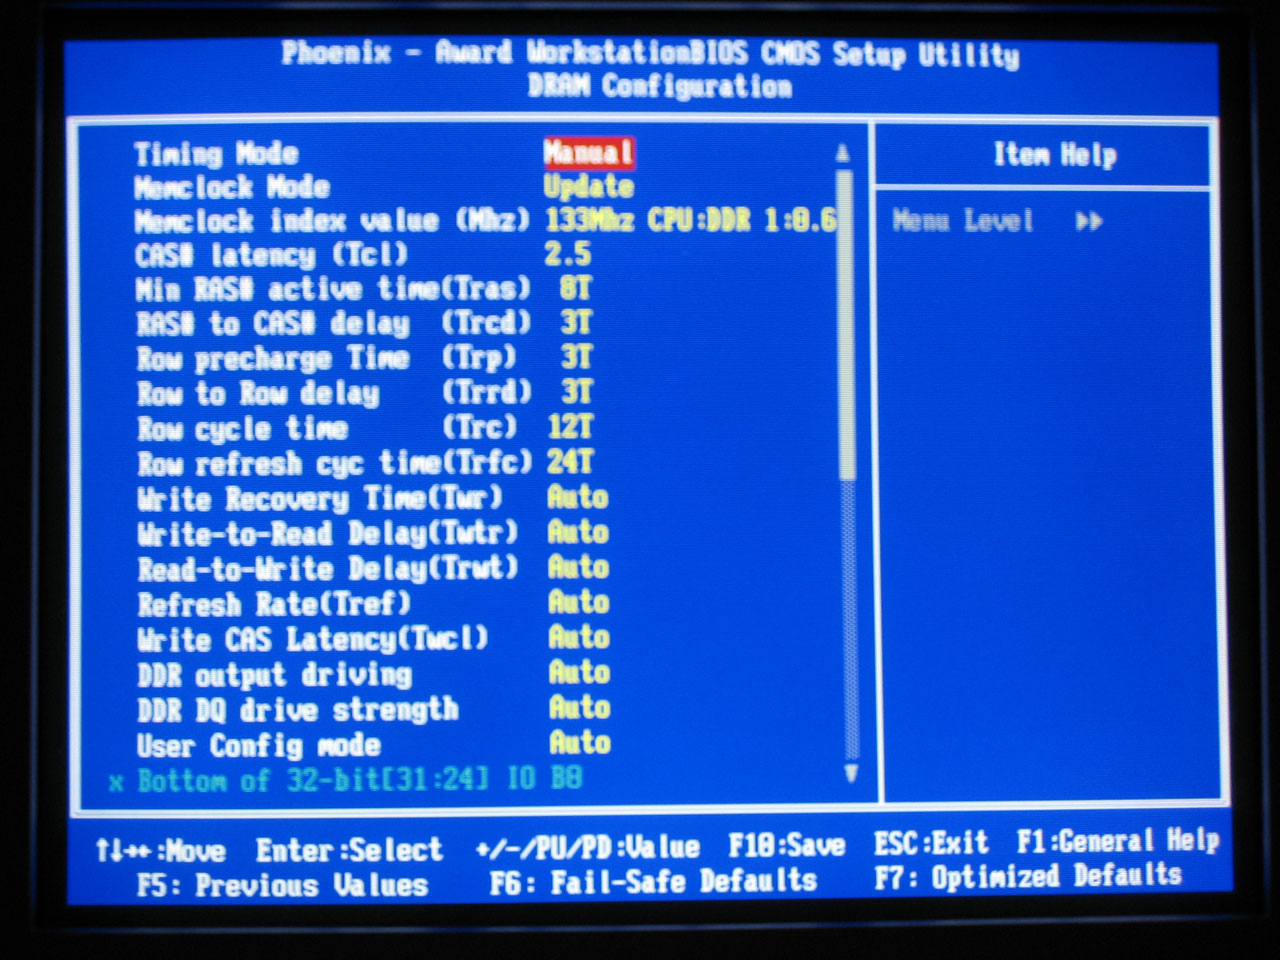
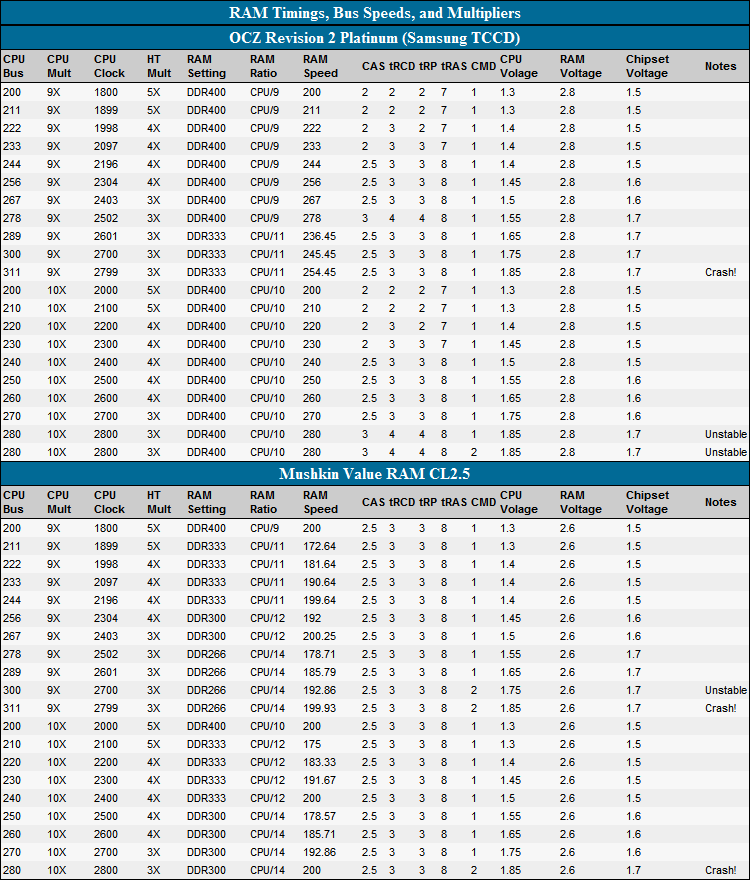
Even if you select the slowest possible timings, some DIMMs won't be able to run much above DDR400 speeds. Value RAM in particular is often what is left after all the high speed blanks are binned out, which is why it can be as cheap as half the cost of quality RAM. The above BIOS screens show our settings for 9x300 with the value and performance RAM - you can see that we had to drop to DDR266 vs. DDR333, since not even the OCZ ran optimally at DDR600. (At least, that's what we needed on this particular board with this particular set of DIMMs. 3-4-4-8 with 2T command rate worked, but was slower than DDR333 2.5-3-3-8 with 1T.) If you're going for top performance, value RAM is a poor choice. If, on the other hand, you want to save money, $85 RAM is a lot more attractive than $150+ RAM. The trick to using value RAM is that you basically have to keep it at or below DDR400 speeds, and this is accomplished by the use of memory ratios. There's a stigma against using higher memory ratios, because it "negates the performance gain." That can be true on some platforms, but it doesn't seem to affect Athlon 64 quite as much due to the integrated memory controller. Let's talk about why.
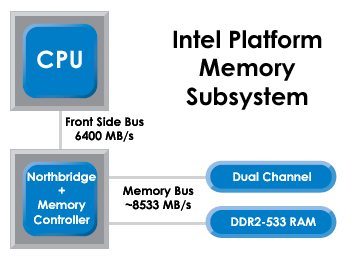
On the P4 chipsets, the NB talks to the CPU at one speed, and it can talk to RAM at a slower or faster speed. If it talks to RAM faster than it talks to the CPU (i.e. DDR2-533 or DDR2-667 with FSB800), there will be fewer "empty trains" going to the CPU. If it talks slower to the RAM than the FSB, however, there will be more empty slots on the FSB. When we look at Pentium overclocking in the future, we'll cover this more, but the basic idea is that you want the RAM to run at FSB speed or faster if at all possible. Dropping even to DDR333 (which is actually DDR320 for most Intel chipsets) can cause a 5 to 10% performance loss, and DDR266 would be even worse. So, why is Athlon 64 different?
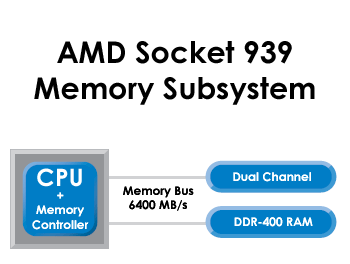
An interesting corollary to the above discussion is in the Northbridge link of AMD vs. Intel. On AMD, the Northbridge is connected via the HyperTransport link. Running at 1000 MHz base (double-pumped makes it equivalent to 2000 MHz), the HT bus is 16-bits wide (2 bytes) with dedicated upstream and downstream links. All told, that gives:
2000 MHz * 2 bytes = 4000 MB/sThe total HT bandwidth is thus 8000 MB/s - 4000 MB/s in each direction. Here's the catch, though: this bandwidth is separate from the memory bandwidth. If you've ever tried overclocking the HT bus speed and found the results to be of little help, performance-wise, that should hopefully clear things up. There is rarely (if ever) 4 GB/s of data in either direction between the CPU and Northbridge. It's like putting an eight-lane highway through a rural farming community; since there's very little traffic to begin with, the extra lanes (bandwidth) won't help much. That's not to say this is a poor design decision - better to have too much available bandwidth than not enough! The P4 design doesn't suffer from a lack of bandwidth either; the problem is that the time in which it takes to get data from the RAM to the CPU is quite a bit longer - in other words, higher latencies.
The net result is that while a lower RAM clock speed can still impact performance on Athlon 64 systems, it will not do so as much as on a P4 style configuration. That's the theory, anyway, and we hope to support it with results from several planned overclocking articles.
To illustrate the above points, we've created a brief list of cycle rates and timings of RAM. We'll start with some common RAM speeds, but the actual speed of your RAM will depend on the CPU multiplier and CPU bus speed, among other things. With the clock speeds and timings, we can also calculate the latency and estimate the total memory latency. Remember that the RAM timings are relative to the base bus speed, not the doubled speed, so DDR400 has a 200MHz base clock speed. There is also latency involved internally in the CPU (typically at least a single RAM cycle each way is spent in the memory controller), as well as in sending the address request across the memory bus and receiving the data back across the bus to the CPU (we guessed at two RAM cycles each way). Command rate adds another cycle, and maybe we're wrong or missed some other potential delays.
Everything takes time, and the memory timings generally only reflect the delays caused internally by the RAM. Different clock speeds and timings should produce a different total latency, and we estimate the total memory subsystem latency below. We'll check the actual latency in our benchmarks later. In practice, going from DDR200 to DDR400 RAM will not cut the RAM latency in half, even at the same timings. For reference, our estimated latency is calculated as:
7 * (Cycle Latency) + CL + 0.1 * tRCD + 0.05 * tRPIt would be different for other platforms, and it's probably off by as much as 20%, we'd guess. The "7" represents the command rate, CPU to memory controller delays, and memory controller to RAM delays. We did use some tests to try to come up with a good estimate, but take the estimated latency in the following table with a serious dose of skepticism. For a P4 platform, the major change is that the inclusion of the NB will change the "7" factor to something much larger - perhaps 14 to 20. (We'll look at that in a future article.)
| RAM Speeds; Timings and Theoretical Latencies | |||||||||||
| RAM Rating | Base Speed | ns per cycle | CAS | tRCD | tRP | tRAS | CL ns | tRCD ns | tRP ns | tRAS ns | Estimated Latency |
| DDR266 | 133.33 | 7.5 | 2 | 2 | 2 | 5 | 15 | 15 | 15 | 37.5 | 69.75 |
| DDR266 | 133.33 | 7.5 | 2.5 | 3 | 3 | 7 | 18.75 | 22.5 | 22.5 | 52.5 | 74.63 |
| DDR266 | 133.33 | 7.5 | 3 | 4 | 4 | 8 | 22.5 | 30 | 30 | 60 | 79.5 |
| DDR333 | 166.67 | 6 | 2 | 2 | 2 | 5 | 12 | 12 | 12 | 30 | 55.8 |
| DDR333 | 166.67 | 6 | 2.5 | 3 | 3 | 7 | 15 | 18 | 18 | 42 | 59.7 |
| DDR333 | 166.67 | 6 | 3 | 4 | 4 | 8 | 18 | 24 | 24 | 48 | 63.6 |
| DDR400 | 200 | 5 | 2 | 2 | 2 | 5 | 10 | 10 | 10 | 25 | 46.5 |
| DDR400 | 200 | 5 | 2.5 | 3 | 3 | 7 | 12.5 | 15 | 15 | 35 | 49.75 |
| DDR400 | 200 | 5 | 3 | 4 | 4 | 8 | 15 | 20 | 20 | 40 | 53 |
| DDR450 | 225 | 4.44 | 2 | 2 | 2 | 5 | 8.89 | 8.89 | 8.89 | 22.22 | 41.33 |
| DDR450 | 225 | 4.44 | 2.5 | 3 | 3 | 7 | 11.11 | 13.33 | 13.33 | 31.11 | 44.22 |
| DDR450 | 225 | 4.44 | 3 | 4 | 4 | 8 | 13.33 | 17.78 | 17.78 | 35.56 | 47.11 |
| DDR500 | 250 | 4 | 2 | 2 | 2 | 5 | 8 | 8 | 8 | 20 | 37.2 |
| DDR500 | 250 | 4 | 2.5 | 3 | 3 | 7 | 10 | 12 | 12 | 28 | 39.8 |
| DDR500 | 250 | 4 | 3 | 4 | 4 | 8 | 12 | 16 | 16 | 32 | 42.4 |
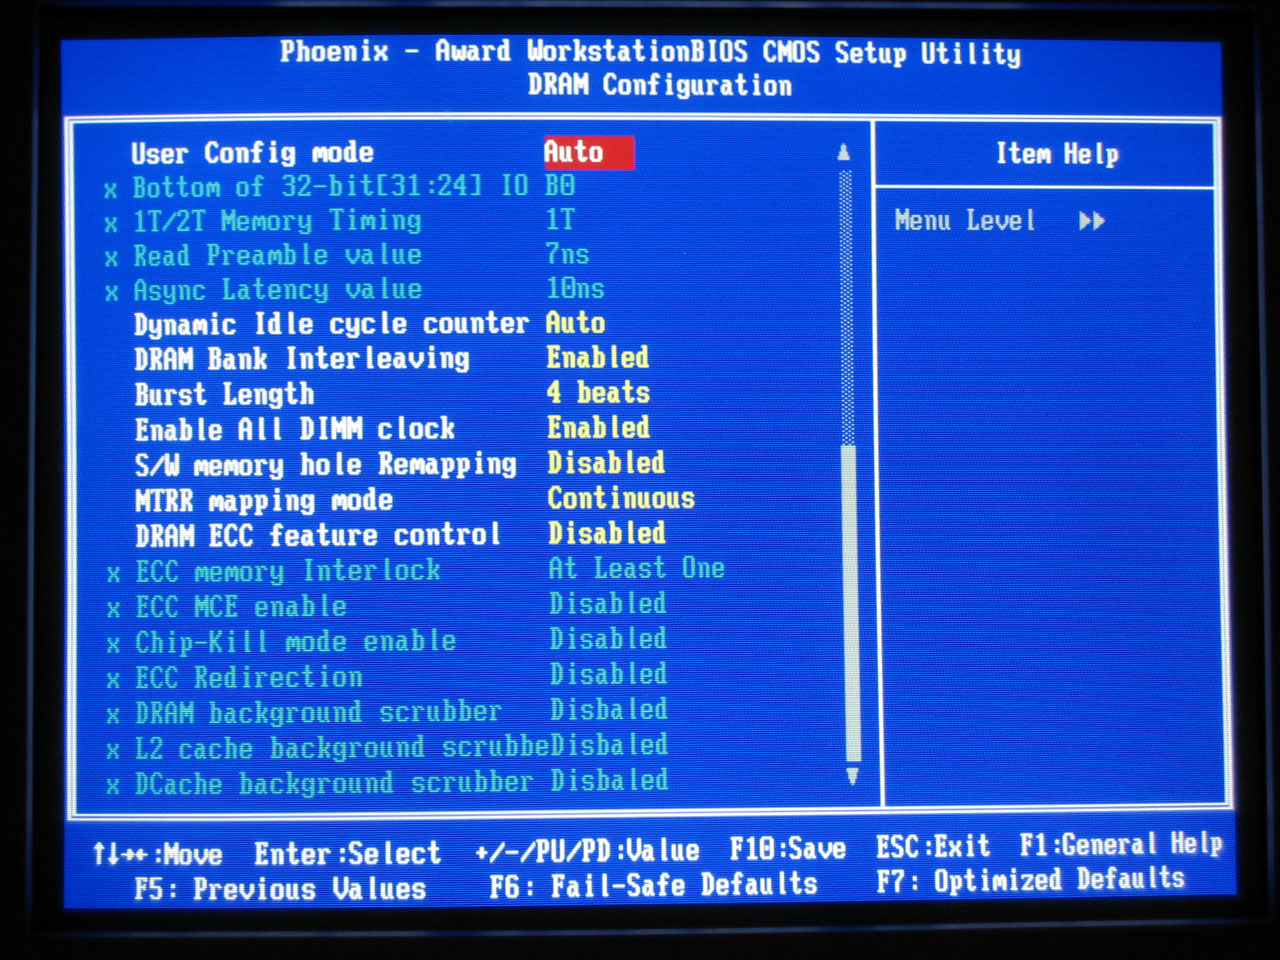
Even with all this information, we haven't even come close to touching on every BIOS option or memory timing that's available. That is, simply put, beyond the scope of this article. There are over a dozen memory timings listed in the DFI BIOS, and we left the majority of them set to Auto. The only items that we changed are CAS, tRCD, tRP, tRAS, and CMD. We may try to look at the other options in the future, but most of the extra settings are not available on the majority of the motherboards, and we want the information contained in this OC Guide to be applicable to more than just the "elite" motherboards.
Test Configuration
9000 words into the article, and we still haven't even given you benchmarks or tested settings. Hopefully, we've managed to convey something of the complexity involved in overclocking. If you already knew all of the preceding material, think of it as a quick refresher course. If you're new to overclocking and skimmed most of that, your success in overclocking is going to be limited. Patience is a major component for any overclocking endeavor. Skimming a guide, finding some tested numbers, and plugging them into your BIOS may work fine, but more likely, you'll have periodic instability and you'll be stuck as to what needs to be changed in order to fix the problem. Now, we're finally ready to give you our test setup and the settings that we used for the various overclocks.
| AMD Overclocking System | ||
| Hardware | Component | Price |
| Processor | Athlon 64 3200+ Venice 512K 2.0GHz (939) - Retail | 190 |
| Motherboard | DFI nF4 INFINITY | 95 |
| Memory | OCZ Rev. 2 Platinum (TCCD) 2-2-2-5-1T | 162 |
| Video Card | (PowerColor) X800Pro PCIe | 224 |
| Hard Drive | Seagate SATA 250GB 7200RPM 8MB 7200.8 NCQ | 109 |
| Optical Drive | NEC 3540A Black (OEM) | 45 |
| Case | Antec SLK3700-BQE | 90 |
| Bottom Line | 915 | |
| Optional Parts | ||
| Hardware | Component | Price |
| Memory | OCZ Gold VX PC-4000 2x512MB 2-2-2-8 @3.3V | 183 |
| Memory | PC-3200 2x512MB Value CL2.5 | 85 |
| Power Supply | OCZ PowerStream 600W | 190 |
Our system configuration is definitely targeting value rather than the high end. The OCZ RAM is decent, but the remaining parts are mostly mid-range. We've listed the current prices in the above table, and we're looking at about $900 without the monitor, keyboard, mouse, speakers, and power supply - assuming that you use the included PSU in the Antec case. Dropping to value RAM can cut another $70 from the price. While a slightly nicer PSU isn't a bad idea, the OCZ 600W is overkill for non-SLI setups, for sure - which is why we list it as an alternative. If you're looking at running an Athlon 64 X2 with 2x1024MB of RAM and dual 7800GTX cards, we've seen an overclocked setup actually break the 400W mark, so 600W might not be a bad idea in that case.
The graphics card is going to be something of a limitation, as the X800 Pro is certainly not going to compete with a high-end card like a 7800GTX. For the cost, though, it's really not a bad choice. The X800 GT and GTO cards also look good, priced at under $200. Since we're looking at a value-oriented overclocking setup, running a high-end graphics card that eats up more than half the total cost of the system is a bit extreme. However, we'll try to get some benchmarks in a future article looking at exactly that sort of setup. For gaming, at least, the GPU is going to be the critical factor in reaching high frame rates
Because of the GPU limitation, we're going to be testing at 640x480, 800x600, and 1024x768. We'll also test many of the titles with 4xAA enabled, which should serve as a reality check. Even with a super fast CPU, many games are going to be completely GPU limited with the X800 Pro when we run 4xAA, especially at resolutions 1024x768 and above. Frankly, we wouldn't bother enabling 4xAA unless you can at least reach 1024x768 anyway.
System Settings
We have a bunch of screenshots from CPU-Z showing the CPU and Memory tabs, covering most of the settings that we used. Rather than linking 44 images, though, we're just going to provide a single Zip file of all the screens. One thing that became immediately clear is that the BIOS voltages were almost never reflected in the CPU-Z results. Which one is more accurate is impossible to say, short of busting out a voltmeter (and knowing where to attach it).
We did not remember to get a screenshot of every single configuration tested, since we went back to fill in the blanks on CPU performance after running the initial benchmarks. However, you can get the settings used in the following table. If you have a motherboard that doesn't support the same settings that we used, you may or may not be able to reach a specific overclock.
Disclaimer: Many of the tested voltages on the CPU are probably higher than necessary. After trying for 10x280 with up to the maximum voltage possible from the motherboard, I was probably a bit too lenient on turning voltages back to normal. These are more or less the settings I used during the testing - there may be a few errors in record keeping. If you are looking for long-term stability and you can get the system to run stable at 1.450V instead of 1.650V, that would be a wise decision. The results in the following table are merely intended as an initial reference point.
Click to enlarge.
Note how CPU voltages scaled rapidly as we neared the highest overclock levels. We didn't spend a lot of time trying to get things running stably at a lower voltage level, so mostly, we went in .05V increments - again, you might be able to get better results. If we experienced a crash during our benchmarking, we would try to increase the CPU and/or chipset voltage to get the tests to run stable. If that didn't work, we resorted to tweaking memory timings, generally by increasing latencies until we found a stable setting. Once we went from CL2 to CL2.5, we didn't spend the time trying to get 2.5-2-2, 2.5-3-2, or anything other than 2.5-3-3 (or higher latencies) to run stably.
With our performance RAM, we kept it at a steady 2.8V setting. We did try 2.9V on some of the higher overclocks, particularly where we had to drop from the PC3200 to PC2700, but we couldn't get 1T timings at PC3200 above a 280 MHz CPU bus speed. The value RAM was kept at a steady 2.6V setting and 2.5-3-3-8-1T timings, except in a few cases where we had to run with 2T timings. We tried to get 3-4-4-8-1T instead, but at 9x300, we could not run the value RAM without the 2T setting.
You'll notice the "crash" and "unstable" comments on several of the highest overclock attempts. "Crash" means that we were unable to run many of the tests due to repeated lockups, reboots, etc. "Unstable" means that we were able to get benchmark results for all (or nearly all tests), but programs might crash at times. For example, Far Cry might crash at 1024x768 4xAA on the first attempt, but rebooting and starting again from that point would complete the tests. We tried to run all of the gaming benchmarks in order without rebooting, which will keep system temperatures higher than letting the GPU cool down for a couple of minutes while we reboot. We won't include the settings that crashed in our results, but we did include the unstable results. We'll be using these unstable settings for some cooling tests in the future to see if a change in HSF will help - and hopefully even allow higher overclocks.
A last comment is that we didn't fully benchmark all of the settings listed in the charts. We tested 1800, 2000, 2200, 2400, 2600, and 2700 MHz. We also tested 2800 MHz on a couple of configurations, although stability was iffy at best. In order to provide a linear scale (so that the results at 2700 aren't skewed), we interpolated the in-between scores. This is a problem with the graphing capability that we have within Excel. We did run some quick tests at each setting, though, just to verify that we could POST and complete PCMark04/PCMark05. In case you're wondering, the entire benchmark suite takes around 4 to 5 hours to complete. That will hopefully explain why we didn't run the additional tests or spend a lot of time fine-tuning each tested setting.
And now, on with the benchmarks.
RAM Latency
We talked about memory latency a bit before, and we estimated the total latency. Using CPU-Z and the included Latency.exe utility, we can get an actual real value for memory latency - or at least, more real than our estimate. There are different ways of measuring memory latency, but we simply took the highest reported value from the table that was generated. For every system, that value was in the bottom-right corner of the table, indicating a data set of 32MB and a stride of 512. While the values may or may not be entirely accurate, they should at least be consistently measured across all the tested configurations. Here are the results, in CPU cycles as well as nanoseconds. Remember that at higher CPU speeds, each cycle is faster, so pay more attention to the nanoseconds graph.
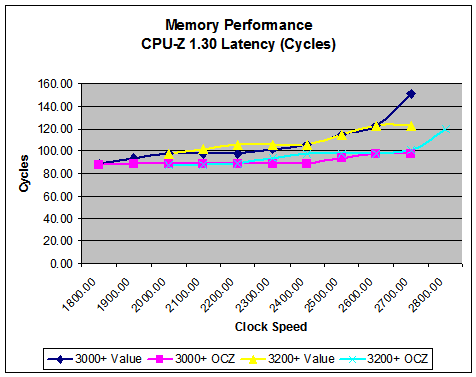
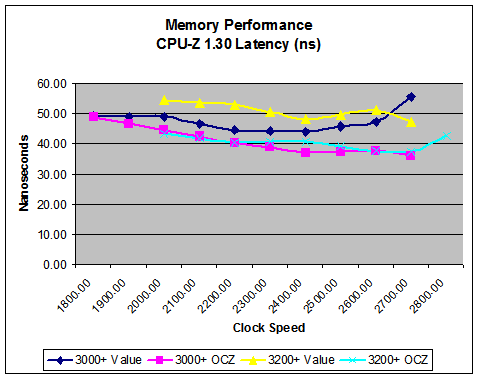
While the value RAM is clearly slower than the expensive RAM, the big question is: how much performance do you actually lose by opting for more economical RAM? This is one of the areas that we are interested in testing for this article, and we'll comment on the results throughout the benchmarks.
RAM Possibilities
One area of the BIOS that's missing (for now) is support for additional RAM ratios. The reality is that the RAM speed is derived from the CPU clock with a divider. Ideally, we'd like to see a BIOS that gives direct access to the CPU divider rather than hiding it behind approximate memory speeds. That would allow for the selection of a larger range of options, but we're not sure if that's something that AMD controls in the CPU or if the BIOS programmers can do this. Here's a list of the standard RAM Settings, CPU multipliers and the resultant memory dividers that were available in the Infinity BIOS.
| Standard AMD Memory Ratios | |||
| RAM Setting | CPU Multiplier | RAM Divider | True RAM Speed |
| DDR200 | 9X | CPU/18 | DDR200 |
| DDR266 | 9X | CPU/14 | DDR257 |
| DDR333 | 9X | CPU/11 | DDR327 |
| DDR400 | 9X | CPU/9 | DDR400 |
| DDR200 | 10X | CPU/20 | DDR200 |
| DDR266 | 10X | CPU/15 | DDR267 |
| DDR333 | 10X | CPU/12 | DDR333 |
| DDR400 | 10X | CPU/10 | DDR400 |
| DDR200 | 11X | CPU/22 | DDR200 |
| DDR266 | 11X | CPU/17 | DDR259 |
| DDR333 | 11X | CPU/14 | DDR314 |
| DDR400 | 11X | CPU/11 | DDR400 |
| DDR200 | 12X | CPU/24 | DDR200 |
| DDR266 | 12X | CPU/18 | DDR267 |
| DDR333 | 12X | CPU/15 | DDR320 |
| DDR400 | 12X | CPU/12 | DDR400 |
We have a LanParty UT nF3 250Gb that includes support for many in-between options from DDR200 through DDR500. Some of the interesting inclusions are DDR240, DDR280, DDR300, DDR360, DDR440, and DDR500. (CPU-Z actually failed to report the divider on a couple of those settings, but the resultant RAM speed was still read properly.) While additional memory dividers on the high end won't really help tweakers looking to get the most from the TCCD, BH5, or CH5 RAM, they can be particularly useful when using value RAM. All you need to do is select the appropriate divider to get your RAM under DDR400 - assuming standard value RAM. That way, you wouldn't take as much of a performance hit by running something like 10x250 (2.5 GHz). You could select a 13X divider rather than the standard 15X divider.
Additional ratios can even be useful for tuning performance RAM. For example, OCZ VX would not run stable above DDR500 (10x250), and we had to use 2-3-3-8-1T timings even then. (The 3.2V limit of the motherboard was at least partially to blame.) Running at 10x270, we had to drop to DDR333 (CPU/12), which resulted in the RAM running at DDR450 rather than the DDR540 result that would have been required for the normal CPU/10 ratio. However, if we could have selected a CPU/11 ratio, we could have run the RAM at DDR490 and gained a bit more performance. The additional ratios aren't required, but they would be nice to have.
If the last two paragraphs didn't make sense, then you can guess why we don't get additional access to RAM dividers. Experienced users might know how to make use of the settings, but many people would simply get confused; a "Catch-22".
Application Performance
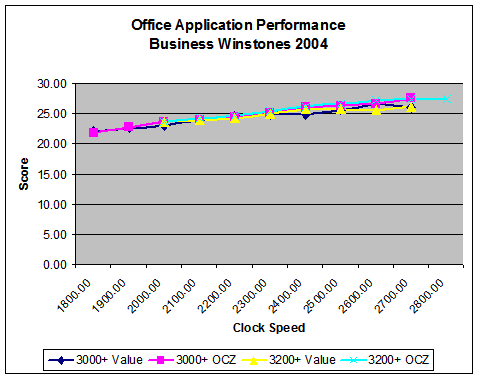
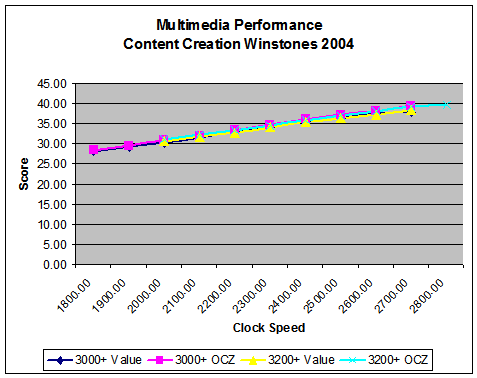
We'll start with some general application performance, courtesy of Winstones 2004. Winstones runs a bunch of scripts in a variety of real-world applications. The problem is that many of the scripts simulate user input and operate at speeds that no human can approach. Rendering an image, encoding audio or video, etc. can take time. Word, Excel, and Outlook, on the other hand, are almost entirely user-limited. While the fastest systems do perform higher, in every day use the typical office applications are going to run so fast that differentiating between the various overclocked settings is difficult, if not impossible.
Similar in some ways to Winstones performance, PCMark attempts to gauge system performance. The results are a little more theoretical, as PCMark takes 5 to 10 minutes to run compared to 20 to 30 minutes for the Winstones tests. PCMark also includes some 2D and 3D graphics tests, which make the GPU somewhat important to the overall score. With Windows Vista moving to more hardware acceleration for windowing tasks, though, that's not necessarily a bad thing.
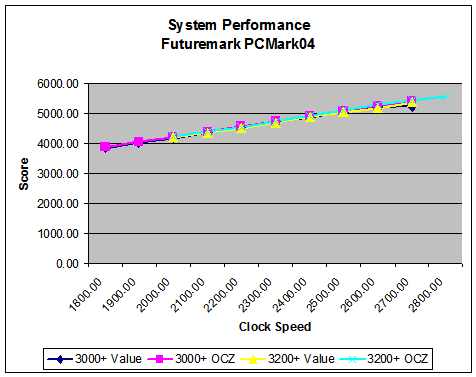
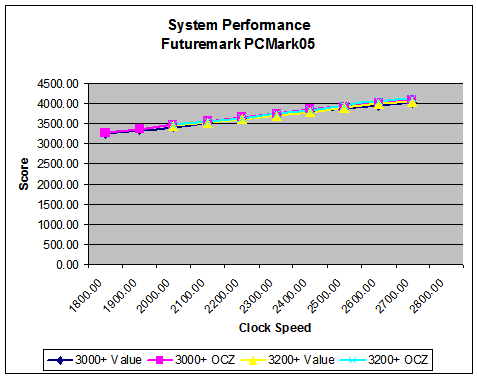
In case the graphs don't convey this fact well enough, our standard application scores benefited very little from the use of higher quality RAM. While the 2T command rate on the 9x300 value configuration did worse than the 9x289 value configuration, nearly all of the other tests show increasing performance, even with slightly lower memory speeds and latencies. The biggest gap between the value and performance RAM was in Business Winstones at 2.4 GHz, and even then, it was only a 5% margin of victory.
Encoding Performance
For our encoding performance tests, we used AutoGK 1.96 with both the DivX and Xvid codecs. We encoded chapter 9 from The Sum of All Fears without audio to 75% quality. This results in a file size about 1/3 as large as the original (not counting the audio size). As a more common encoding task, we also encode a Budweiser commercial from 30 MB down to 5 MB, including audio encoding. This results in three encoding passes: the compression test, a first pass, and the final pass. We take the total number of frames in the video (900) and divide it by the time taken, reporting the resulting frames per second. In all AutoGK benchmarks, higher scores will be better.

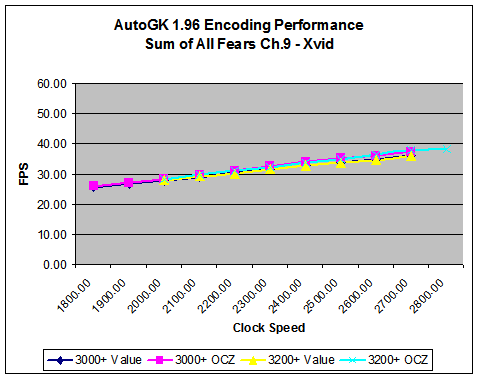
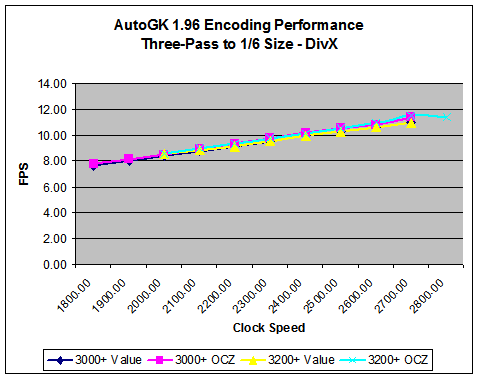

Comparing the value RAM and the performance RAM, the largest gap is at 2.7 GHz, and it's once again 5%. Also of interest is that the 10x270 PC2700 part outperformed the 10x280 PC3200 2T part - although dropping to 1T and PC2700 at 2.8 GHz would have improved performance, it seemed less stable than at PC3200 3-4-4-8-2T. Our CPU was definitely hitting its limit above 2.70 GHz.
Synthetic Gaming Performance
We've already looked at some Futuremark performance numbers, and most people are already familiar with 3DMark. You'll note that we list 3DMark as a Synthetic Gaming benchmark. This is not meant as a slam on the application, but the truth is that games and graphics are so complex these days that the only thing that any benchmark can really tell you is how well that benchmark runs. Doom 3 says nothing about how Quake 4 will actually run on the same system; we'd assume it will be similar, but we won't know until it comes out and we can test it. If a game can't even give you sure knowledge of how other licensees of the engine will run, how can it possibly give you an insight into how a different engine will run? That's 3DMark in a nutshell: some games will correlate very well with the performance results and scaling that we see in 3DMark, and others will be completely different. The only thing that the benchmark shows for sure is how well it runs.
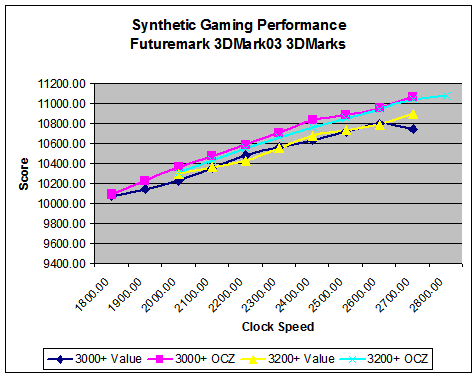
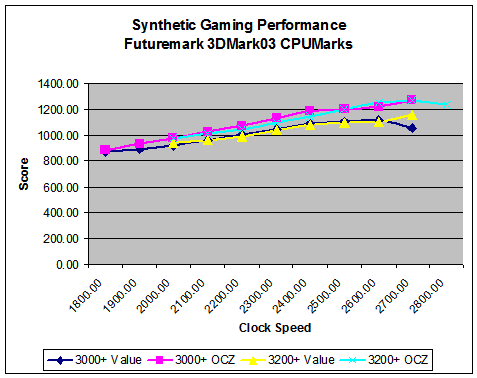
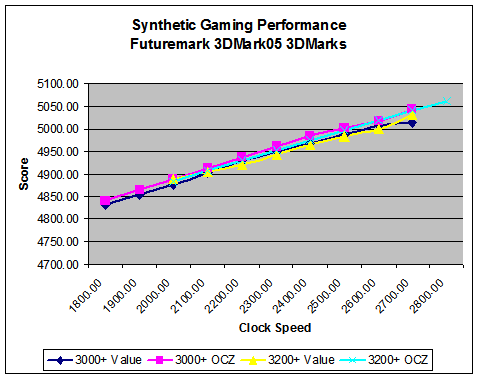
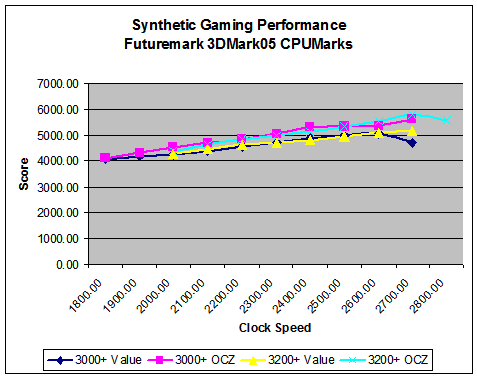
The good news is that we also get CPUMarks that largely remove the graphics card from the picture. The CPUMarks render a couple of the same tests as the 3DMarks portions of the tests, but they compute the transform and lighting operations and some other areas on the CPU rather than the GPU. The CPU tests are also multi-threaded, but the Venice chips don't gain anything from that. (If we were to compare the results with a Pentium 4 HT, the P4 tends to perform very well relative to actual gaming results.) The CPU scores are more in line with the other results that we've already seen, gaining 46% and 42% in 03 and 05, respectively.
Being able to run the entire 3DMarks03/05 tests from start to finish without crashing is once again a good indication of stability. We went a step further and looped the tests for eight hours or more on the top overclocks, without trouble... at least, without incident on everything 2700 MHz and below. The 2800 MHz overclock would crash after 30 to 60 minutes of looping, usually during the CPU portion of the test.
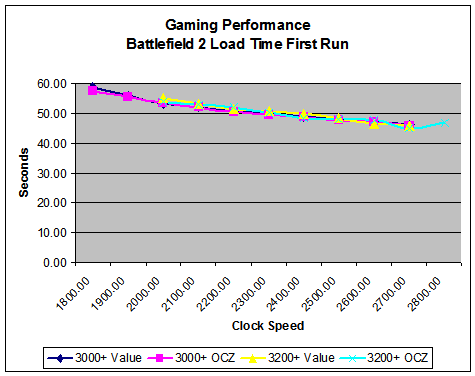
Battlefield 2 Performance
We're still working on coming up with some good benchmarks for Battlefield 2. For this test, the sample demo from Guru3D was used, which runs through the Operation Clean Sweep map. Unfortunately, there is only a single player in the map, so it's not a true indicator of performance. It does show the use of several vehicles, and it crosses a large distance, which is good for stressing memory usage. The results still seem too high, however.
Update (10/08/2005): I finally figured out the problem with the initial benchmark tests. Since I haven't done a lot with BF2 benchmarking, I made a serious error. It turns out that by default there's a 24 second pause after the map is loaded before the actual demo playback commences (unless you press ESC or click Join Game). The problem is that the benchmark already begins to record frame rates at the menu screen, so for 24 seconds the computer is rendering 200 to 1000 FPS. That skews the results so heavily that I have chosen to remove the graphs and information. I'll cover proper BF2 performance (with a proper demo file) in the next installment. The loading times below are still correct, so they can remain.
We also timed how long it took to load the level for benchmarking (after disabling the intro movies). We recorded the time for the initial load as well as the time for the second load of the same level after exiting and reloading.

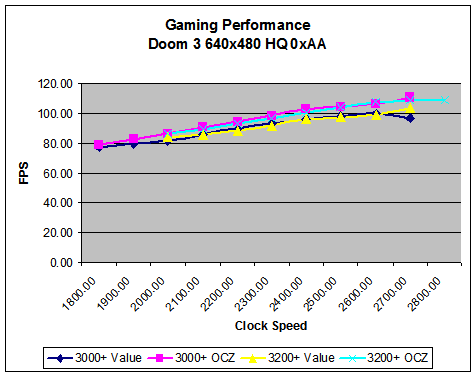
Doom 3 Performance
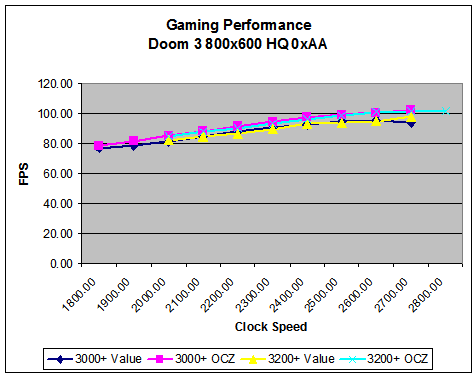
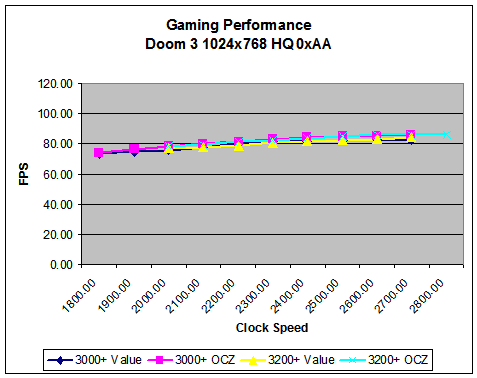
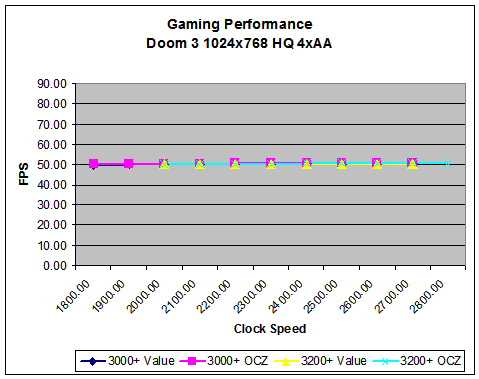
More so than any other game that we tested, Doom 3 is going to be held up by the X800 Pro. With the engine being heavily optimized for NVIDIA's architecture - or simply being a better fit for OpenGL and shadows, if you prefer - performance scaling drops off rapidly with increasing resolutions. Whether future Doom 3 engine licensees will exhibit similar results is up for debate, Call of Duty and Wolfenstein: Enemy Territory, for example, don't correlate directly with Quake 3 performance. However, we expect NVIDIA to maintain some advantage over ATI in Quake 4 and Quake Wars.
Far Cry Performance
Far Cry remains one of the more graphically intense games, and it gives a somewhat different performance picture between ATI and NVIDIA than Doom 3 and Half-Life 2. We tested with the 1.33 patch installed, though we didn't attempt to force HDR or instancing. We ran the standard Ubisoft benchmarks for the Regulator, Research, Training, and Volcano levels. We then averaged the results across these four benchmarks to come up with the final score. If you'd prefer to see the performance on the individual levels, you can download the 18 graphs in a Zip file. We tested with everything - including water - set to Very High quality. (Remember, this is a CPU overclocking article, not a GPU performance article.)
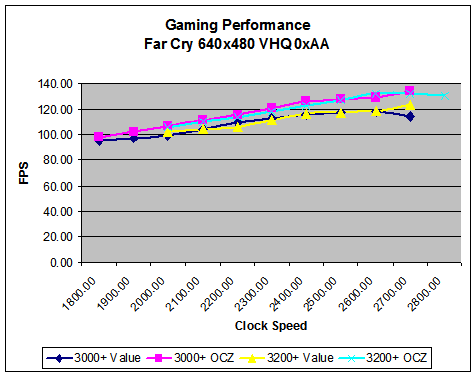
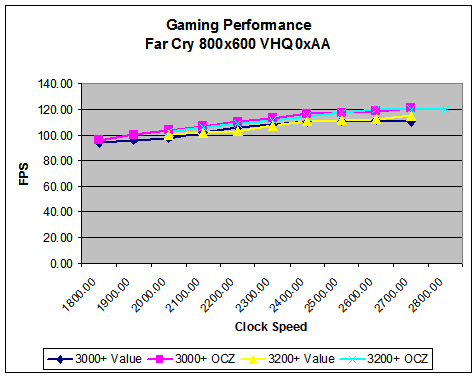


The trend of more expensive RAM realizing higher scores continues, as expected. This time, the gap grows to as much as 9%, indicating that Far Cry is slightly more demanding of the memory subsystem than other games. The 2T timing at 9x300 really kills performance, coming in 15% slower than 9x300 OCZ RAM. If you opt for the Venice 3000+ chip, you might want to spend a bit extra for 2-3-2 RAM as opposed to 2.5-3-3 RAM. The extra $15 or so should bring up performance at 9x300 substantially.
Half-Life 2 Performance
Just as Doom 3 favors NVIDIA performance, Half-Life 2 has done better on ATI cards. Our X800 Pro should provide more than playable results at all the tested resolutions, as HL2 really depends on GPU fillrate for performance. HL2 is also somewhat more CPU limited than other titles, which should give some good performance scaling with our overclocks. Future Source engine games making use of HDR will probably move the bottleneck back towards the GPU, judging by what we've seen in other HDR-enabled titles. Hopefully, Source can manage to provide more realistic HDR modes without cutting performance in half, but we're doubtful.
As with Far Cry, we benchmarked several levels and averaged the results; in this case, we used Anand's C17_12, Canals_08, Coast_05, Coast_12, and Prison_05 demos. Unfortunately, this may be the last time that we use those benchmarks, as the recent Steam upgrade has broken compatibility with revision 7 demos. All of these benchmarks were completed prior to the 9/23 update, luckily, but future overclocking articles will use different demos and will thus not be directly comparable with these scores. For the 22 graphs of the individual levels, we've once again created a Zip file.
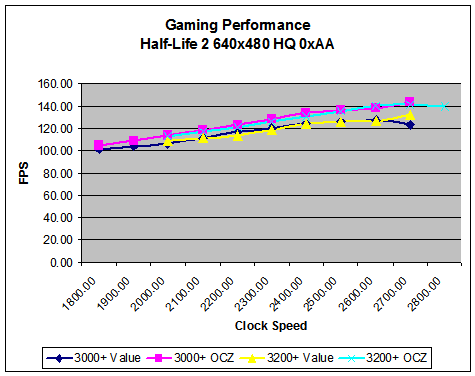
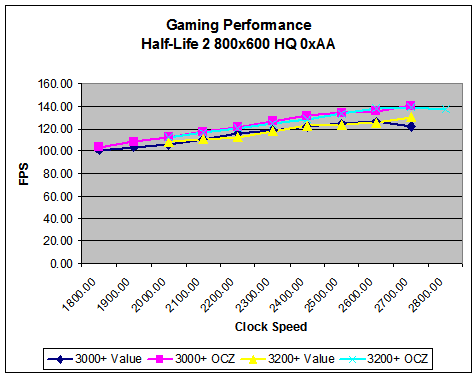
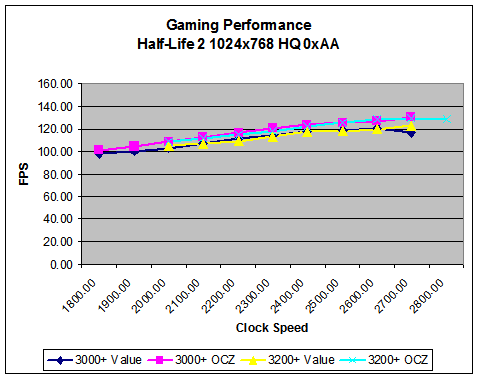
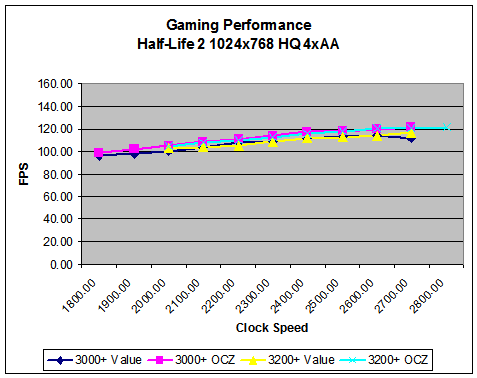
In our biggest margin of victory, the OCZ RAM averages a 9% advantage over the value RAM. That's about the equivalent of a CPU upgrade (assuming that you don't overclock), at about the same cost as upgrading the processor. Like Far Cry, the 2T timing hurts performance. One of the things that you might have noticed is that the 10x280 setting has trailed behind the 2700 MHz configurations in most of the games. If we could get it running stably with 1T command rate, it would be better, but we were unable to accomplish this. The value RAM wouldn't even post at 10x280, so whatever limits that we're running into are at least lessened with higher quality RAM.
Closing Thoughts
This has been a huge undertaking, and we hope that you enjoy the results and overclocking information. Many guides of various forms already exist on the internet, but we really wanted to take a look at some of the options offered by the Venice core processors as well as trying to get by with value RAM instead of higher cost alternatives. After all, why save $60 on the CPU only to spend the same amount of money upgrading the RAM? So, other than a look at how to overclock, what have we learned?
The biggest deal for many people will be the results using standard PC-3200 RAM and higher memory dividers. While you won't be able to match the performance of a system that uses better quality RAM, the largest margin of victory was still under 10% (not counting instances where 2T command rates were used). The average was closer to 5%, and realistically, you won't notice a 5% performance loss. Outside of games, the performance losses attributed to value RAM are even less, with video encoding only losing a few percentages in speed. What it really comes down to is cost. We used a $190 CPU with $85 and $150 RAM. Going with a 3000+ and the value RAM saves almost $125 and should get you about 90 to 95% of the performance of the more expensive setup. That $125 could then be put towards a faster GPU, which will have a far greater impact on games than a 200 or even 400 MHz CPU upgrade.
Other than the value vs. quality RAM debate, what about the overall experience of overclocking this configuration? We were pretty impressed with the "budget" DFI motherboard. While I haven't personally used the Ultra-D, there were few problems on the Infinity that I couldn't deal with. Even with a good motherboard, though, overclocking can be exasperating at times. With value RAM rated at DDR400 2.5-3-3-8, it was at times difficult to get those timings even at speeds slightly below the rated DDR400, particularly on the high end of the overclocking scale. While I'd be willing to run 2.6 or even 2.7 GHz with the OCZ RAM, I have a feeling that long-term stability with the value RAM might require dropping to 2.5 to 2.6 GHz instead, or else increasing the timings to 3-3-3-8 or even 3-4-4-8. And speaking of timings, the 2T command rate should almost always be avoided. Results for a couple of settings were included, and overall, you would be better off running 100 or even 200 MHz slower with 1T command rate.
Something else that all of the graphs and results don't indicate is some of the oddities that can come up with overclocking. The SATA drive would sometimes make strange noises during the Windows XP boot sequence, almost like the HDD heads were seeking back and forth across the drive. Everything seems to indicate that the overclock is somehow to blame, and while a BIOS update might be able to address this particular issue, the end result is that XP would sometimes take up to 5 minutes to load at higher overclocks. Once loaded, everything worked fine, and the HDD was still running at full SATA spec. Another possible cause for delays in loading XP could be the networking subsystem. The testbed was connected to a gigabit switch, and we've experienced issues with network stability on overclocked PCs in the past. An MSI K8N Neo Platinum, for example, drops network connectivity after a day or two in many - but not all - overclocked configurations. We didn't experience this particular problem during testing of the DFI board, but it's something to look for on your own systems. Dropping the speed of the HyperTransport bus also helped avoid some - but not all - of the hard drive access delays. As we said, be prepared for some strange behavior now and then during overclocking.
The final comment that we want to make is about the long term viability of overclocking. We started this article with a warning, and we'll end it the same way. While we haven't encountered problems with the CPU yet, that doesn't mean that the chip won't simply die in a few weeks, months, or hopefully, not for years. Higher voltages in particular can affect CPU life, as they can accelerate electron drift. As we couldn't get to 2.7 GHz without running at 1.750V, we're a little hesitant to recommend that speed as a long-term solution. Given that 2.6 GHz is, at worst, only 4% slower, we'd recommend that as a better solution and go with the 1.650V setting. That's similar to how Intel supposedly binned CPUs back in the socket 7 days: they would reportedly increase CPU clock speeds until the chips failed, and then sell them two bins below the maximum stable clock speed. Whether that's rumor or in truth how they operate (operated?), running at speeds slightly slower than your "stable" maximum will be preferred by many. Crashing even every couple of days or once a week is too reminiscent of the Windows 95 era.
We've tried to get across the point that there are no guarantees with overclocking. Even with that disclaimer, we're pretty confident that the vast majority of Athlon 64 Venice chips will run at 2.4 GHz, and probably even 2.6 GHz. It may require higher voltages, better cooling, or relaxed memory timings, but with the right combination of parts, it's a relatively safe bet. Worst case scenario, try running at 3-4-4-9-2T memory timings, then try running at those timings and PC2700 or even PC2100 on the RAM. If it's still unstable, it might be your motherboard or some other factor holding you back. Even a 15% overclock is still pretty good, though, and you can probably get that without any special equipment other than an enthusiast motherboard.
That closes up this overclocking article. We have several similar articles planned, though we're interested in feedback from the readers. Was this too superficial? Do you want more details on tweaking memory timings beyond what we've mentioned? Or is the mix of benchmarks, settings, and results about right? Let us know. This article was long, with a large portion dedicated to introducing the uninitiated to the art and practice of overclocking. Future articles in this series will focus more on the end results and refer back to the concepts presented here. As always, any recommendations and comments are welcome.


